
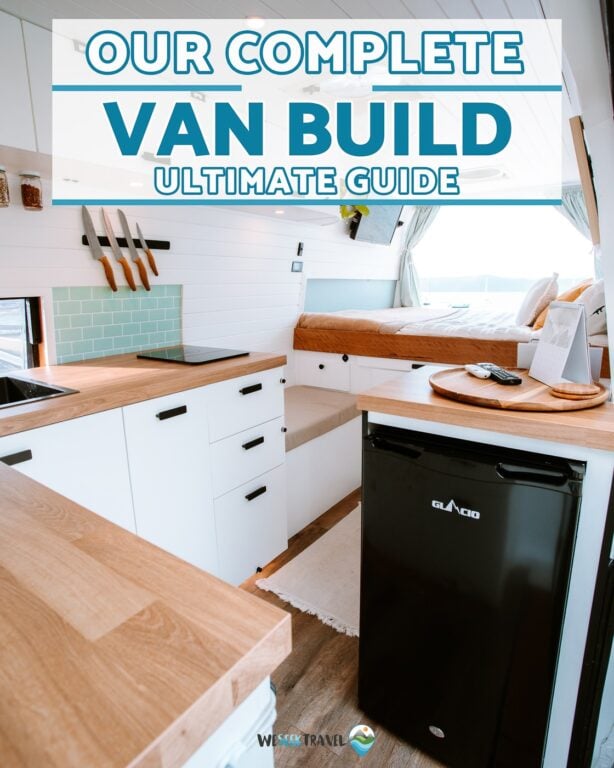
A full campervan build guide for those attempting a DIY van conversion. Access to our complete campervan build on our Ford Transit 2013 LWB High Roof Panel van. Includes our full van conversion process, helpful resources, tips, things to know and things we wish we knew when we started!
It’s really no wonder that Van Life is taking off post-covid. After enduring the hysteria of sweeping global shutdowns, I believe many travelers have a newfound appreciation for what is really important. The allure of life on the move is calling us. Living out of a van is a giant stride toward freeing ourselves from a mediocre emphasis on acquiring physical possessions and instead, allowing us to live for experience.
And now, with remote work booming, this is all more accessible than it’s ever been before.
The pursuit of minimalist, nomadic living has always been at the forefront of my decisions and life perspective. Consequently, for me, a van conversion was a natural progression and response to enable a continued life of movement.
So, after converting my own van, I’ve compiled this comprehensive resource guide to DIY van conversions to help other aspiring van builders taking the leap.
- About This DIY Van Conversion Guide
- Introducing The Van For this Conversion
- The Canvas: Choosing a Van to Convert
- Where to Get DIY Van Build Materials & Parts in Australia
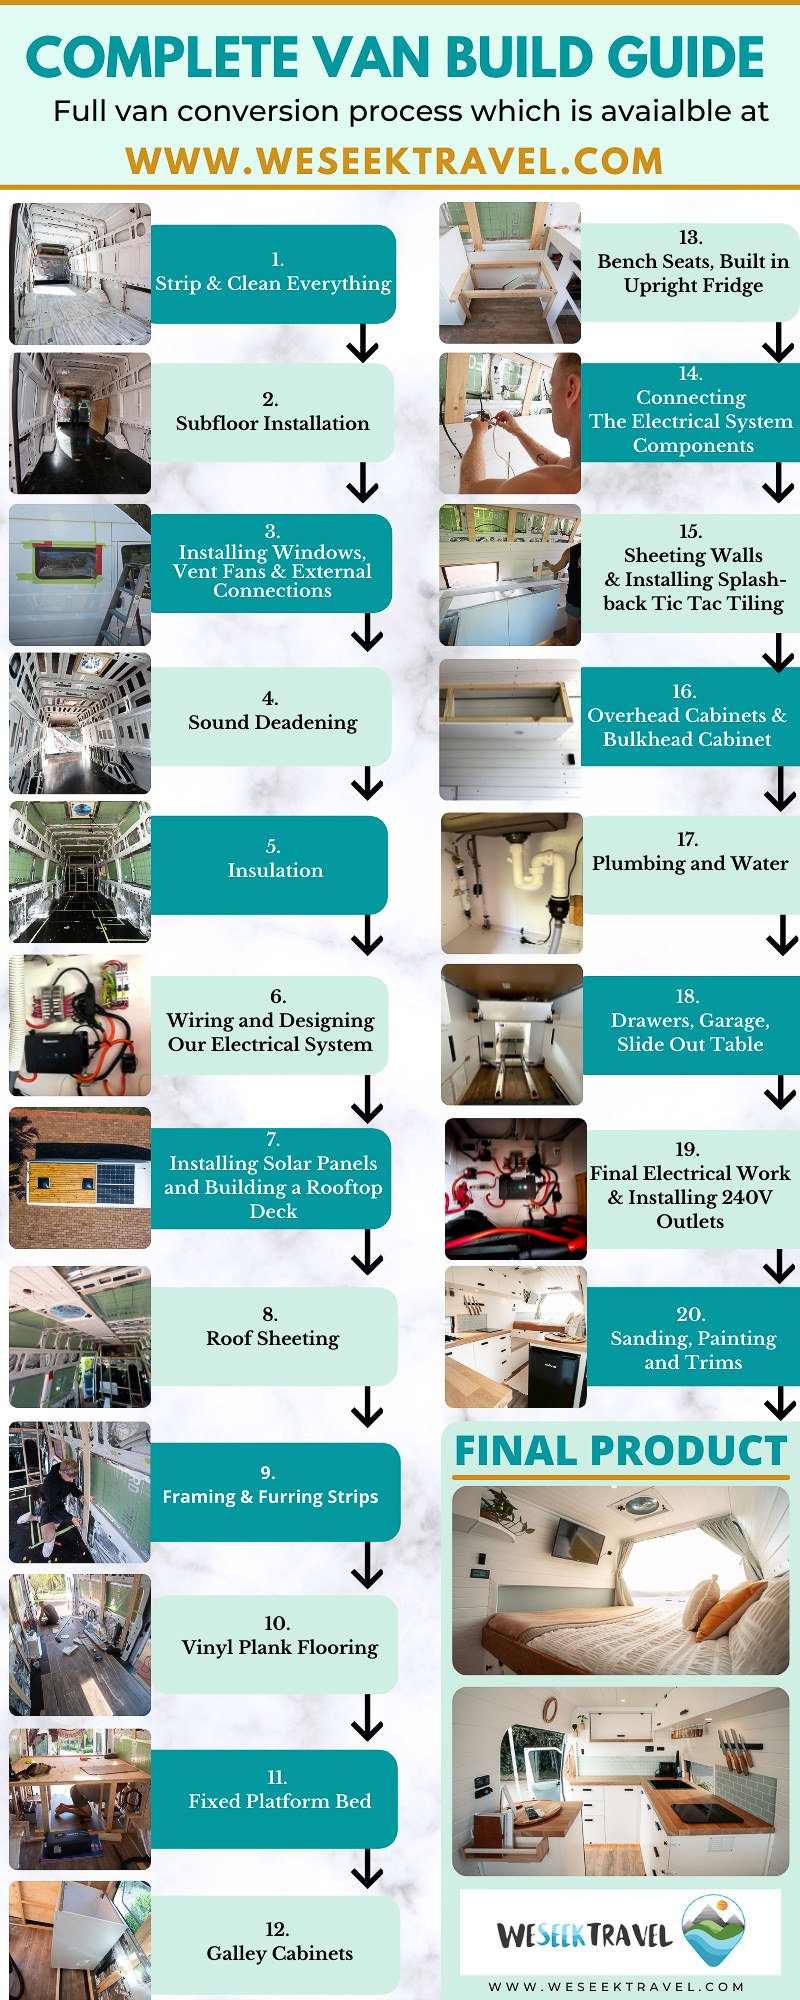
- DIY Van Conversion – Our Build Step-By-Step
- 1. First Step: Strip & Clean Everything
- 2. Van Subfloor Installation
- 3. Installing Windows, Vent Fans & External Connections on Our van
- 4. Sound Deadening
- 5. Insulation
- 6. Wiring and Designing Our Electrical System
- 7. Installing Solar Panels and Building a Rooftop Deck
- 8. Roof Sheeting
- 9. Framing & Furring Strips
- 10. Vinyl Plank Flooring
- 11. Fixed Platform Bed
- 12. Galley Cabinets
- 13. Bench Seats, Built in Upright Fridge
- 14. Connecting The Electrical System Components
- 15. Sheeting the Walls & Installing Splash-back Tic Tac Tiling
- 16. Overhead Cabinets & Bulkhead Cabinet
- 17. Plumbing and Water
- 18. Drawers, Garage, Slide Out Table
- 19. Final Electrical Work & Installing 240V Outlets
- 20. Sanding, Painting and Trims
- After the Van Build: Read About Our Adventures on the Road
We're now on the road! Follow our Australian van journey in our Weekly Van Journal.


About This DIY Van Conversion Guide
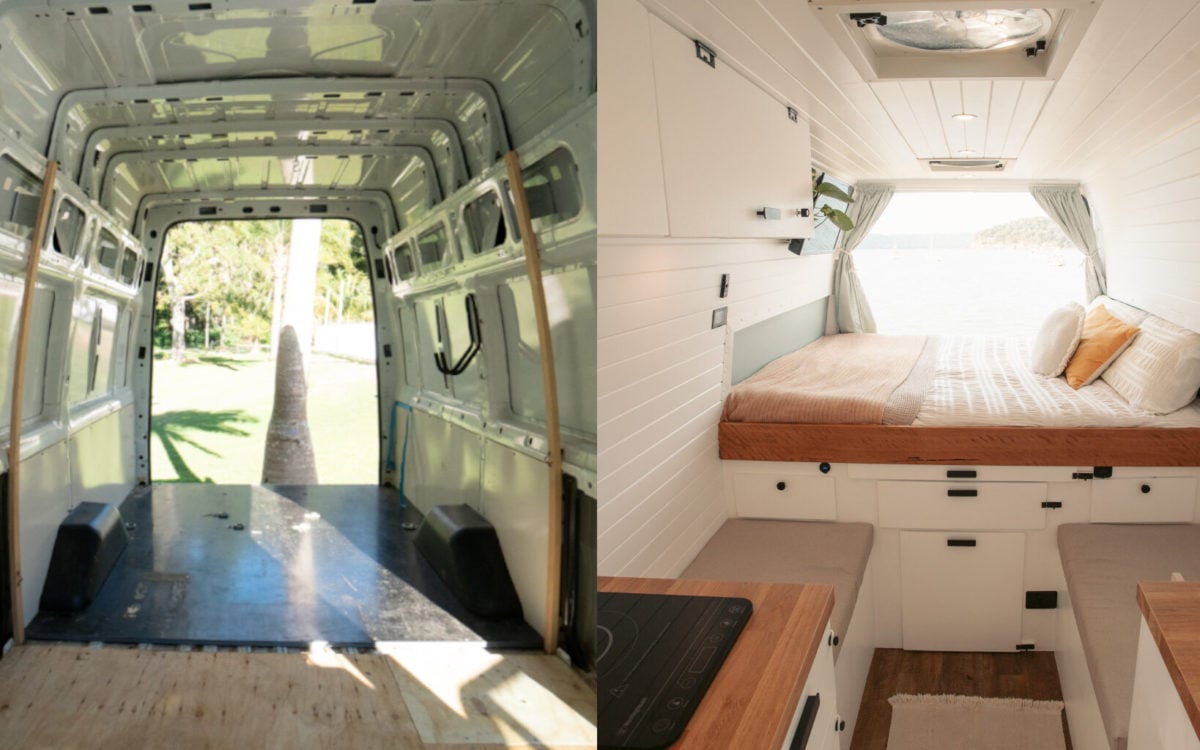
This is a long post detailing our conversion process of converting our 2013 Ford Transit LWB High Roof panel van into a fully self-contained luxury campervan. In this guide, I've introduced the step-by-step process that describes an outline of our build.
While this isn't meant to be followed step-by-step, I believe that revealing our process will be beneficial for planning your own.
While van conversions have been a big deal in the States, Canada, and Europe for years, I was surprised to find a tremendous lack of free, online resources for Australian van builds. Hopefully, this guide will help to fill that gap and be a useful resource on your very own project.
Therfore, I've included several resources and tips to help you plan and convert your own DIY van that is specific for conversions in Australia but also applicable to those of you in the rest of the world too.

Disclaimer
My goal for this blog post was to create a free resource that I myself would have benefited from when first starting out.
Remember though, I am not a qualified carpenter, auto-electrician, plumber or mechanic— I'm a photographer and travel writer. However, I do have numerous years of boat-building experience as well as having dabbled in just about every construction-related trade out there.
So, take this DIY van conversion guide for what it is— an amateur helping other amateurs based on his own experience building a self-contained, off-grid campervan.
Introducing The Van For this Conversion
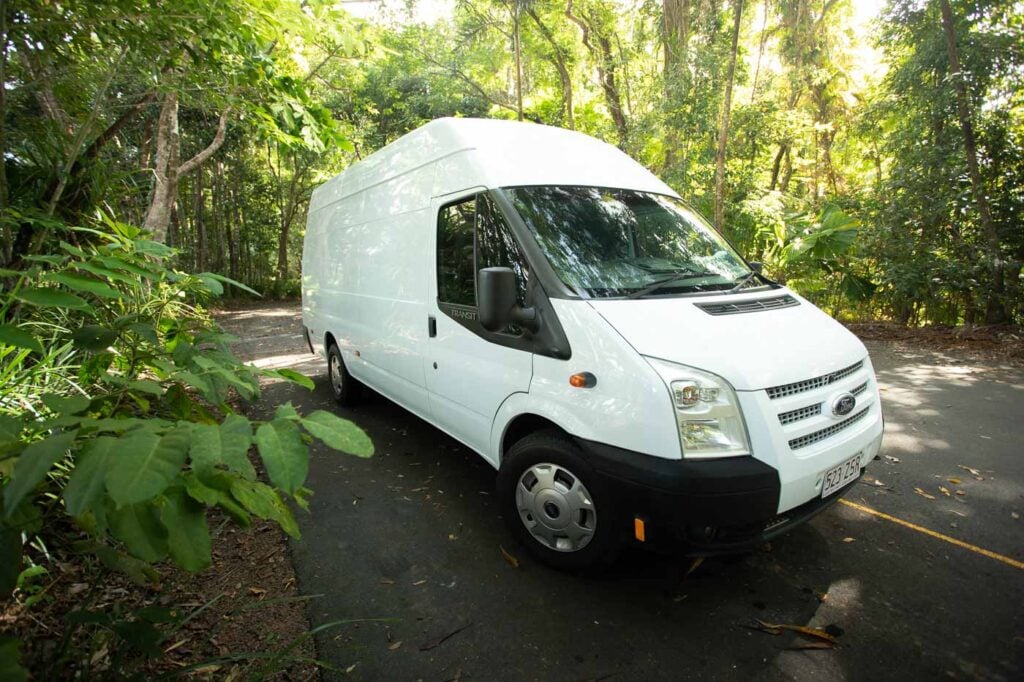
Introducing Clifden: A Long Wheel Base, High Roof, Turbo Diesel 2.2L Ford Transit Van that we converted into a self-contained, off-grid, luxury campervan. Below are some features that make it stand out.

All Electric Off-Grid System
We opted for a fully-electric build to negate the headache of dealing with LPG gas installation in Australia. All-electric means cooking with an induction cooktop, heating our shower with electric, on-demand water heating and installing both 12V and 240V systems in our van.
Of course, all of this came at the price of going BIG on our electrical system. We're super glad we did. I've also included a section at the bottom of this post that goes into the pros and cons.
However, we knew that overdoing things electrically is also not a good idea. What I mean by this is that we refrained from installing automated switches for tank valves and latches etc. After living on boats, we know that simple, mechanical options are much more reliable than initial electrical conveniences.

All-Wood Interior
Traditionally, Aussies associate campervans with ugly, marine carpet walls and hospital-style plastic panelling. We challenged that by taking a page out of the American and Canadian builds and built everything out of light, pine tongue-and-groove boards and plywood.
Our interior design was largely inspired by our experience living and working on yachts. In the end, we wanted a space that feels like a home, not a weekender and we were more than happy to sacrifice a bit of weight to achieve that.

Fully Self-Contained
I've mentioned this a few times already, but this is a big deal when we were considering options for our build. Self-contained means that you can sleep, cook, shower and use a toilet out of your own van. We wanted a home, not a camper, so this title was a no-brainer for us.


Need Help With Planning Your Van Build?
Stuck? Need some advice?
I'm happy to answer quick questions to help you with your own van projects.
I'm currently also offering remote one-on-one consulting to help you plan and guide you through your own van conversion projects. I offer 30-minute, 1-hour, and 1.5-hour consultations. Hit me up for prices!
Van Conversion Specs & What We Used in the Build
Here's a full summary list of our conversion specs. I've also linked to some of the products we've used from the source where we picked up each item.
Electrical Basics
- 420 amp hours of batteries
- 320 watts of solar panels
- DC-DC charging from the van alternator
- Shore power (for mains power plug-in)
- Bluetooth charging monitoring (status on your phone)
- 2000W inverter charger
- 7x 12V & USB outlets
- 3x internal & 1x external 240V double pole GPOs

CHARGE SYSTEM COMPONENTS
- Solar panels: 2x Renogy 160W Panels connected in parallel with MC4 Y-connectors | protected by 40A ANL fuse
- Charge Controller: Renogy 50A DC-DC & MPPT | charge output & run from engine battery protected by 70A circuit breakers
- Inverter/Charger: Renogy 2000W Inverter Charger | protected by 250A terminal fuse & 16A RCD protection on the AC side
- Mains connection: 15A inlet
BATTERY & MONITORING
- Batteries: 3X Giant 140AH AGM (in parallel)
- Battery Isolation Switches: 275A Heavy-Duty Isolation Switch
- Distribution Blocks: 12V Distribution Blocks
- Battery Monitor: Renogy 500A Battery Monitor & Shunt
- Charge Bluetooth module: Renogy BT-2
LOAD SYSTEM COMPONENTS
DC:
- 12V Fuse panel: Blue Sea 12V Fuse Panel
- Vent fans: 2X LivPow Roof Vent
- Fridge: Glacio 95L Standing Fridge/Freezer
- Lights: 8X Acegoo (warm) downlights & 1X warm cabinet kickboard LED strip
- Water pump: SeaFlow 12V Water Pump
- Smart TV: Devanti 24" 12V Smart TV
- 12V Outlets: 4X Narva cig-socket + USB oulets & 3X 48W USB C PD outlets
AC:
- Outlets: 3X 10A Clipsal Double Pole GPOs & 1X 10A External GPO
- Appliances:
Water & Plumbing
- 70L freshwater tank with electric gauge
- 50L grey water tank under-mounted
- Hose plug-in for mains water and to fill up tank
- Outdoor shower


Galley
- Full-sized kitchen with plenty of benchtop space
- Full-sized, deep sink
- Retractable and extendable tap with flow to & spray function
- 95L upright compressor fridge (12V)
- Built-in induction cooktop
- Nespresso coffee machine
- Outdoor dual-burner butane stove
Accommodation
- Horizontal double bed
- Bench seats fit 4x people
- Huge slide-out table

Amenities and Extra Features
- Openable window in the galley
- 2x 12V roof vent fans
- Slide-out chemical toilet
- Outdoor electric hot-water shower (heater)
- Full-HD 12V Smart TV with Google TV
- Access to the electrical cupboard from the garage or the main living area
- Dashcam (front and rear) + 2x reversing cameras (one high, one low)
- Large roof deck
- Loads of storage


You might notice a gas box mounted in the rear in some of the photos. This box doesn't house any LPG cylinders. Instead, we use this box to store canned sprays like butane for our outdoor cooker, WD-40 and other pressurized products we need for maintenance on the road.
The Canvas: Choosing a Van to Convert
After spending weeks on end in smaller vehicles in other parts of the world like Iceland and New Zealand, we knew that we wanted something that we could comfortably live in for extended periods of time.
A huge part of that is the ability to stand up inside the van. I've seen lots of people in Australia going for shorter vans like Hiaces or iLoads for their van conversions.
While some of the conversion jobs are great, the unfortunate truth is that most people give up on the idea of Van Life simply because being inside their vans feels too cramped.
Our Van: The 2013 VM Ford Transit
That's why we chose the long wheelbase and high roof variant of the Ford Transit. Many people on Facebook groups and forums do like to complain about parking. But honestly, it's been surprisingly easy. Of course, we can't enter most underground car parks but we normally have no trouble fitting into regular car spots where we can overhang the gutter a little.
I think the resistance towards larger vans is simply just others projecting their fear of what they're not comfortable with.
We chose the Ford Transit for our DIY van conversion over other alternatives like the Mercedes Sprinter or Iveco Daily because we found a great deal in Cairns at the time. Honestly, I think people place too much emphasis and stress on brands.
What I believe to be more important is the age, condition and how well looked after the van is. Diesel vans are very reliable when looked after and maintained correctly. Also, when it comes to fitting out, they're all a bit of a pain, each with their own annoying curves and caveats.

Our Transit had low kilometres and was really clean in and out. There was little to no rust and the engine had been looked after and serviced properly. The last thing we would want is to spend hundreds of hours and thousands of dollars converting a lemon.


Where to Get DIY Van Build Materials & Parts in Australia
Building Materials
Our van conversion was possible due to a select few retailers in Australia. For most of our building materials, including timber, hardware, paint, plumbing fittings etc. we relied on Bunnings and our local hardware shop.
Van-Build Specific Products
For all van-build specific items like electrical components, specific plumbing fittings and roof hatches, we used Amazon. Amazon is getting better and better in terms of price and delivery times in Australia. Furthermore, Amazon allows us to access items for sale in the US market with fast delivery.
We found this useful numerous times since the DIY van conversion market in America and Canada is already well-established. This means it's stocked with great products at a cheaper price than you'd find at Australian retailers.
Insulation
For our insulation, we used a combination of Foilboard and reflective-backed earthwool. While you can pick this up at hardware stores like Bunnings, we found it much cheaper to go directly to insulation suppliers.
Electrical Cabling
If you have the aptitude, I'd highly recommend making up your own battery and inverter cable. We installed several batteries, a big inverter and a DC-DC charger in our DIY van build. As a result, we needed a fair bit of thick copper cable between components.
For this, we used heavy-duty welding cable from an eBay supplier in Perth. In the end, we believe that this guy saved us hundreds of dollars as opposed to buying pre-lugged battery cables.
For all 12V and 240V power cabling, we went to our local electrical wholesaler (John R Turk). We bought rolls in 100-metre lengths to save money which also meant we could get a trade discount for buying bulk.
DIY Van Conversion - Our Build Step-By-Step
When first taking the plunge into our first DIY van conversion for van life, we found that planning out the order of the build was one of the most difficult parts. In this section, I'll outline our entire van build from start to finish. I hope that this will be useful for you in planning your process.
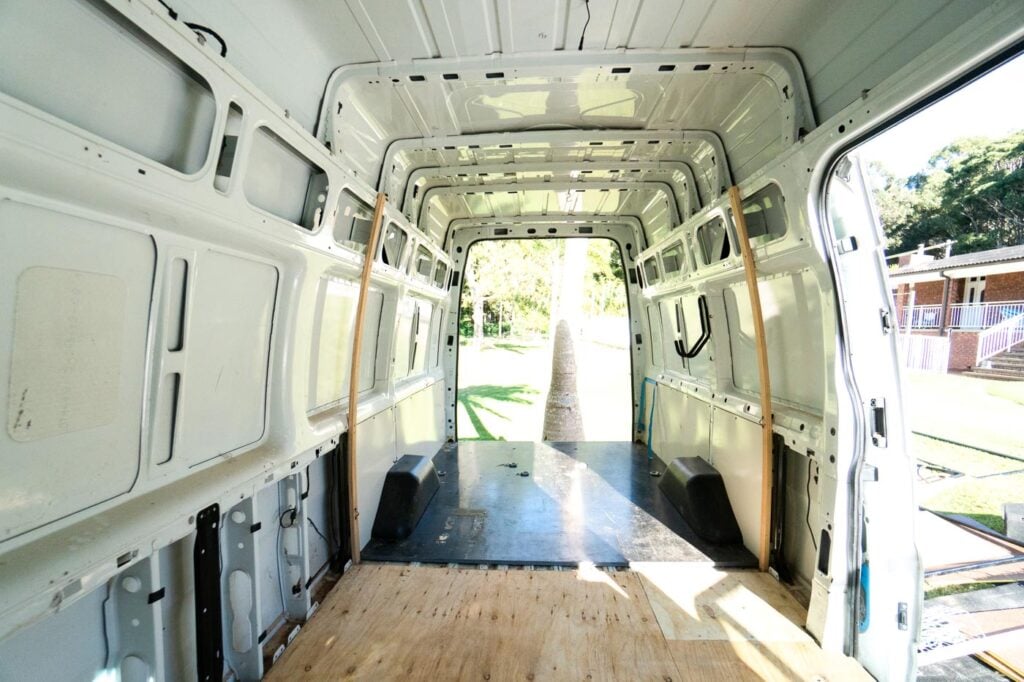
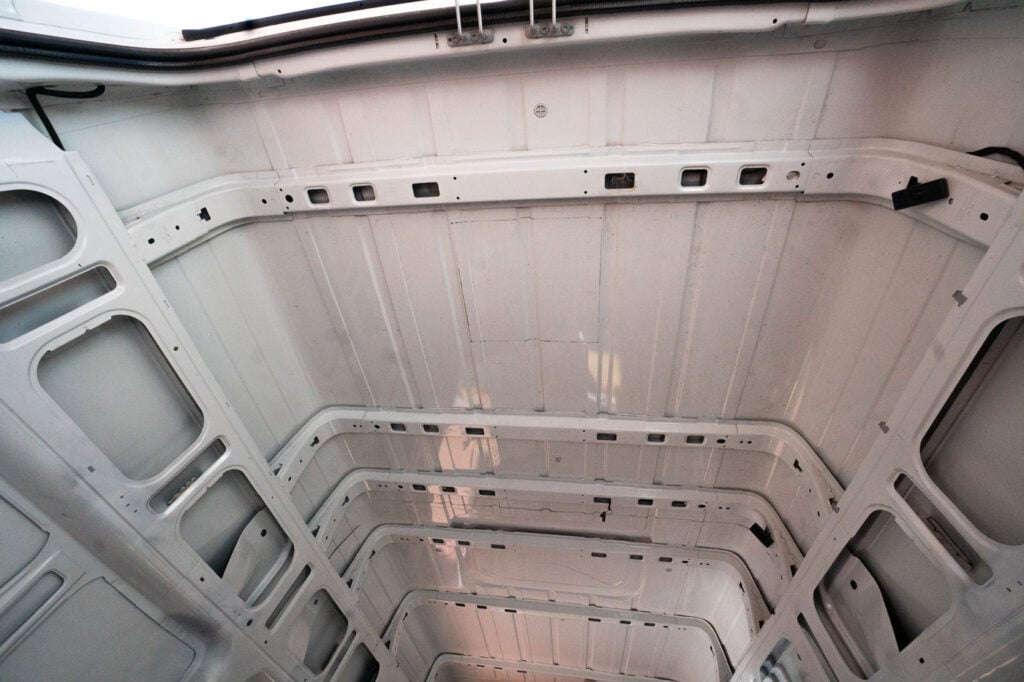
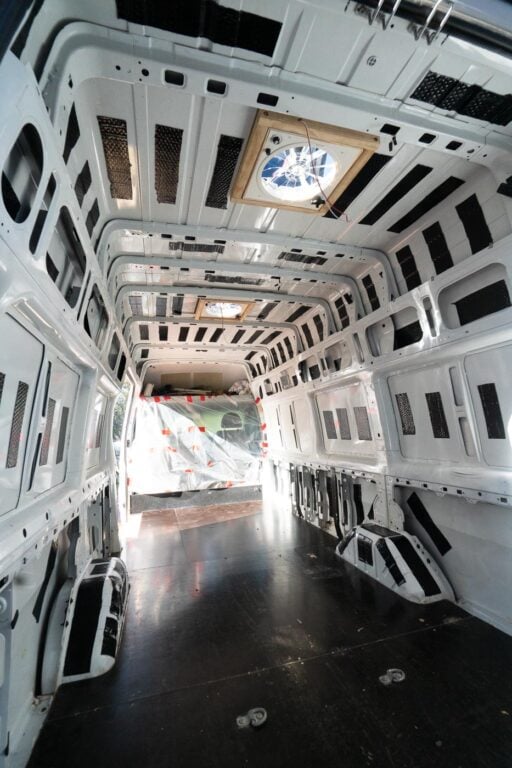
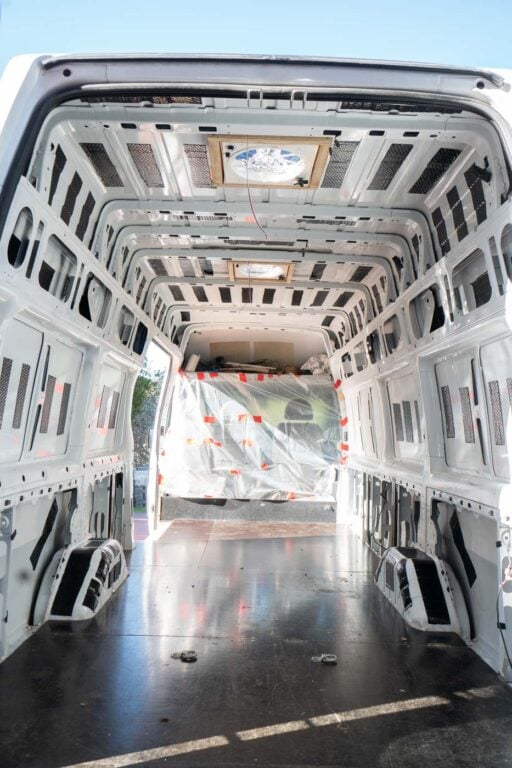
1. First Step: Strip & Clean Everything
Our particular Transit already had a quick "camper" conversion when we purchased it. However, this was very basic, with a single plywood wall and a hanging bed.
The first step for us was disassembling and removing everything in the van back to bare metal. We removed the stock over-driver cabinet, all carpeting, flooring, 12V lighting etc.

Starting off with a fresh slate is important as it allowed us better plan our build and to spot any areas of rust or flaking paint.
Fortunately, our van was very clean. Nevertheless, we sanded down any signs of the tiniest bit of surface rust, cleaned the entire van with isopropyl alcohol and applied three coats of anti-rust paint on any exposed metal.


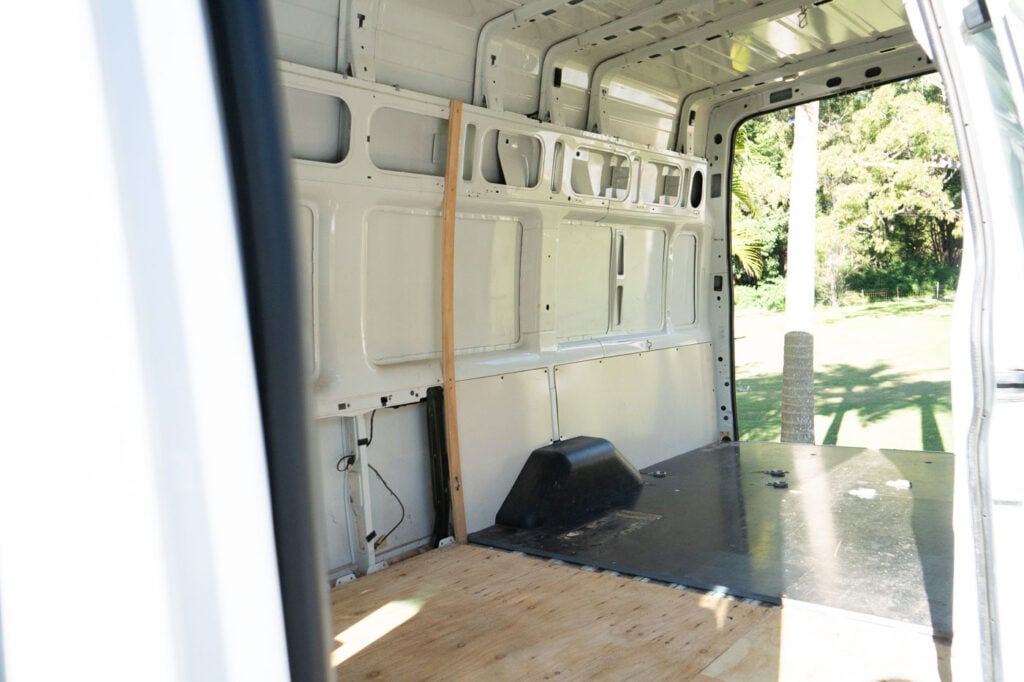
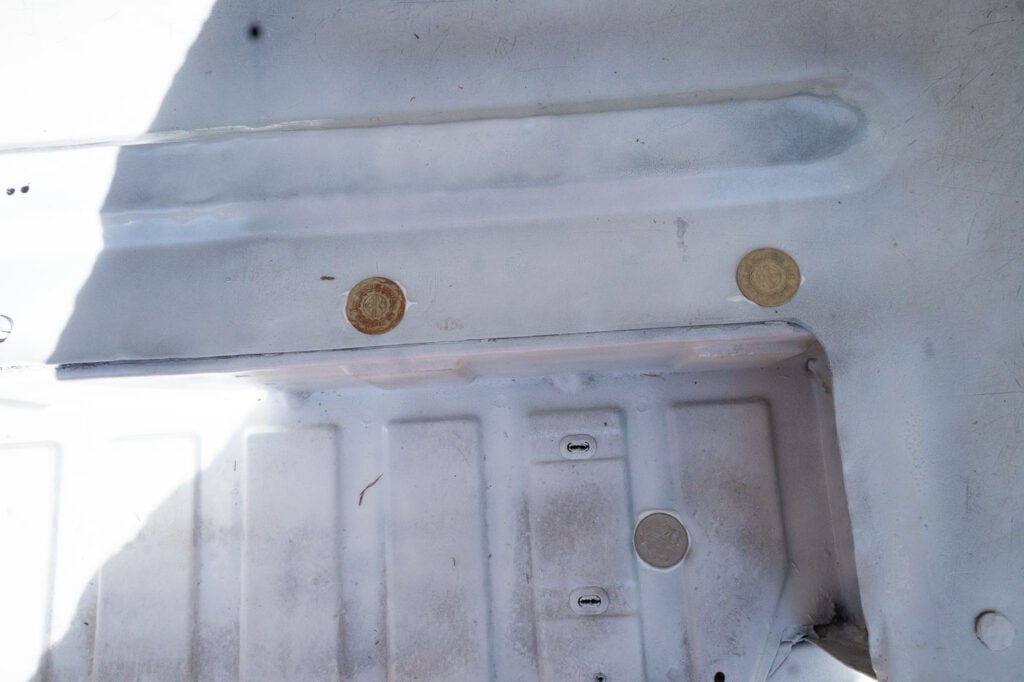
Also, you might find in some vans that there are existing screw or bolt holes in the floor. We patched any existing holes by using sikaflex and some international coins we had lying around and then spraying over them with metal paint.
We then topped it off with 3M duct tape and applied sikaflex to the underneath. This means that no dust, dirt or moisture can creep up through the bottom of the van.

2. Van Subfloor Installation
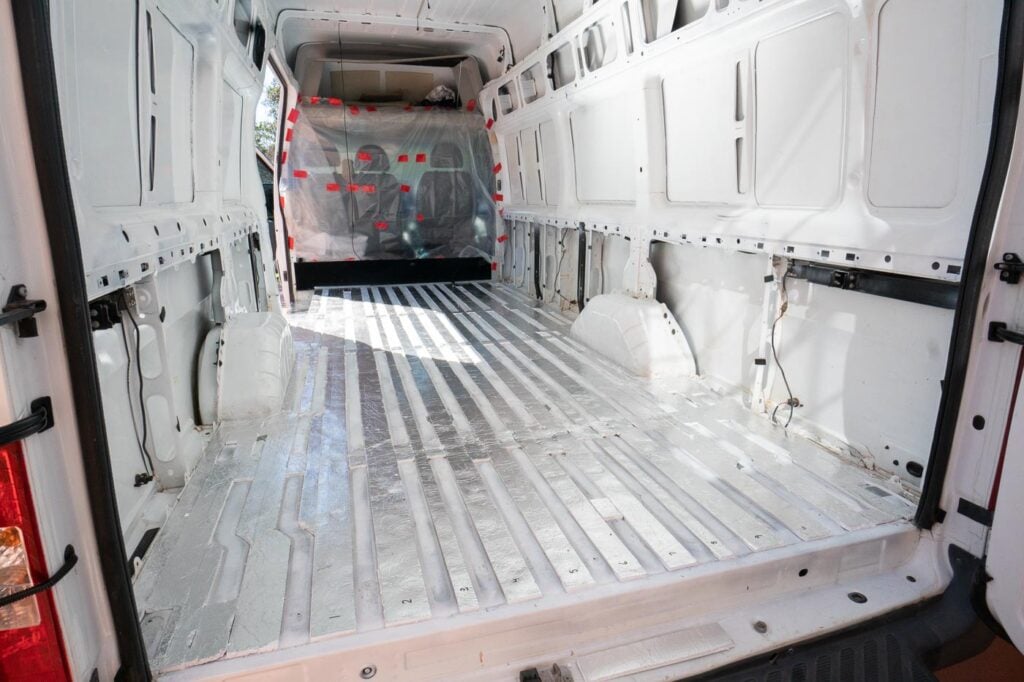
Having a fresh, clean and completely rust-proof canvas to start gave us the confidence to begin our Aussie van conversion! To avoid stepping all over our freshly painted metal flooring, we decided to complete the subfloor job first.
Floor Insulation
Having already purchased our insulation, we decided to use a couple of foilboard sheets to insulate the floor first. Because we are converting our van for Australia, we didn't need to completely insulate the floor. While this is important in colder climates, Australia never gets cold enough to transfer blistering temperatures from underneath the van.
While we could have just put a couple of panels down, we didn't want to sacrifice any headroom when the job isn't really necessary to start with.
So, the best decision for us was to cut out foilboard strips to fit in the grooves of the metal floor. This way, we were able to achieve partial insulation of the floor at a low cost, while not sacrificing any headroom!
We measured the width and length of each gap and used spray-glue to secure the insulation strips.


Plywood Subfloor
Once all of the gaps were filled, we measured the floor space and used a jigsaw to cut two sheets of 17MM form ply to use as our subfloor. We knew that a solid foundation would make things a lot easier to install and stronger long term as you can screw cabinets and framing directly into it.
Form ply is also designed to be very strong and to have timber fixed to it. Having a smooth, plastic coating on it also means that installing our vinyl board flooring would be much easier and the finish would be nicer too.


To install the subfloor, we used sikaflex and self-tapping screws to secure it straight into the van metal. We were careful not to screw through anything important underneath the van by measuring and triple-checking each fixing. Then, we went underneath the van and painted and sika-flexed each screw to make sure that moisture or dirt couldn't get through.
Also, we made sure to paint any exposed ply edges to and we ran thick beads of silicone around the entire edge of the subfloor. This created a strong, waterproof and durable subfloor that serves as a foundation for our entire build.
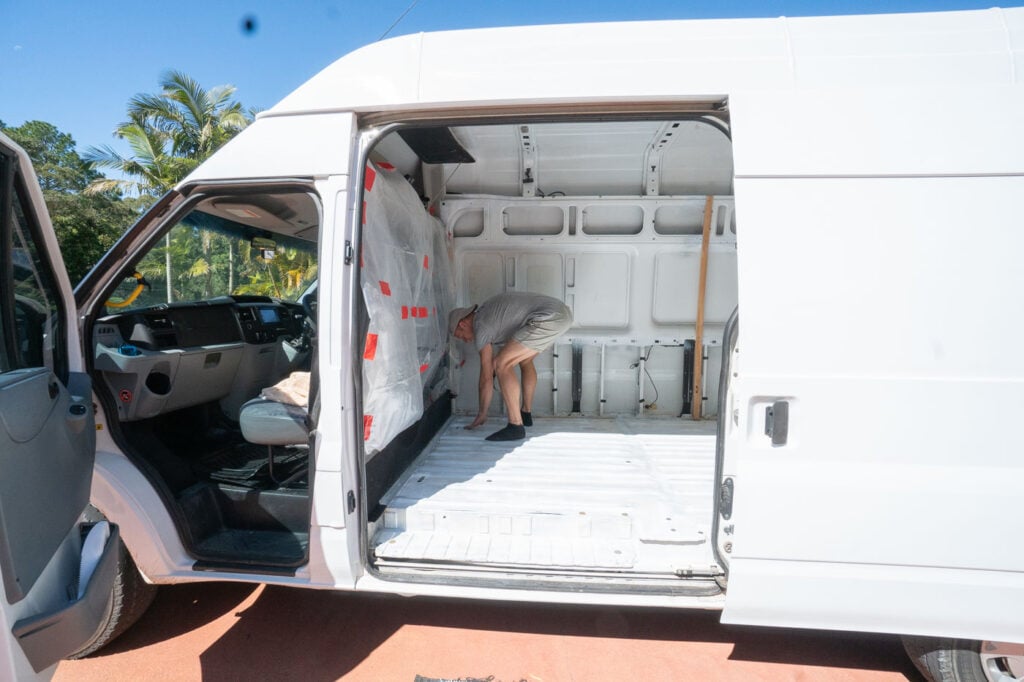
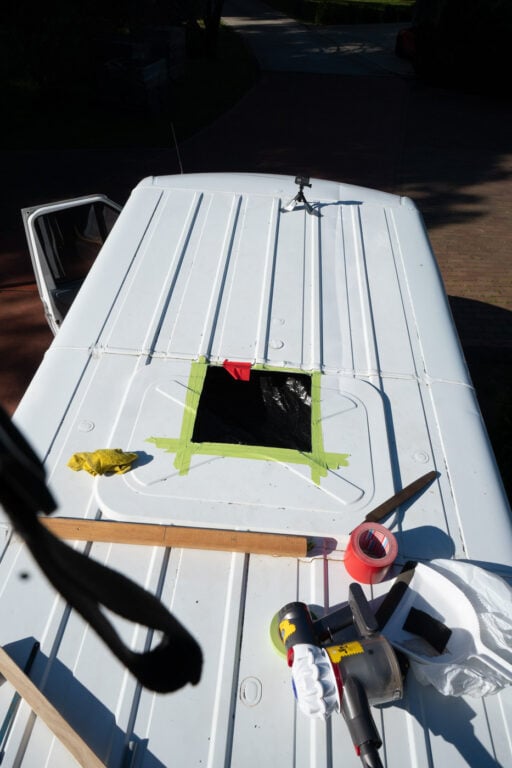
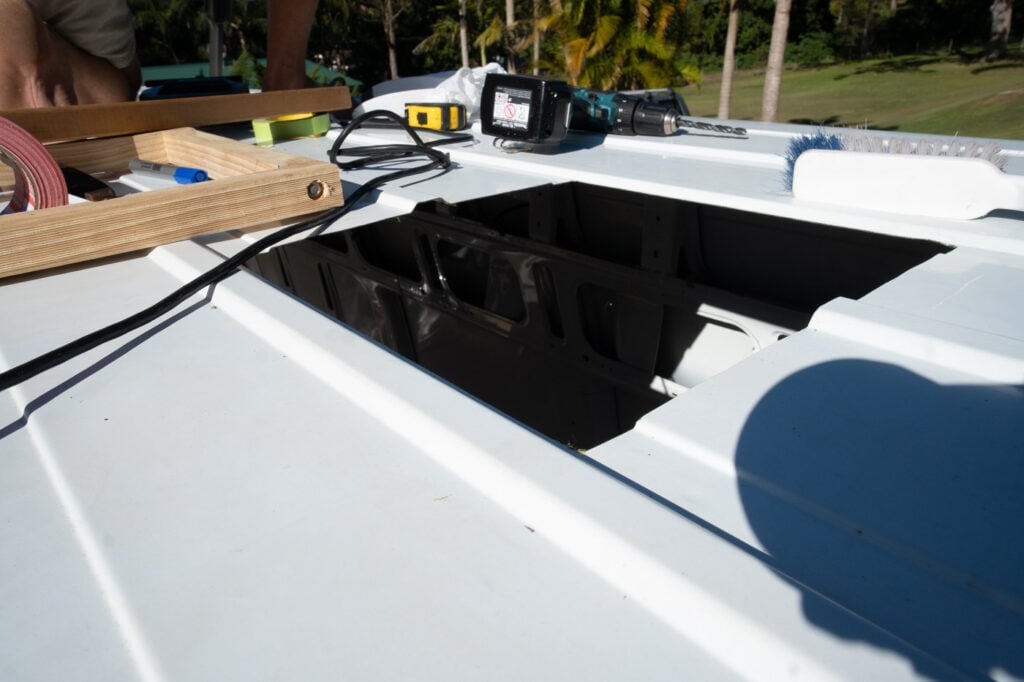
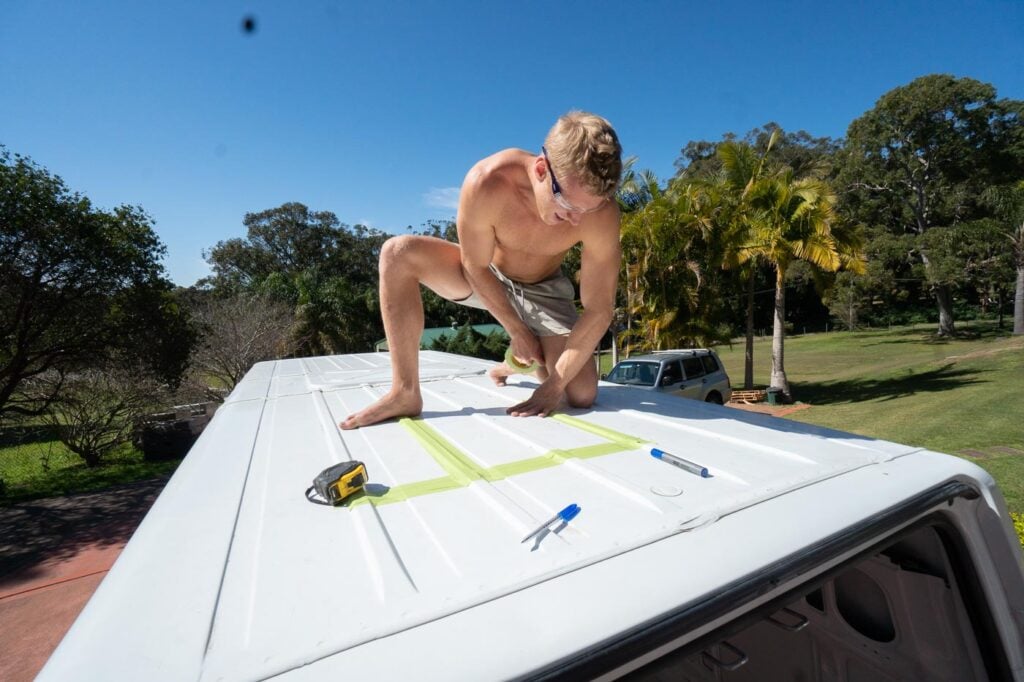
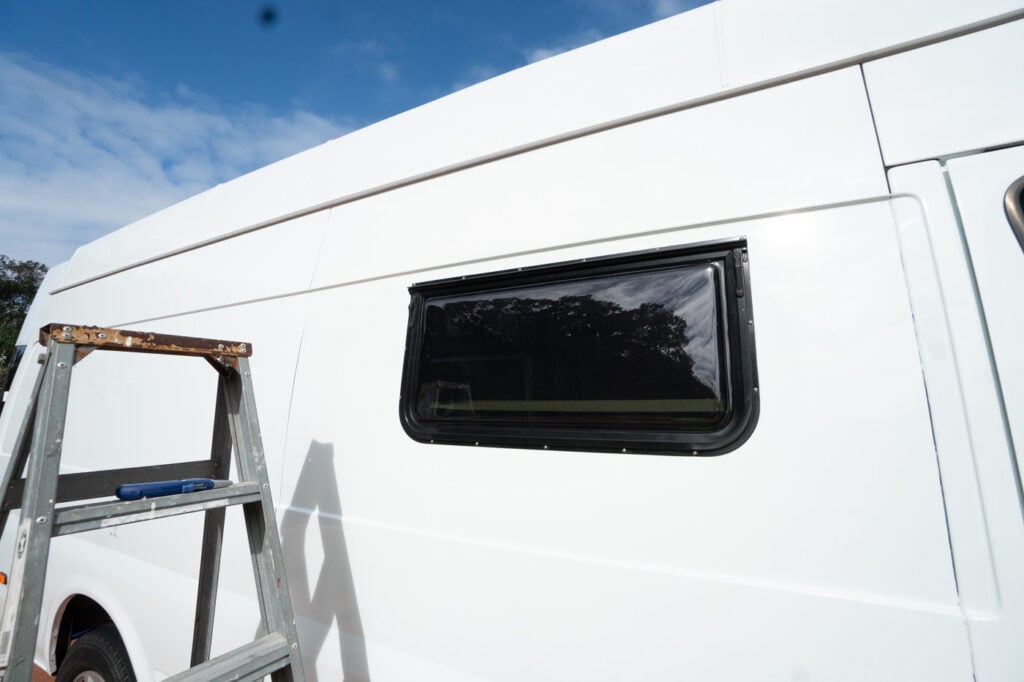
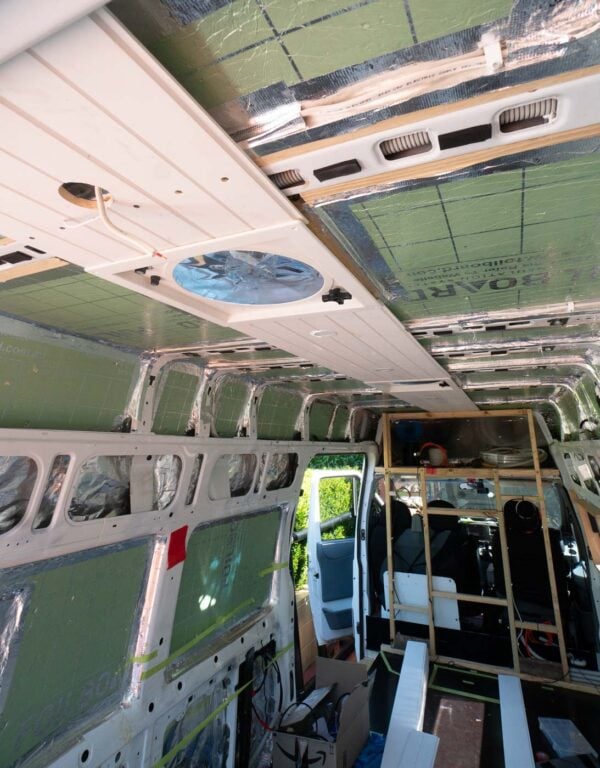
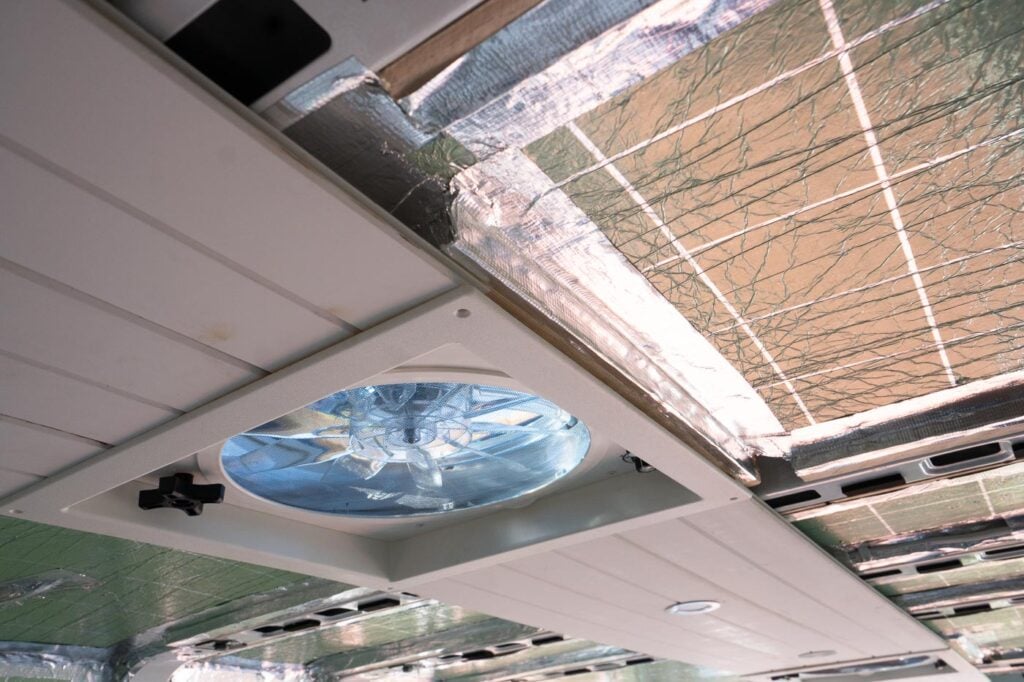
3. Installing Windows, Vent Fans & External Connections on Our van
A good tip that I received from a van-conversion veteran is to begin building from the outside in. So, before considering installing insulation, we needed to mount the vents and windows.
Unfortunately, we lacked the foresight to cut the holes for the inverter's input and an external GPO at this stage and ended up doing it a bit later on in the build. This didn't impact us much but I'll include this process in this section because it makes more sense to do it early.
Vent Fans
We decided to install two roof vents in our van. This is because the vents we chose have bi-directional fans, allowing air to be both pushed and sucked. This means that we can create great cross-ventilation by having one fan act as an extractor while the other blows in fresh air.
Our vents: LivPow Roof Vent
The prospect of cutting big holes in our shiny new van was a little daunting, but a necessary task. So, after measuring and remeasuring countless times, we bit the bullet. Below is a summary of the steps we took to install vent fans in our Ford Transit conversion.
- Build a pine frame that mirrors the measurements of the mounting surface, this will sit on the roof inside the van and act as a point to sink the screws into and rigidify the area around the vent
- Measure the location between any ribs or battens and mark the centre
- Drill a hole through the centre hole upwards to get the reference transferred to the top
- Use masking tape all around the cutting area and mark out the fan cut-out
- Cut with a jigsaw and metal blade, sand down rough edges and treat with metal protective paint
- Level out any bumps and grooves by layering butyl waterproofing tape
- Apply roofing-grade sikaflex all around the seal and push the vent into position
- Have someone hold the pine frame and pre-drill pilot holes in all vent anchoring positions
- Fix the vent to the roof by drilling stainless steel screws through the pilot holes of the roof metal and into the wooden frame on the inside. Go slow and halfway in to start with, begin at the corners and work your way around from opposite screws.
- Tighten all the screws carefully so that sikaflex pours out at every edge, be careful not to over-tighten but ensure there is a flush seal.
- Clean up sikaflex and cover the screws too.


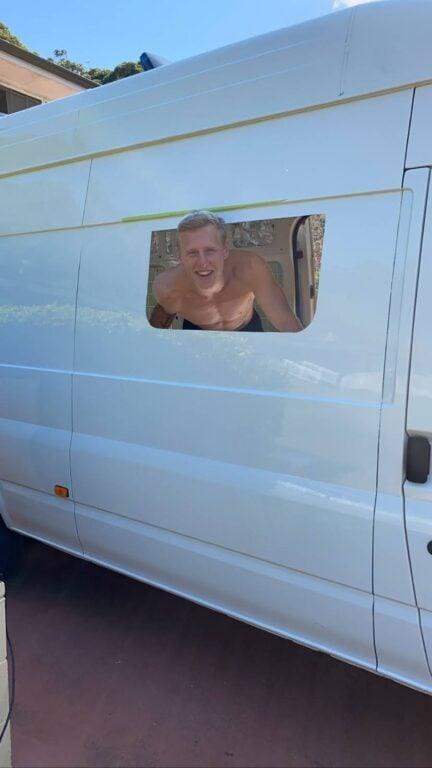
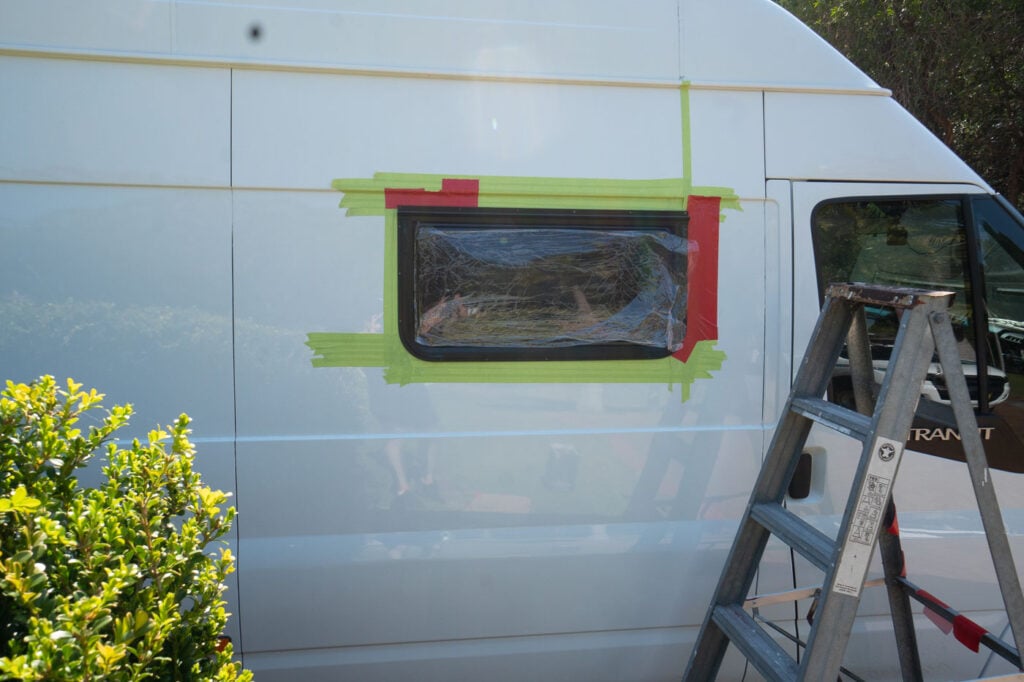
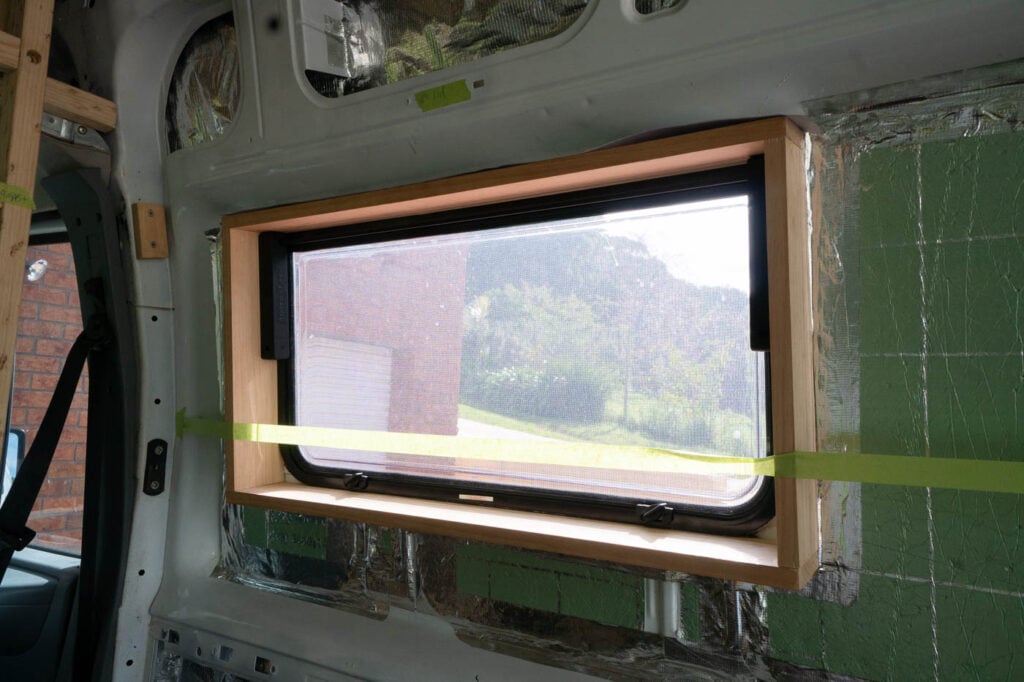
Side Window Installation
Our van already had rear windows on the barn door but we also wanted a small, openable window with a bug screen near the kitchen. We'd spent a bit of time in vans outside of Australia prior to this DIY conversion so we knew that too many windows reduce privacy or "stealth" too much. However, a small window for a breeze and natural light was still essential for us.
We purchased an openable window that was designed for caravans and had an inbuilt bug screen. It opens from the bottom up with a winding mechanism which is ideal because you can have it semi-open in the rain without any getting in.
The process of installing a window in a DIY van life conversion is similar to what you see in the states and other places as the products don't vary much. However, the job might be different depending on the window you get. As a result, the best advice is to consult the manufacturer's directions.


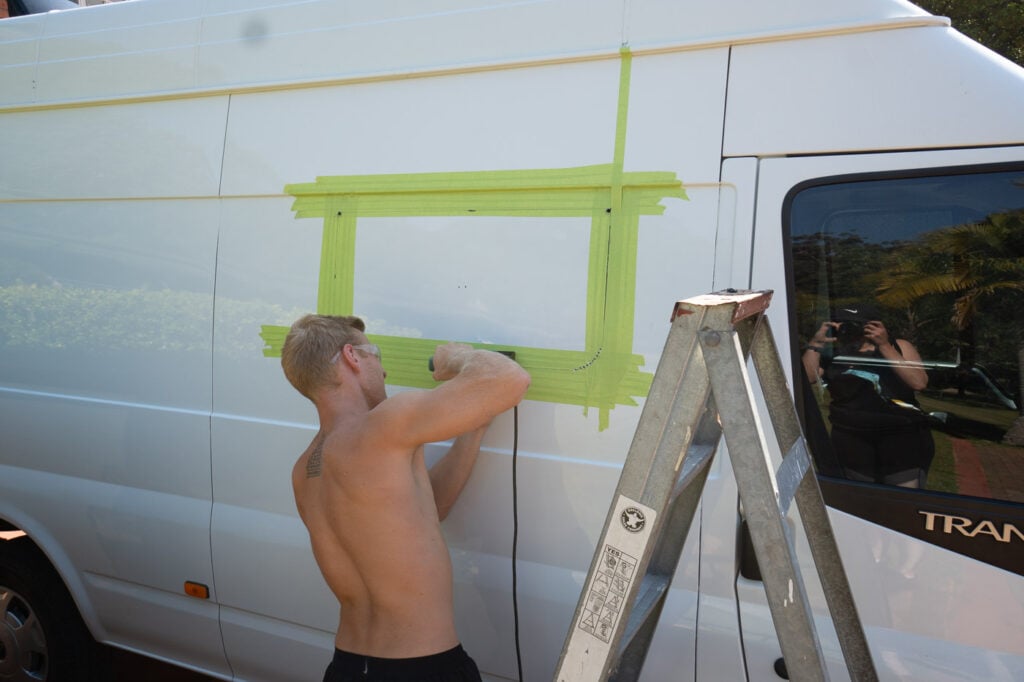


Either way, for ours, we followed a similar process to the fan vents. Our window is sealed using a rubber sealing strip and clear, external-grade silicone. Our window requires fixing with an array of stainless screws, which we like as it's easy to install and I like the marine-esque look of it.


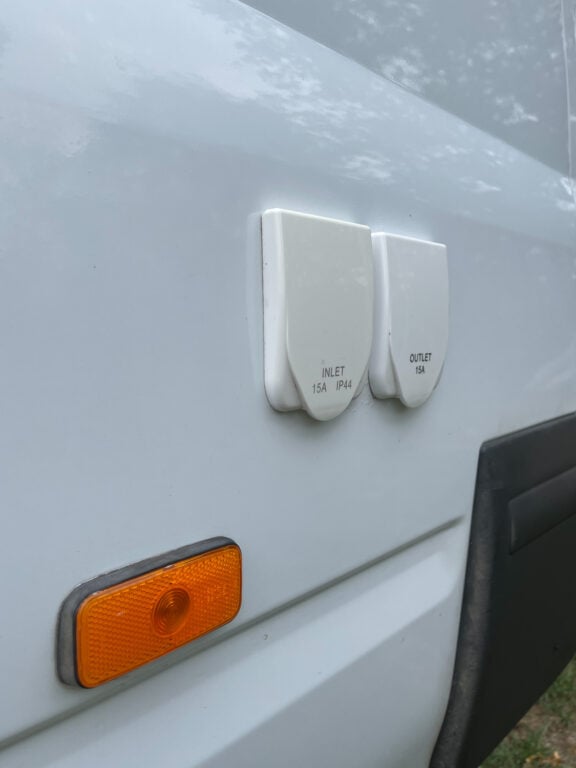
External Outlet & Inlet
As mentioned, we didn't actually do this job at this stage of the build but I'd recommend to. If you're planning to include an inverter charger in your Aussie van conversion for 240V power, you'll want an external input.
This transfers "shore power", from regular grid-connected power outlets into your van to charge your batteries and power your outlets.
While we were at it, we also installed an external GPO beside the inlet in case we ever needed 240V power outside.
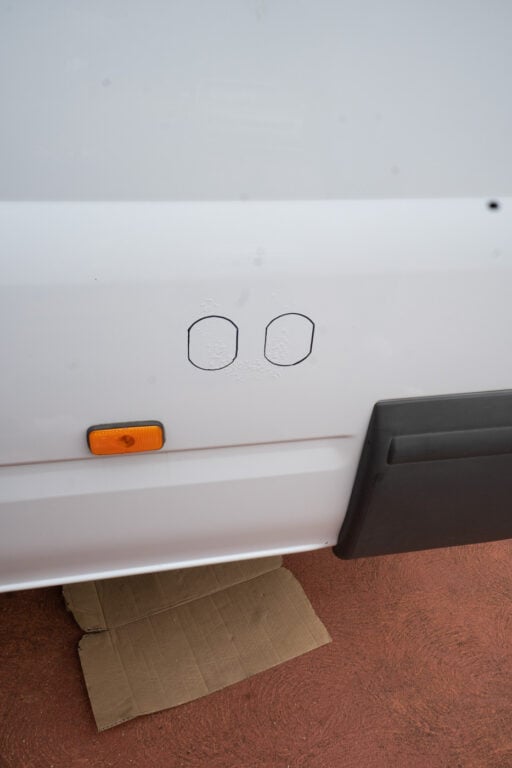

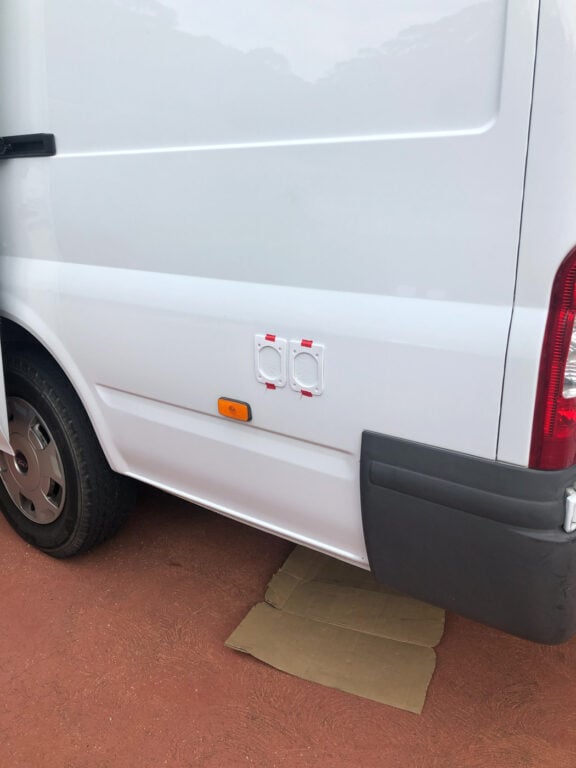

We followed the exact same process as the vent and window installation for these outlets. You can legally install the housings for these yourself. However, the actual wiring needs to be completed by a qualified electrician in Australia.


4. Sound Deadening
I've seen many van conversions where the DIYer rips straight into insulation before considering any sound deadening products. We're stoked that we chose not to overlook this and can certainly vouch for it.
Essentially, soundproofing your van with butyl achieves two things. A van is essentially a big, metal drum that amplifies sound through verberation. Heavy, butyl sound-proofing limits the van's thin metal panelling from vibrating and essentially stops the annoying, empty "dong" sound.
Also more importantly, it also helps to stop sound from travelling through the metal from the inside and the outside.
There are a few of these products available but we can highly recommend Kilmat. 50 square feet is just enough to cover a high roof, long-wheelbase van.
I've seen a lot of people in the states recommending Fatmat Rattletrap but this is usually tricky to get in Australia. However, they're all essentially the same thing. Dynamat is another good option.
Update: I've been advised that this butyl product from Weisshorn is a great alternative to the expensive sound deadeners like Fatmat and Dynamat. While I haven't had personal experience with the product, it got a great wrap on the Vanlife Australia Facebook Group. The main thing to look for when choosing a cheaper product is the material itself. You want 100% butyl rubber with an optional aluminium reflective sheet on top.
Cutting and Sticking Sound Deadener
We measured and cut squares and rectangles from the roll of Kilmat with a Stanley knife, using old plywood as a cutting board below. The sound deadener has a self-adhesive backing that sticks to the van panelling really well. However, before applying, we re-cleaned the surface with isopropyl alcohol to ensure long-lasting adhesion. A small paint roller proved useful to roll out the Kilmat and remove any air bubbles.

The trick is to cover at least one-third of each metal panelling with the butyl deadener. You really don't need to add any more than this. We'd done our research on sound deadening but were still really surprised about just how effective it was.

Tip: Check your van for existing sound-deadening. Usually this is found on some side panels and above the driver area. It will most likely be painted over. You can test the effectiveness by "knocking" on the surface next to the butyl and then comparing to a panel without it.
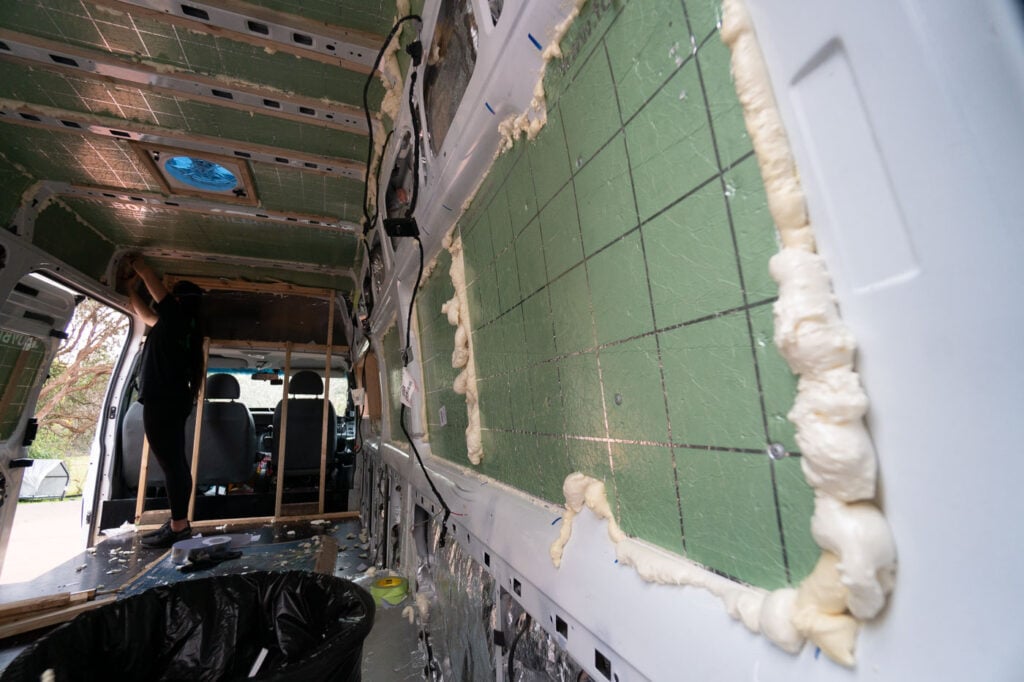
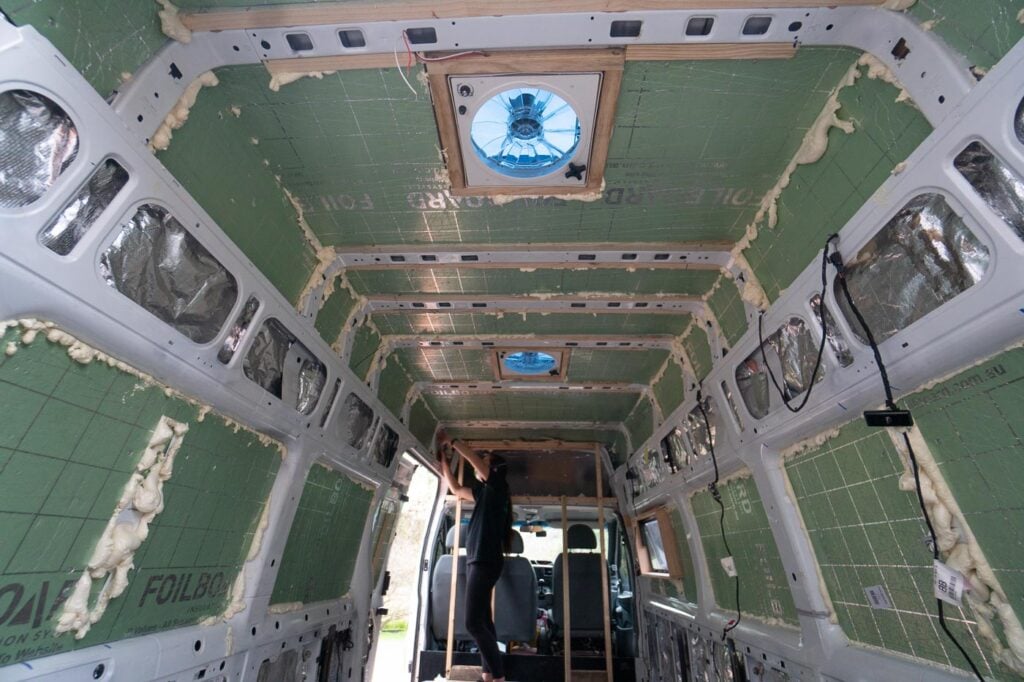
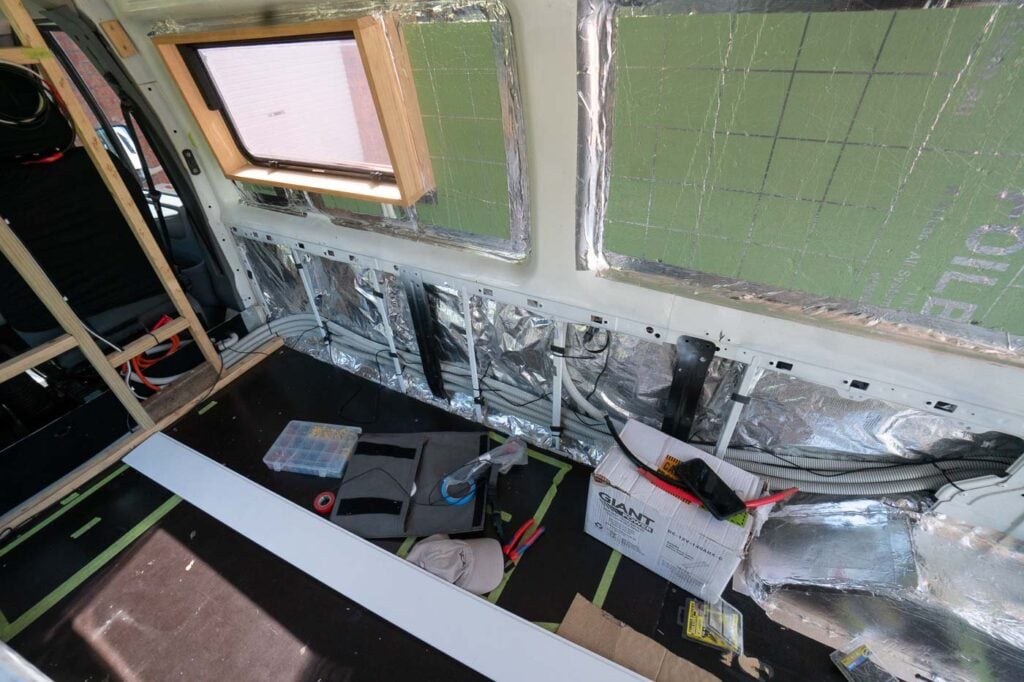
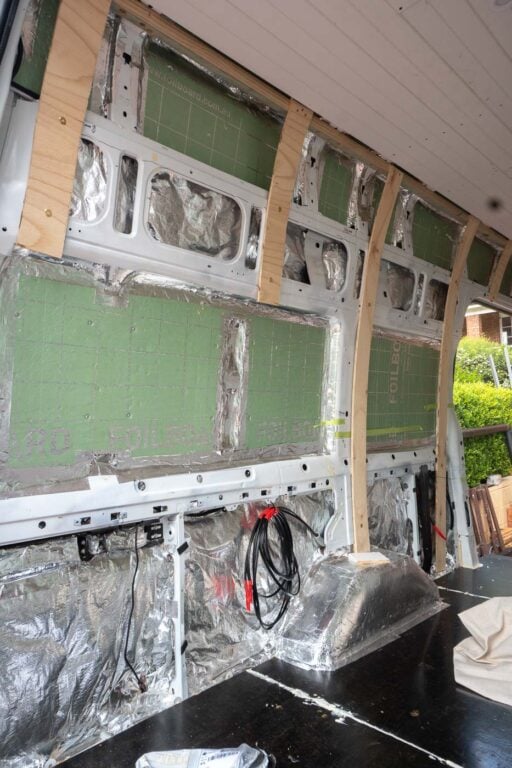
5. Insulation
Insulation is perhaps one of the most confusing and debated topics when it comes to DIY van conversions in Australia. However, after a fair bit of research and now an ongoing trial, we are confident that our climate control system is effective in Aussie conditions.
In our van conversion, we used a combination of foilboard for the flat panels and reflective backed earth wool in the cavities. We also used foilboard in the grooves underneath the subfloor. These products are designed for tin shed roofs, which is very similar to a van.
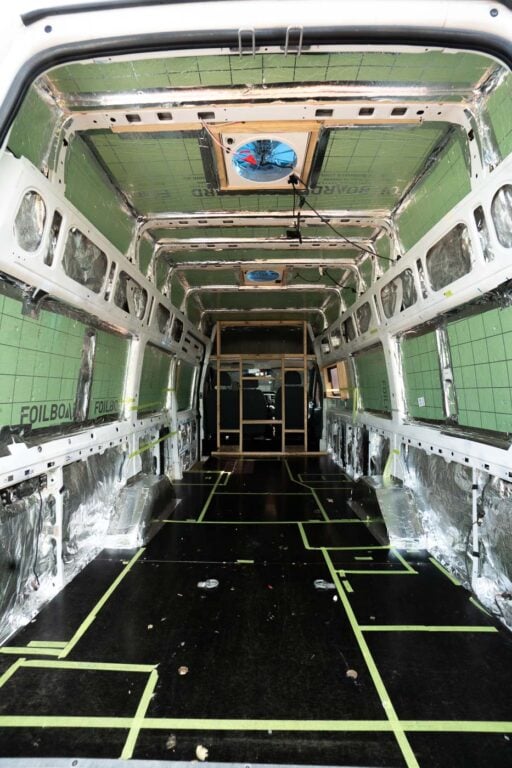

Creating an Insulation Air Gap in a Van Conversion
Something often overlooked, but the most important thing when using these insulation products is to utilise an air gap between the insulation and the metal.
To create this gap, we sika-flexed lightweight pine spacers to the metal. Then, when installing the foilboard, we used spray-glue and short fixing screws to secure the insulation to the spacers.
Creating an air gap isn't as important when using "batts" like the reflective-backed earth wool. So, for the cavities, we simply filled them with the insulation and used aluminium insulation tape to seal it all off.


For the roof, we had previously bolted pine battens on either side of every roof rib which were then cut flush with these ribs. The battens on both sides were bolted through the ribs, with sikaflex pro between the wood and metal and clamped together using a long galvanised bolt.
Also, fixed lightweight strips of 4MM ply on top of these battens with a 150MM overhang on both sides.
This sat just off the van roof metal and meant that our battens also provided a fixing point for the roof insulation with the desired air gap. We also used sikaflex to glue small squares of foilboard in the centre of the larger roof panels to give a bit more support.


Spray Expanda-Foam to Finish
Then, we sealed all gaps with expanding foam to trap the heat in the air-pockets and prevent condensation buildup. Finally, we trimmed the expanding foam and finished the job by sealing it all in with reflective aluminium tape. We took our time and in the end, we were very happy with our insulation job.


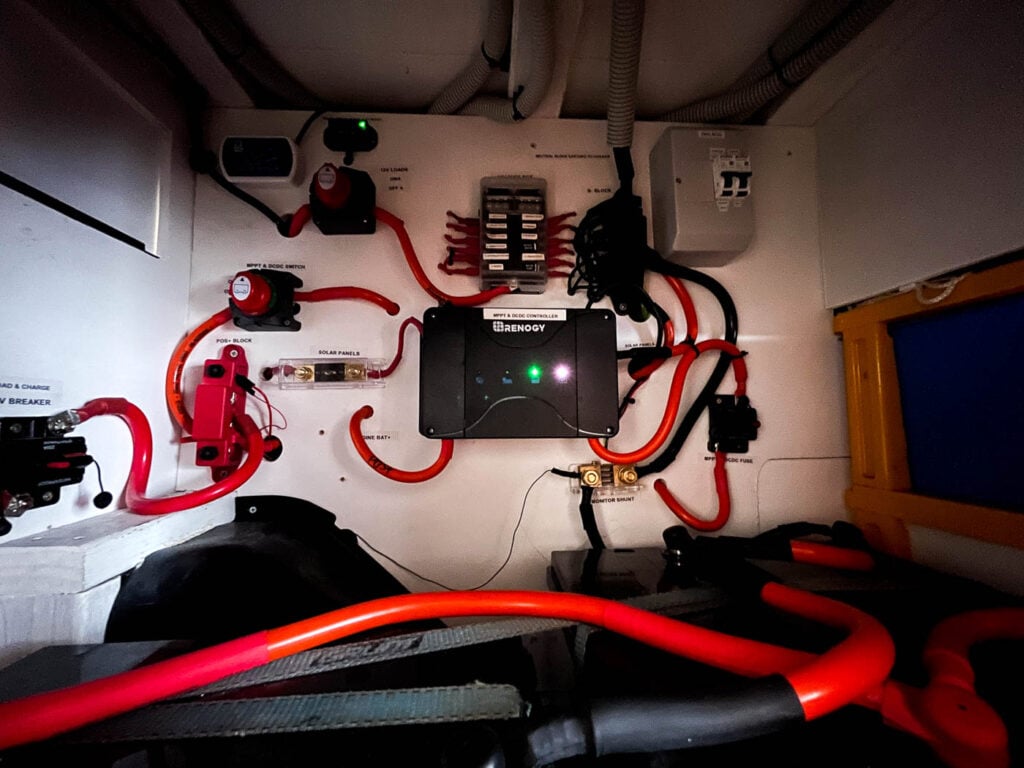
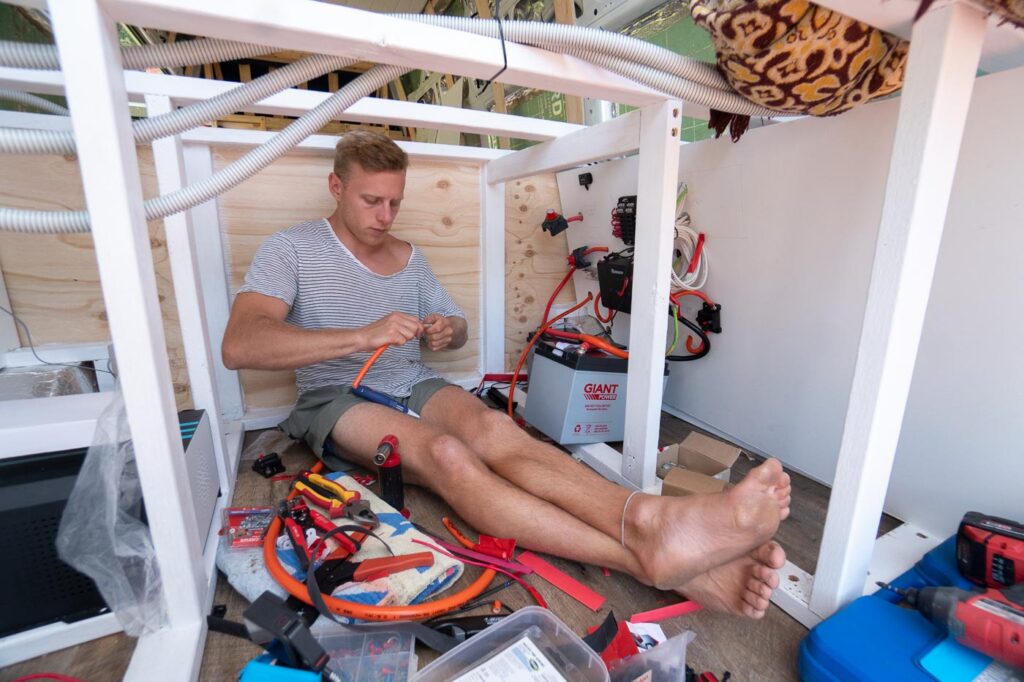
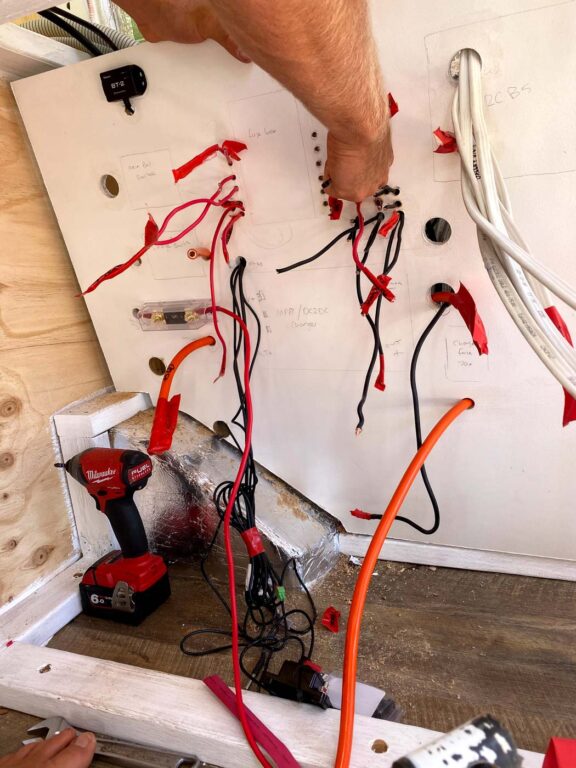
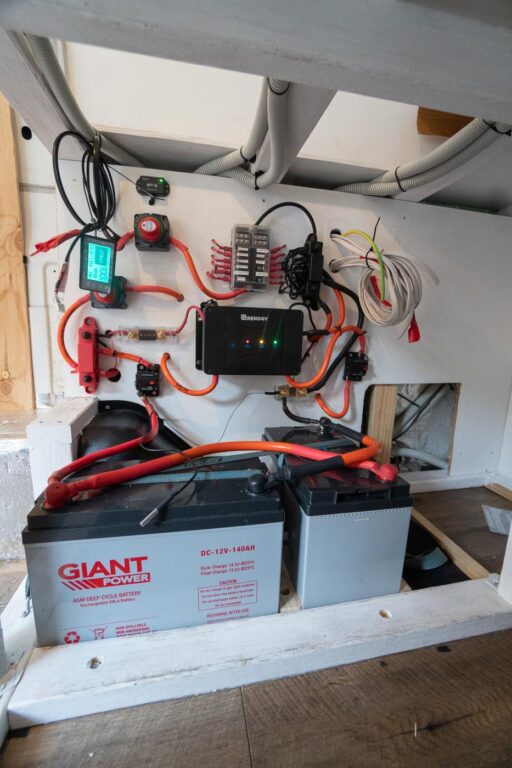
6. Wiring and Designing Our Electrical System
The first step to installing a van electrical system is to research and draw up a schematic of your plan. We went big on electrics but kept it as simple as possible to avoid unnecessary complications.
It's a good idea to have everything planned out and purchased before you begin running cables so you know the size of the components and cable and fuse requirements etc.
Our Van Electrical System
Below I've included our wiring diagram that shows both the charge and loads side of our entire system. This includes the cable sizes, fuse sizes and how everything is wired up.
Click the image below for a full-sized version.
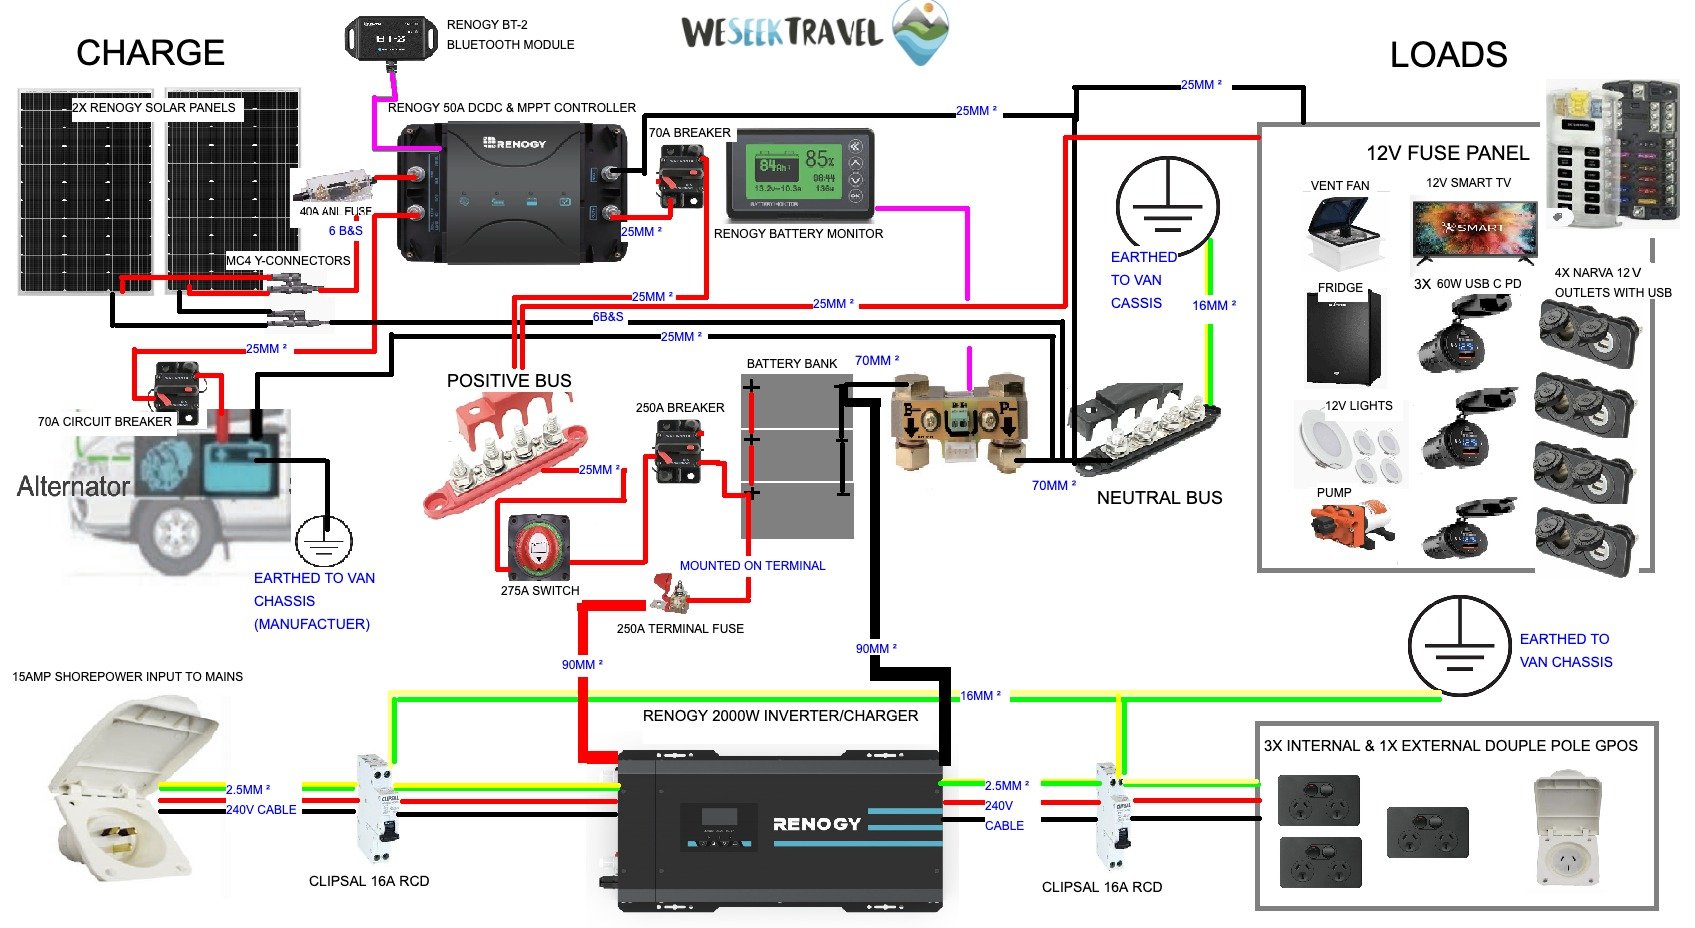
As you can see, I've split the schematic into charge and load sides to make it easier to follow. While cable diameters will depend on the length of your run, I've also included the sizes we used to hook up each component, labelled in blue.
Check out this calculator to help you work out cable size requirements for your DIY build.
The cable runs in the diagram should be easy to follow, with red showing positive, black neutral and purple data cables (included with the component).
There are two wires that I forgot to add to the drawing. The first is an IGN (ignition) sensor cable that connects to our van's engine 12V accessory system from the DC-DC/MPPT controller.
We tapped the positive IGN wire into the fuse box, piggy-backed off a 12V cigarette socket and joined the neutral IGN wire to the van's 12V earth point under the dash. This effectively tells the charge controller when the engine is running so that it can turn on DC-DC charging. However, this is required only if your van has a smart alternator, so check with your model and read the Renogy instructions.
The second cable is a signal wire that runs from our inverter to a remote switch (included with the inverter/charger). This allows us to turn the inverter on/off from our galley.
The AC side of our schematic is shown to help you understand how our inverter is connected. Remember that it's illegal to do any 240V wiring or terminating in Australia unless you are a licensed electrician.
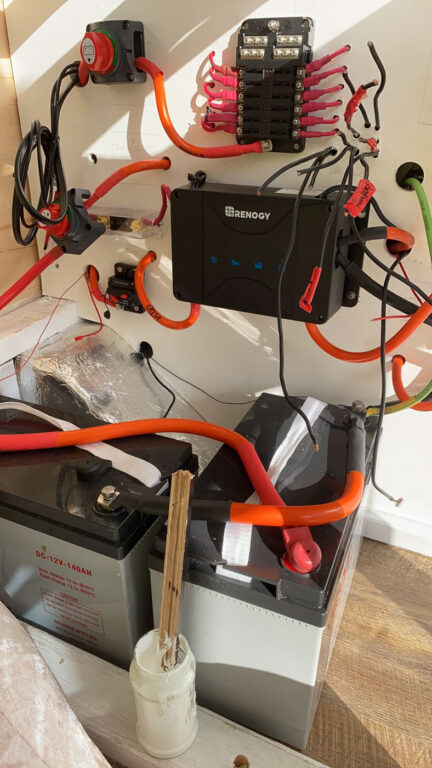
All of Our Electrical Components
Below I've summarised all of the components you see in the above schematic. I've also included links to purchase every piece of the puzzle if you're looking to create your own Renogy system like ours.
CHARGE SYSTEM COMPONENTS
- Solar panels: 2x Renogy 160W Panels connected in parallel with MC4 Y-connectors | protected by 40A ANL fuse
- Charge Controller: Renogy 50A DC-DC & MPPT | charge output & run from engine battery protected by 70A circuit breakers
- Inverter/Charger: Renogy 2000W Inverter Charger | protected by 250A terminal fuse & 16A RCD protection on the AC side
- Mains connection: 15A inlet
BATTERY & MONITORING
- Batteries: 3X Giant 140AH AGM (in parallel)
- Battery Isolation Switches: 275A Heavy-Duty Isolation Switch
- Distribution Blocks: 12V Distribution Blocks
- Battery Monitor: Renogy 500A Battery Monitor & Shunt
- Charge Bluetooth module: Renogy BT-2
LOAD SYSTEM COMPONENTS
DC:
- 12V Fuse panel: Blue Sea 12V Fuse Panel
- Vent fans: 2X LivPow Roof Vent
- Fridge: Glacio 95L Standing Fridge/Freezer
- Lights: 8X Acegoo (warm) downlights & 1X warm cabinet kickboard LED strip
- Water pump: SeaFlow 12V Water Pump
- Smart TV: Devanti 24" 12V Smart TV
- 12V Outlets: 4X Narva cig-socket + USB oulets & 3X 48W USB C PD outlets
AC:
- Outlets: 3X 10A Clipsal Double Pole GPOs & 1X 10A External GPO
- Appliances:
Running Our Cables
In the end, after spending weeks on planning and purchasing components on Amazon, we were ready to begin running our cables. This first stage is simply just running the cables to the points they will later be terminated. This way, you can hide all the van wiring behind the walls.

Working Out Cable Sizing & Preparing The Runs
We used electrical conduit to house all of our wiring, both 12V and 240V.
While it's not compulsory for a 12V system, we wanted our cabling well protected and insulated. We ended up using heavy-duty 4.65MM² (6MM² equivalent) automotive twin cabling for our entire 12V system. This is admittedly a little overkill for low-wattage appliances like our 12V downlights but necessary for bigger drawers like our fridge, vents and outlets.
However, it ended up being easier and cheaper to buy a 100M roll of thicker cable than buying shorter lengths of varying diameters.
We ran all of our twin 12V wires from the designated electrical cabinet in the rear to where the appliance would be installed later on. Also, we made sure to run extra cable before cutting each length so that we'd have enough to work with once we got to it.
Since our fans were already installed, we wired these straight in since the cable would be covered up by the ceiling sheeting in the next few steps. There were also a couple of lengths of signal wires to run including our tank level sensor, battery monitor and inverter power switch.
As mentioned, all wires are run in grey flexible conduit, which passes through the cavities in front of the insulation (don't place it behind as you don't want hot cables).
In some instances, we needed to drill holes to pass the conduit through steel. Where this was necessary, we made sure to paint any bare steel to prevent rust. We then used cable ties to secure and clean up the conduit runs so that they wouldn't ever move.

Designing 12V Lighting Circuits
We have four different lighting circuits in our van. This includes three main galley LEDs downlights, two bed lights, three downlights under the overhead cabinets and an LED lighting strip in our galley cabinet kickboard.
Our downlights: AceGoo 12V LED Downlights (I recommend the warm ones)
OR: Cheaper alternative with good reviews: RV LED Recessed Lights
We ran all circuits in parallel and wired switches in convenient locations in the van. Essentially, all of our lighting is on a single circuit from the 12V fuse panel. However, we wired in switches which were branched off down the run of the main "source".
Since the cabinetry hadn't been built yet, we simply ran lengths of cable to each point where we planned to mount the lights and install the switches later on, leaving the circuit open and disconnected.
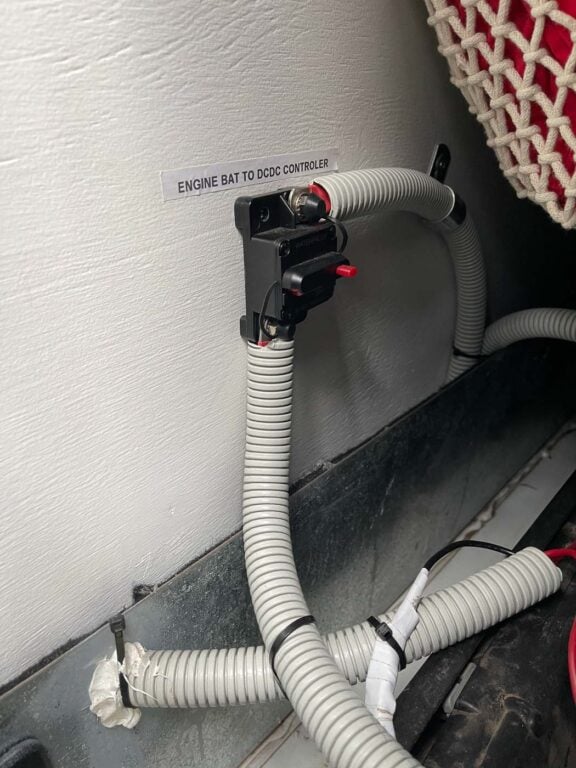
Engine Battery to Dc-DC Charger
Another essential part of our system is our DC-DC charger. This charger utilises the car's alternator to charge our service batteries when the car is running at a maximum rating of 50 amps.
To connect the components, we ran heavy-duty 25MM² welding cable in conduit from the starter battery positive and neutral located under the seat to the DC-DC charger. Just before the battery, we also installed a manual reset circuit breaker so we could easily disconnect the van's engine battery at any time.
We also ran the supplied ignition cable and wired it into the van's 12V fuse panel, piggybacking off a cigarette socket lighter. This basically acts as a signal wire to tell the charger to start drawing power from the alternator only when the car is on.

240V Runs
Next was the 240V wiring. We used 2.5MM² twin+earth, again, insulated inside a separate conduit. I was lucky enough to have an electrician help with the 240V runs as it's illegal to do this yourself in Australia.
These runs again started in the electrical cabinet, where we would later install an RCD block, and ended at the points where we'd install GPOs.
We waited to run the 2.5MM² twin+earth that the inverter would later require for its input and output since these runs would cross the platform bed that we hadn't yet built.
If you're around Sydney/Central Coast NSW and looking for help with 240V installation in your van conversion, message Connor from Process Electrical and let him know I sent you.

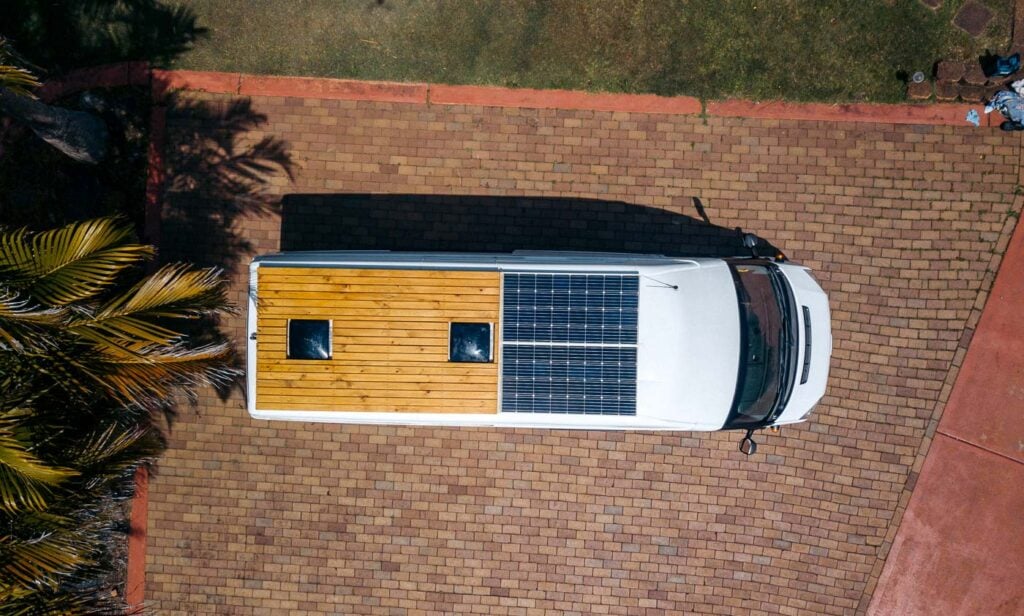
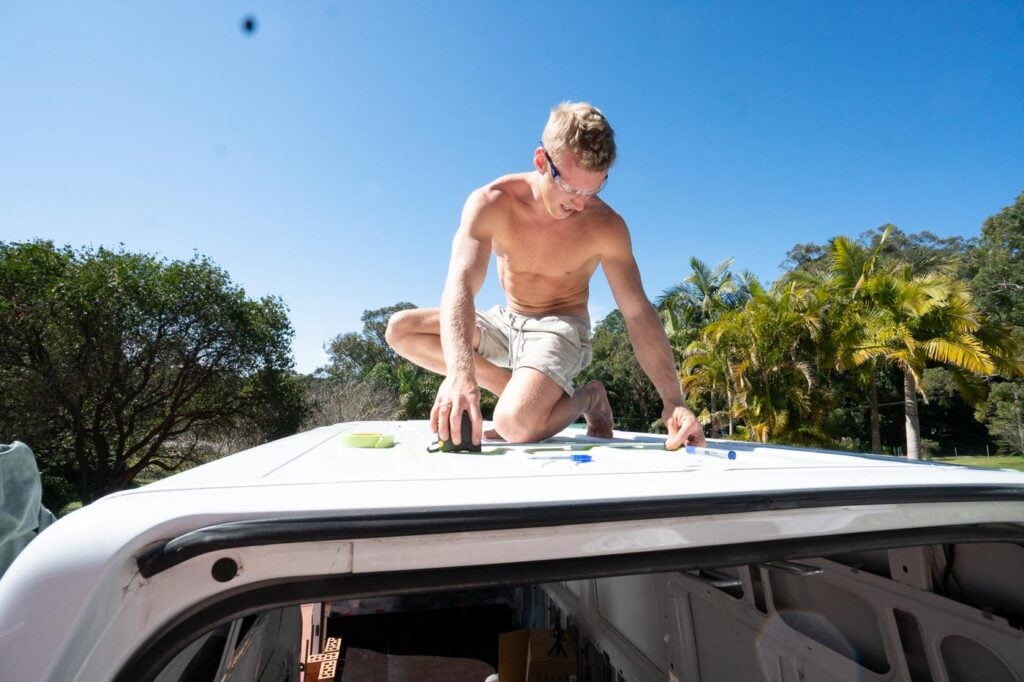
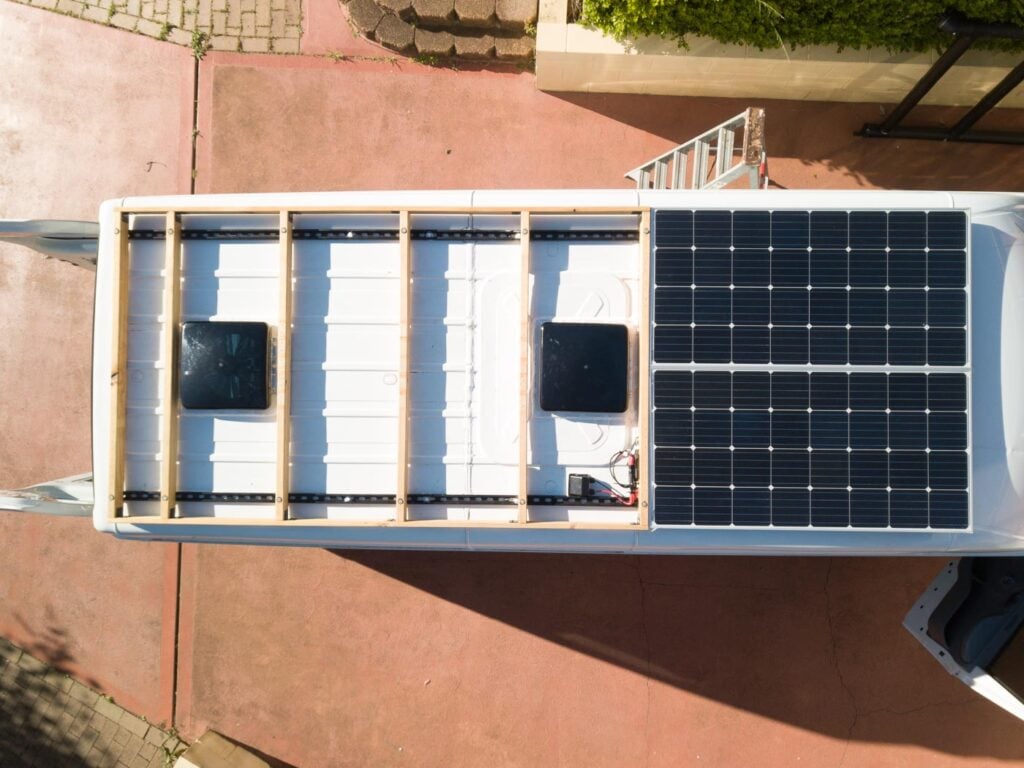
7. Installing Solar Panels and Building a Rooftop Deck
Perhaps one of the most unique features of our van conversion is our big rooftop deck. We'd seen others mount these in DIY van builds overseas, but never in Australia.
Now, I've noticed that it's becoming more and more popular. Some people hate them, some love them. Clearly, we belong to the latter school of thought. Looking back, our roof deck is something we use nearly every day. Be it watching the sunrise with a morning coffee or just getting a better of the sunset, or perhaps using it as a platform to launch our drone— it's something that we absolutely love about our build.
Mounting " DIY Rails"
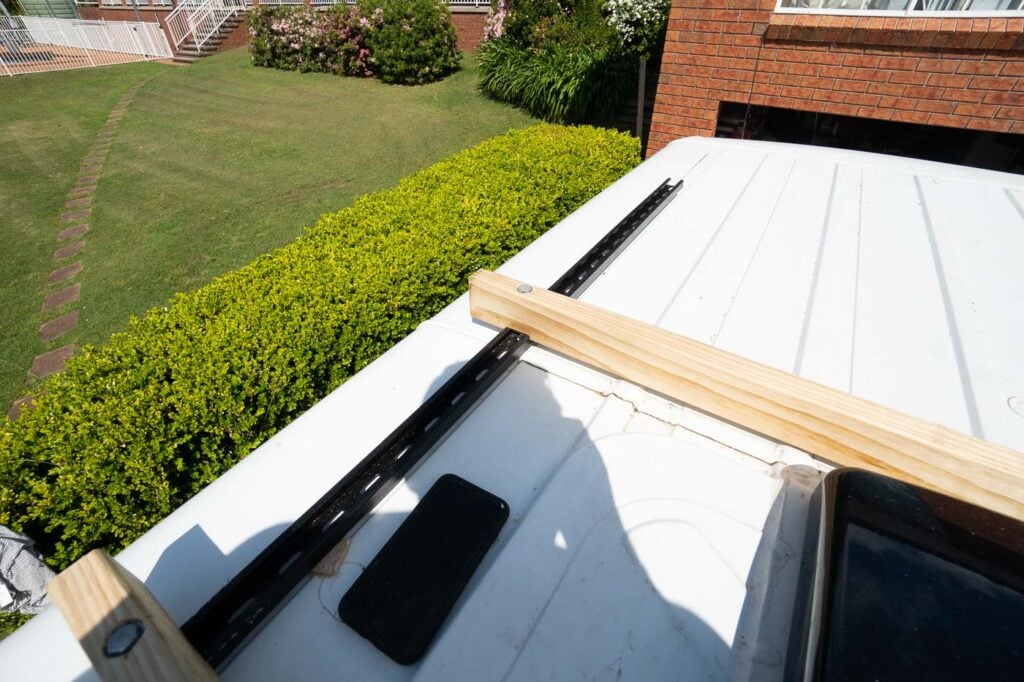
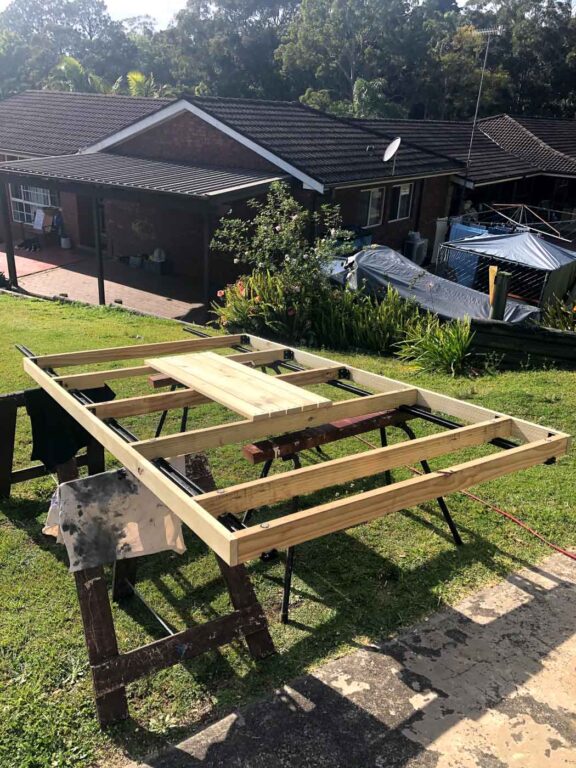
Our roof solution involved mounting "rails" in the roof gutters using 21MM x 42MM galvanised unistrut (which we also painted black) cut to the length of the van.
Unfortunately, our van didn't have roof-rack mounting points so we mounted these by drilling holes through the roof at measured lengths between each roof rib. We then bolted the unistrut through the roof and anchored it with solid stainless steel M10 bolts into the six roof ribs, using nuts on both sides to create a solid fixing.
This equally transfers any downward weight straight into the roof ribs, the same way factory-installed rails are mounted.
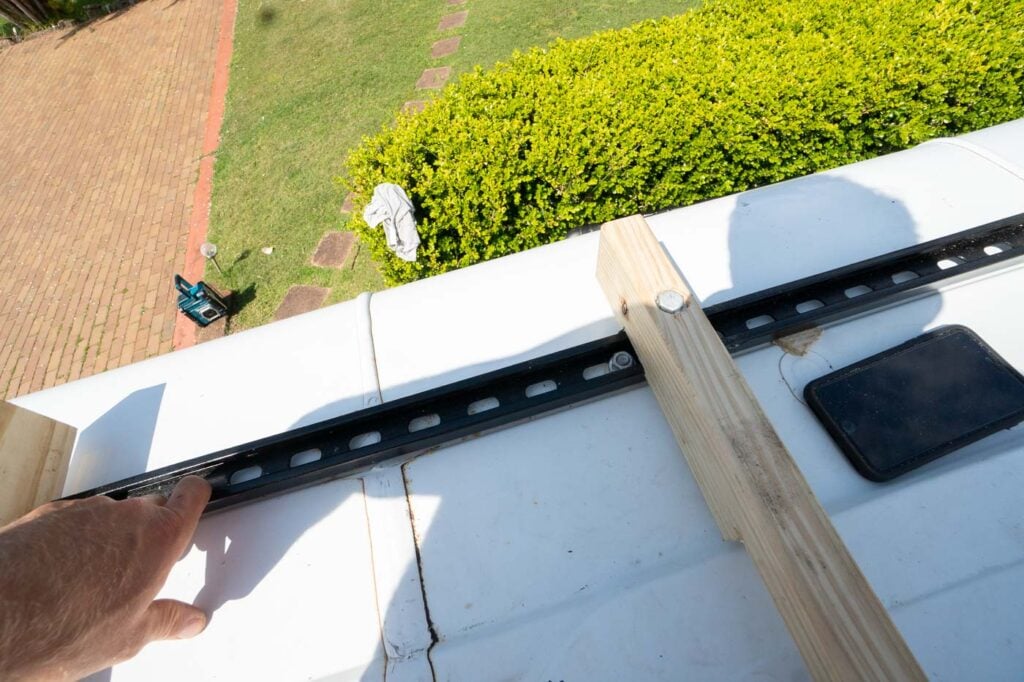


Having drilled 12 new 10MM holes, we needed to ensure each fixing point was waterproof.
So, we used heavy-duty rubber feet mounts that were fitted through the mounting bolts between the rails and the roof metal. We also applied loads of roofing sikaflex on the inside and underneath these feet.
The rubber feet are compressed flush around the hole when the bolts are tightened and creates a gap between the unistrut and the roof to prevent moisture build-up.


Building a Roof Deck
Now that we had solid mounts to attach a roof deck, it was time to design and build one.
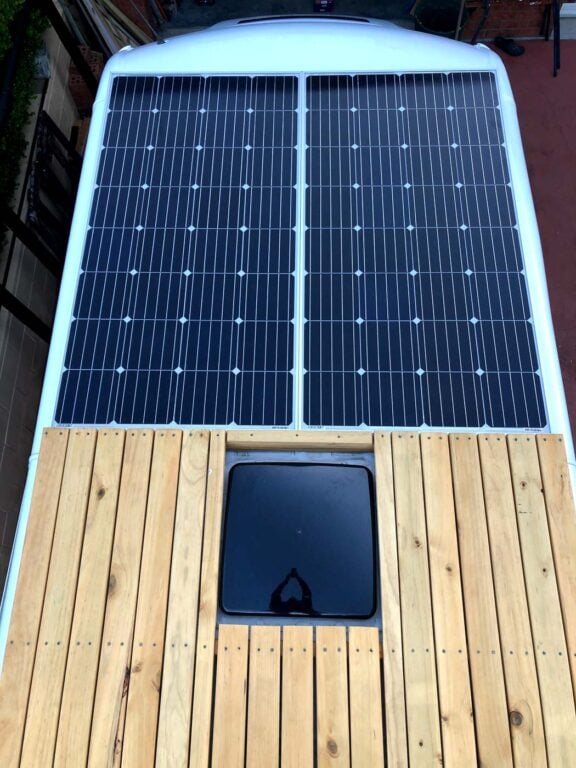
We already had our two solar panels, which we planned to mount at the front of the van, forward of the deck. Our panels were chosen so that they would fit perfectly and utilize the entire roof space and built our deck to follow the same width dimensions.

We used 6x lengths of 70MM x 35MM H3 treated pine as joists, which run width-ways to the van and are mounted onto the unistrut rails using countersunk M10 spring nuts.
Also, we routed 20MM depth out of the point where the joists are mounted to the rails to create a better join and sink the deck lower onto the van. We left an approximately 15MM gap between the timber and the metal to ensure water doesn't pool anywhere.
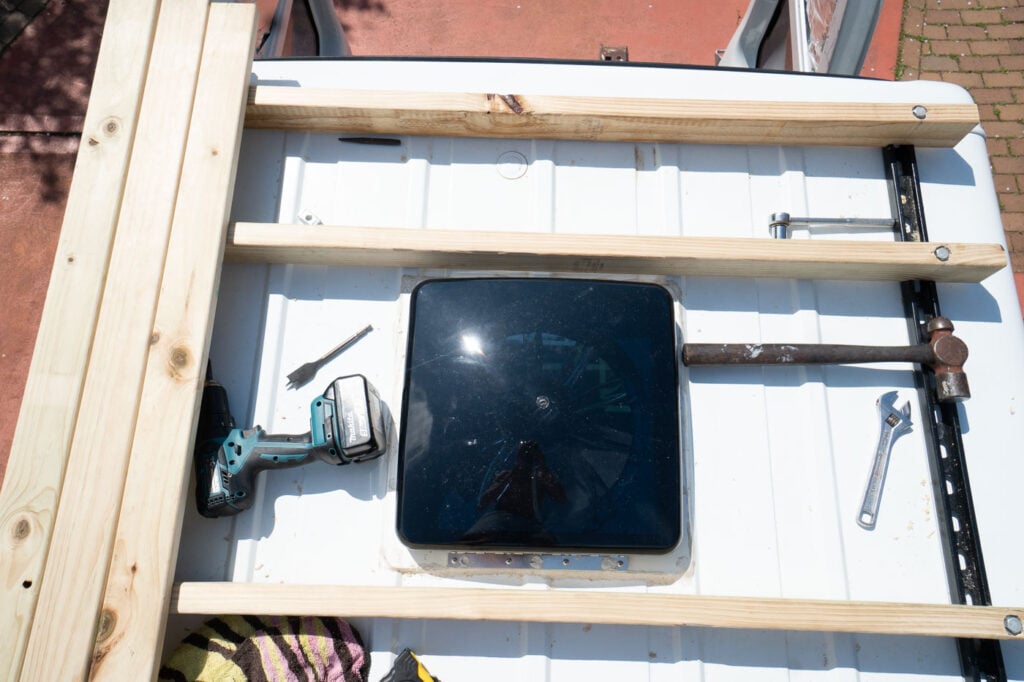

Next, we ran lengths of 70MM x 19MM treated pine decking boards which we fixed to each joist using decking screws, leaving a 3MM gap between each board. These almost fit perfectly. However, in the end, we needed to cut two centre boards down with the table saw to get a good fit around the vents.
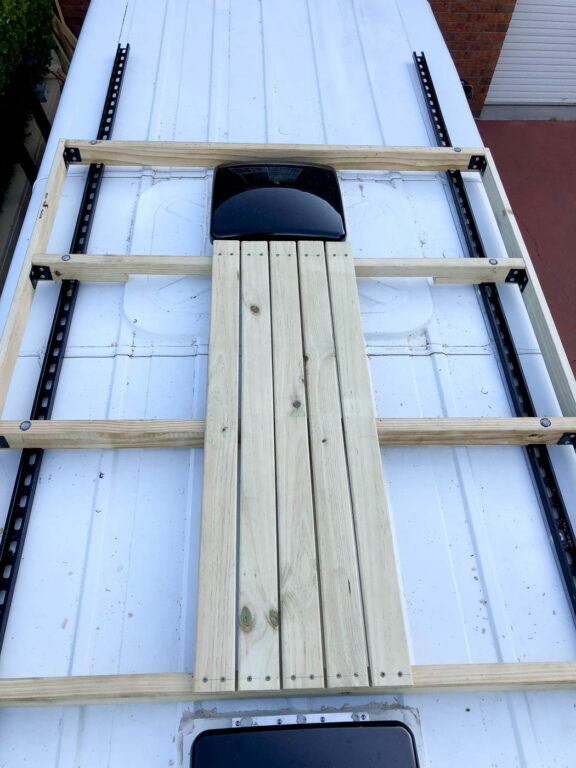

To finish, we boxed in the side and back of the deck with more lightweight decking boards and applied four coats of water-based decking oil to protect and finish it off.

In summary, we were incredibly stoked with how the deck turned out. We reckon it's one of the most unique and awesome parts of our DIY van conversion and we had a lot of fun designing and building it.
Mounting Our Solar Panels
Next up was the solar panel job. Since we already had rails, fixing the panels was easy. However, we wanted to mount the panels length-ways, parallel to the van. So, this involved creating some supports that would run perpendicular to the van, similarly to how we mounted the deck joists.
However, this time we used light but strong aluminium square pipe which we bolted onto the rails with spring nuts. We then bolted these supports directly to the solar panel frame.
Our solar panels: Renogy 160W Solar Panels
For extra measure, we also used stainless steel screws to fix the back of the panels into the deck. Although our fixing solution is really strong, we still mounted a wind-deflector on the front of the to prevent wind-lift.
This was accomplished by installing rivnuts into the front of the solar panel frame and bolting the deflector to it. However, we had to modify the supplied plastic mounting brackets to achieve this.

Running the Solar Panel Cables
Having two solar panels meant that we had the choice of combining them in either series or parallel. Our MPPT charger is limited to a solar input voltage of 25V. As a result, combining our panels, which are rated to over 19V each in series was out of the question.
This made the decision easy for us. We joined our solar panels in parallel by using MC4 Y-branch connectors. Since we'd be outputting a fair bit of current, we also had to up-scale our wiring.
To explain, each panel is capable of generating around 10 amps. This means that a maximum charging current of 20 amps in parallel can be transferred along the run from the panels to the charge controller. After working out our length, we knew this required at least 6B&S automotive cable.
We crimped one end of both positive and neutral with MC4 connectors which would later join into the Y-branch connector and left the other end bare for now.
Installing a Cable Entry Gland on the Roof
Next, we cut the final hole in our van to mount the cable entry gland. Of course, we then painted the bare steel but also fitted a rubber grommet in the hole to protect the cable.
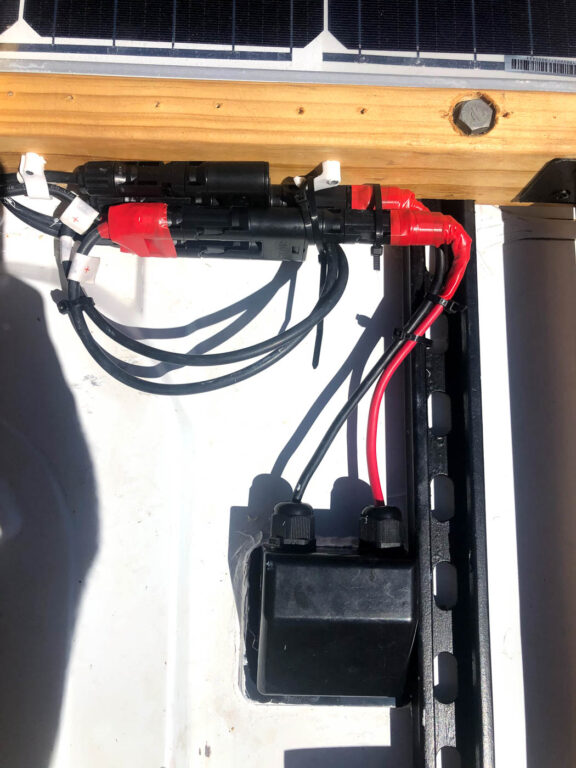

Before mounting, we passed the bare end of the solar cable through the entry gland and through the hole in the roof. Then, once we'd pulled all of the slack through, mounted the entry gland over the hole and sealed it using roofing sikaflex. While the entry glands create a waterproof seal, for extra measure, we applied loads of sika on the inside all over the point where the cable comes through the grommet to seal this regardless.
Following our best practice, we ran the entire length of our solar cable on the inside within some protective conduit to the electrical cabinet area. Then, we lugged the ends, ready to be installed into the M8 MPPT charge controller bolts.
While our van had a factory-installed reversing camera, we wanted to install another one higher up to get a second view and one that would record 24/7 for security. During this part of the build, we also installed a rear camera that came with our dashcam. We mounted this on the back of the deck and ran the cable through the gland to the dashcam in the driver's area. Furthermore, we wired up the sensor cable to the reverse light in order for the camera to turn on when the van was geared in reverse.
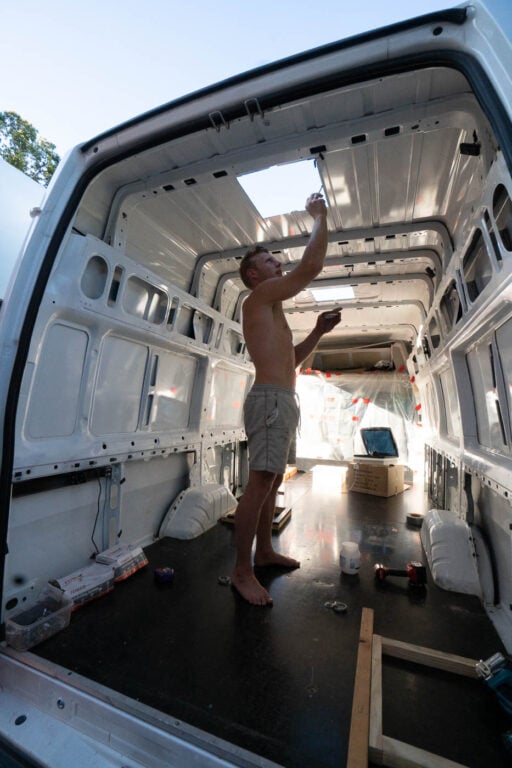
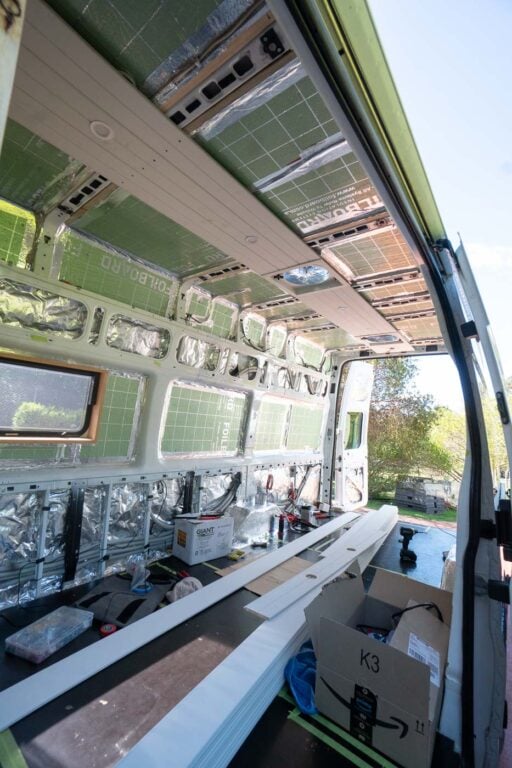
8. Roof Sheeting
If you read the introduction to our DIY van build, then you'll already know we decided to sheet the entire van with tongue-and-groove (or v-groove) pine sheeting. Unfortunately, our local Bunnings only stock the white, pre-primed versions of these in 2.4M lengths.
Luckily, we were able to source 6M lengths at our local timber and hardware store.
Since we had already bolted battens to the roof ribs, we had perfect fixing points to attach or tongue-and-groove boards. We started in the centre of the van and cut lengths to meet the edge of the vents.
These centre boards needed hole saw cutouts for our LED downlights. Since we had already run the 12 cables to these points, we pulled the wires through each hole once the boards were screwed in, ready to be crimped to the lights later on.

The sheeting boards we used leave a very neat finish and are quite easy to work with. However, since we were running a single continuous run for the length of the roof with each board, it proved a bit tricky to get the boards joined up. We needed three people for this job and the delicate use of a rubber mallet to get each board to line up.
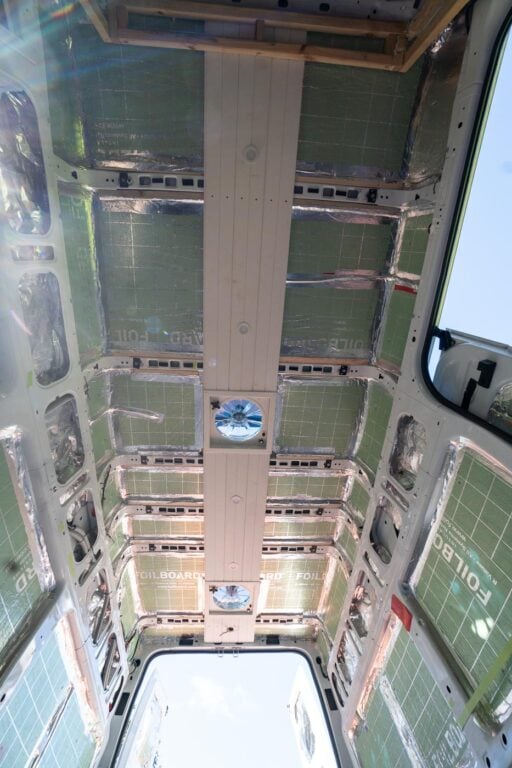


Luckily for us, the 140MM fit perfectly around the vents and even finished snugly at the edge of the roof where the walls would join up. We consider this a truly rare example where luck was actually on our side for this DIY van conversion!


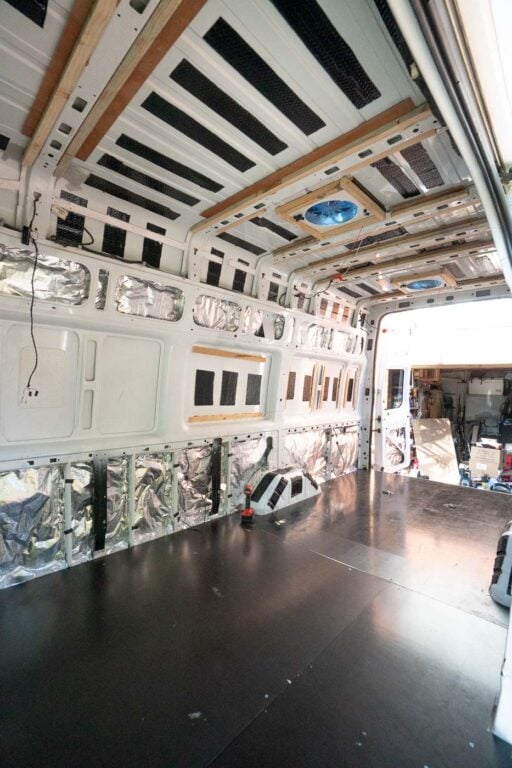
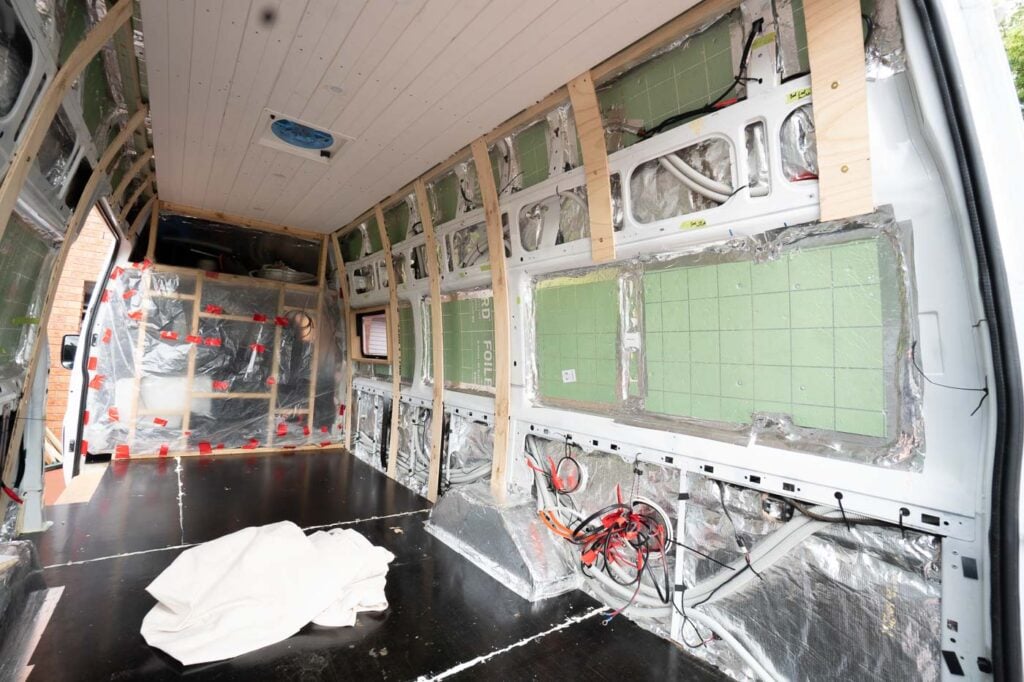
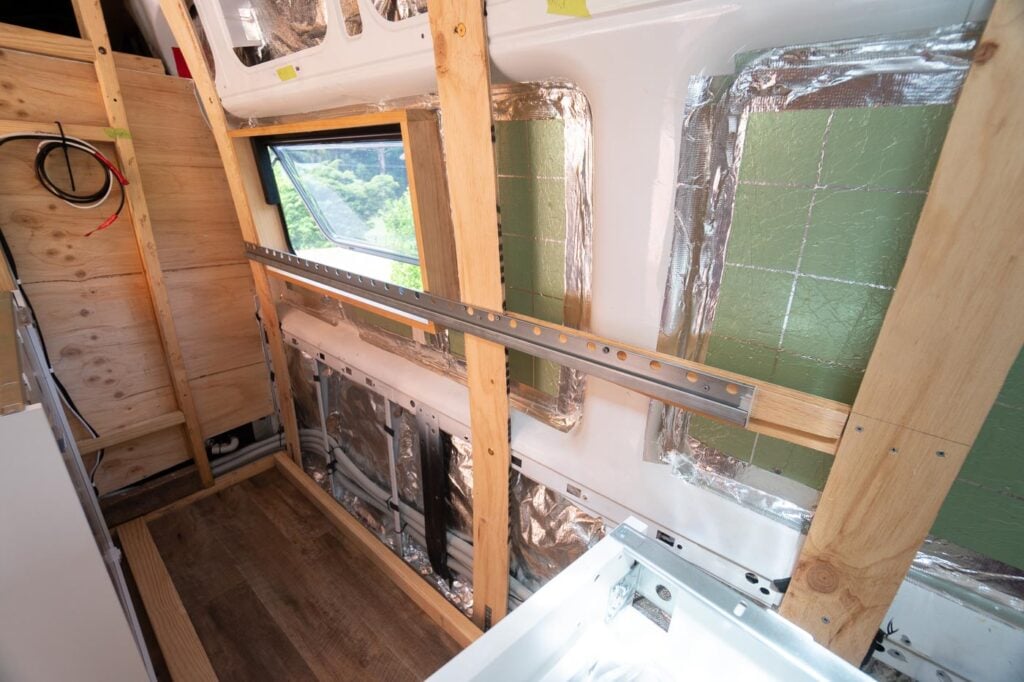
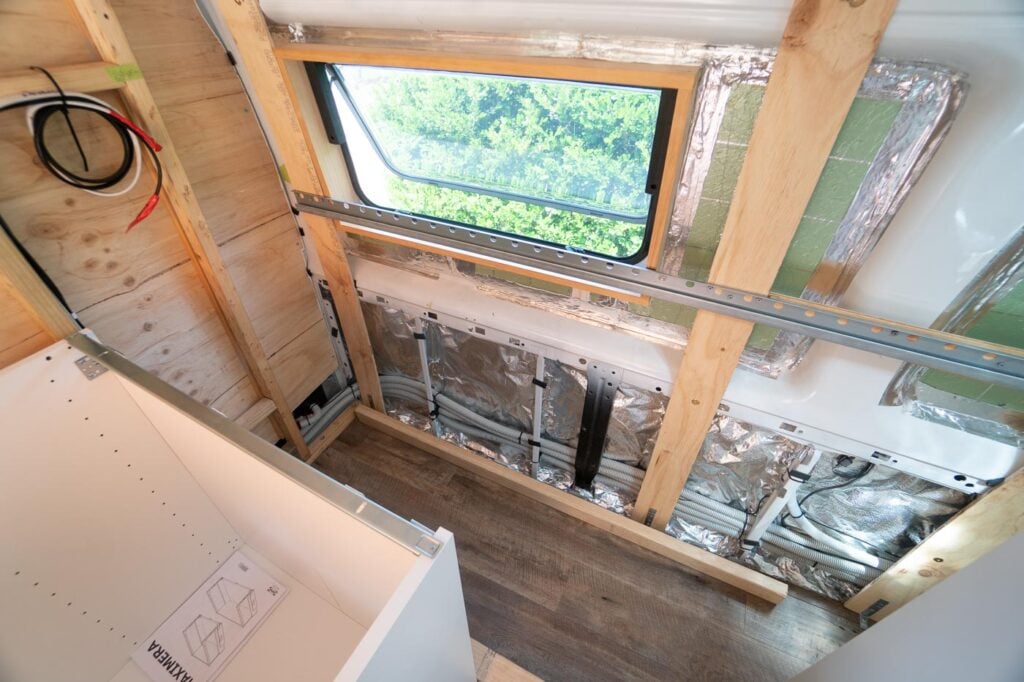
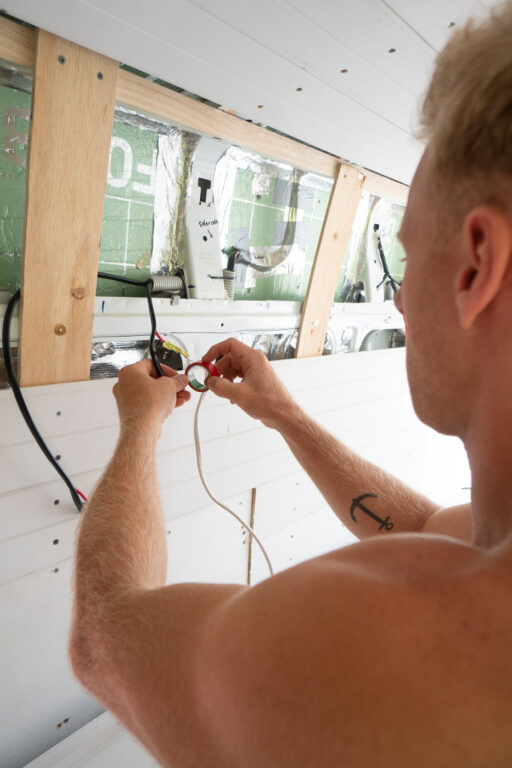
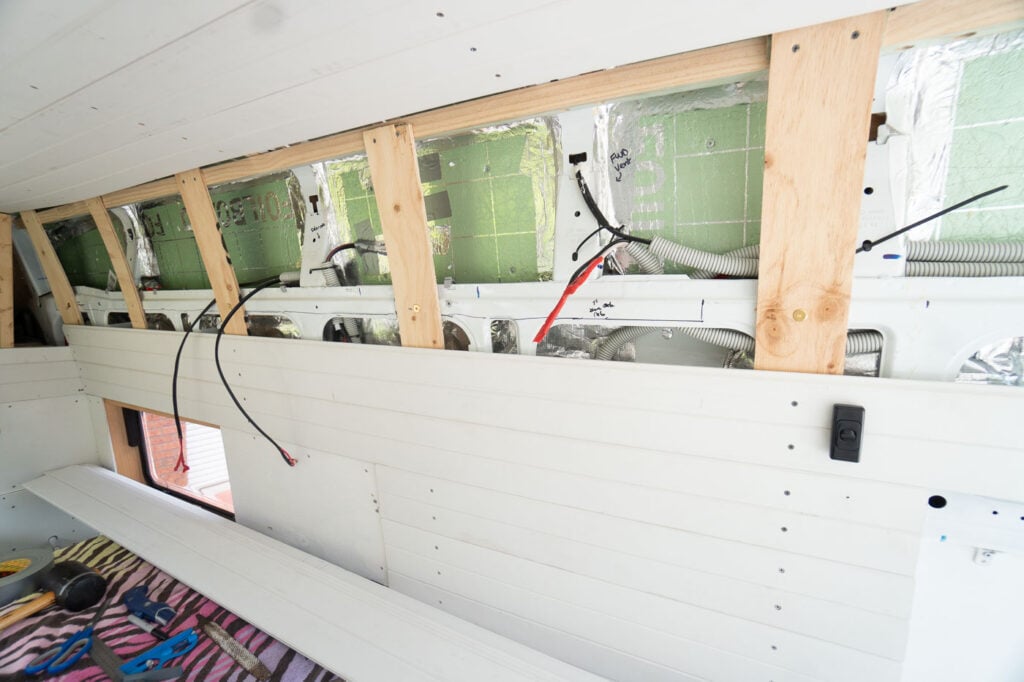
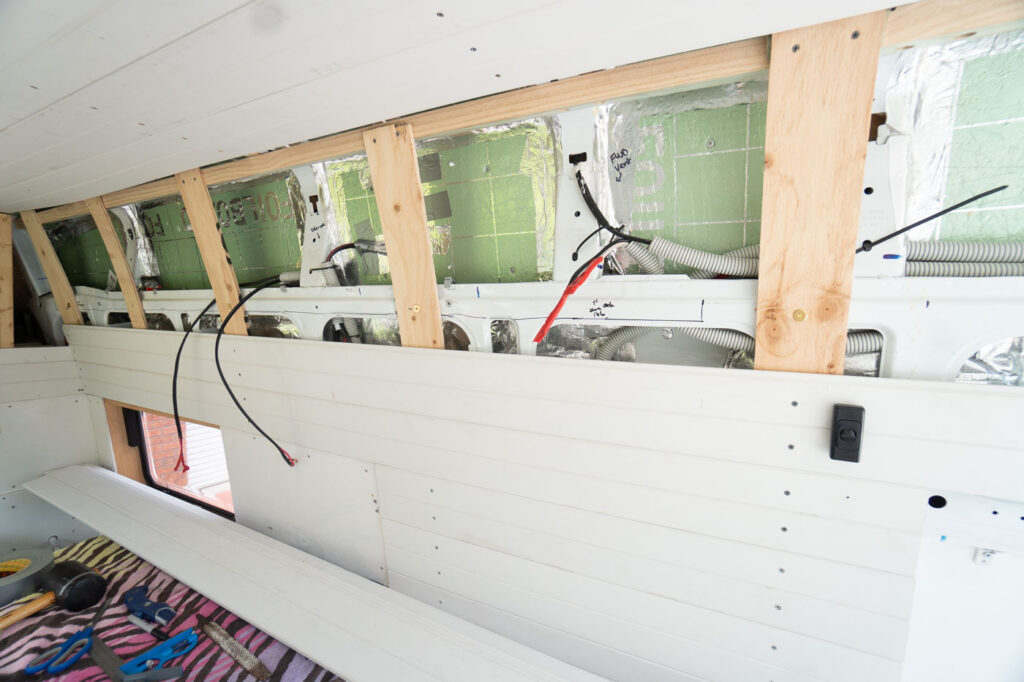
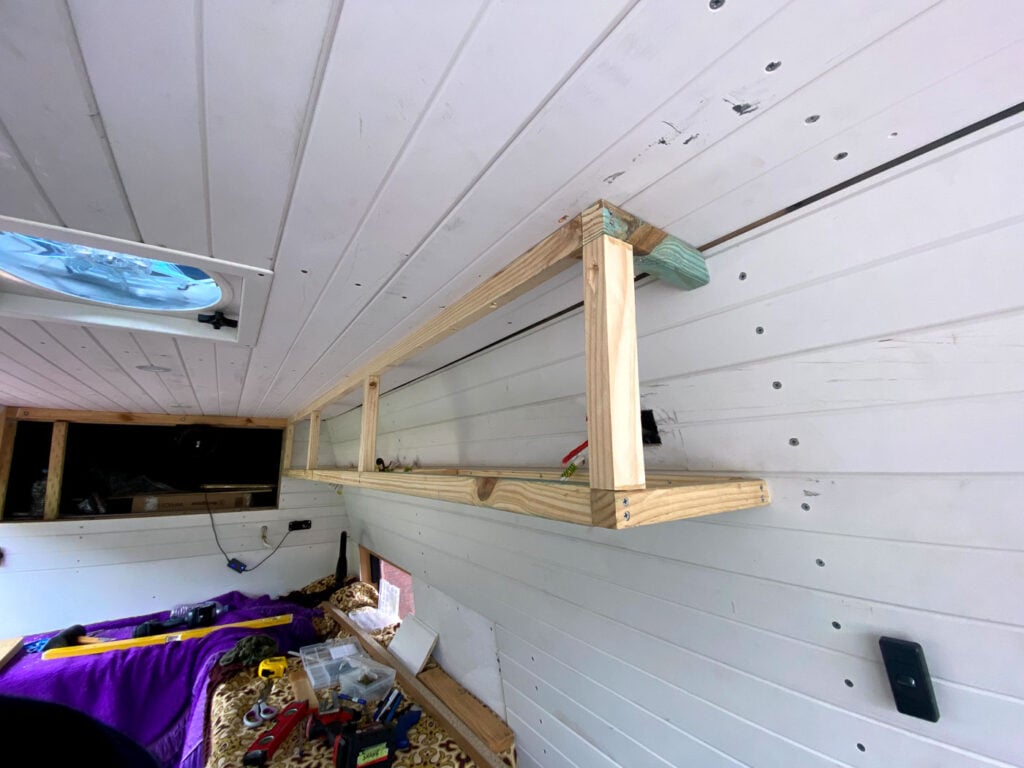
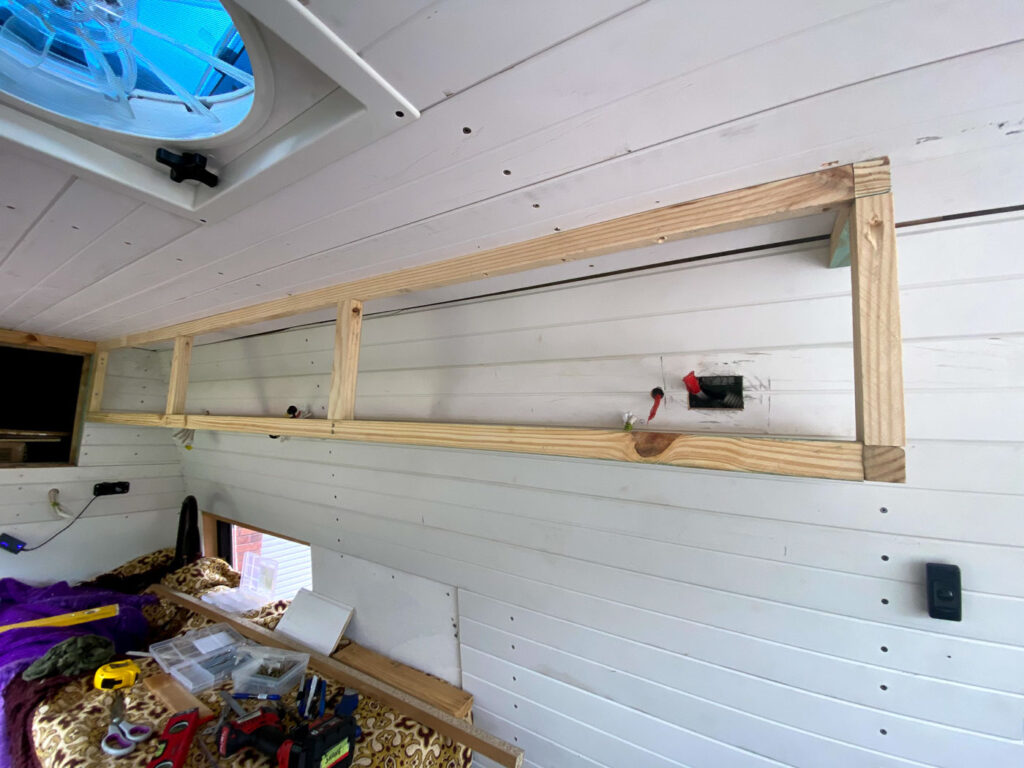
9. Framing & Furring Strips
The next step in the process was to attach furring strips and framing that would serve as the skeleton to our build. In this section, I've included some technical jargon from the building industry to help explain each component more clearly. If you are unfamiliar with any of these, below is a diagram that will clarify it for you.
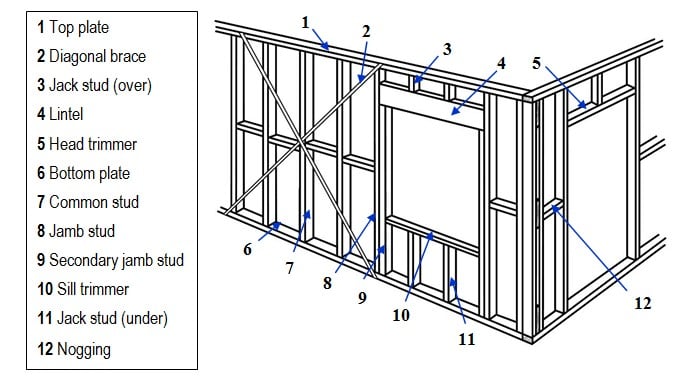

"Centres" refers to the distance between the centre of each "stud "or vertical frame lengths.
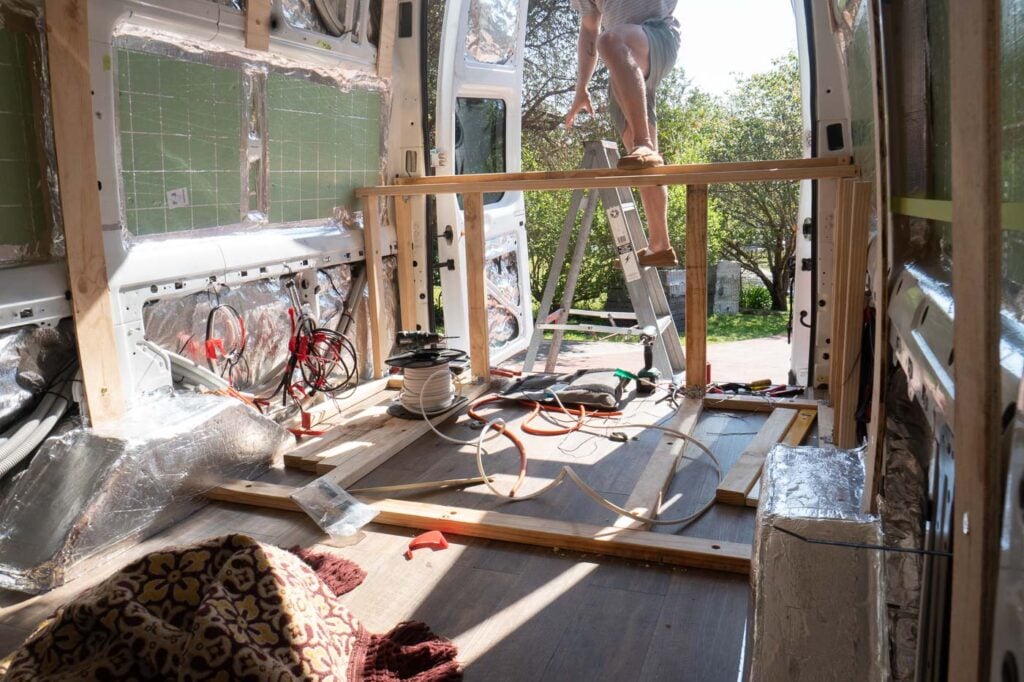
Driver's Area Bulkhead
As you might have noticed from the photos, we'd already built a bulkhead between the driver's area and the van. However, I'll include it in this section of our step-by-step DIY van conversion to make it easier to follow.
For this, we used 40MM x 40MM light treated pine to create a frame in the same fashion you would in a house. This involved a bottom plate bolted into the van floor and a top plate screwed into the timber battens on the roof.
Also, we fixed four studs at roughly 450MM centres with noggings strategically placed at heights for convenient cabinetry fixing points. We only ran the outer "king studs" to the roof, and the others to a sill trimming which would help us frame the cabinet.
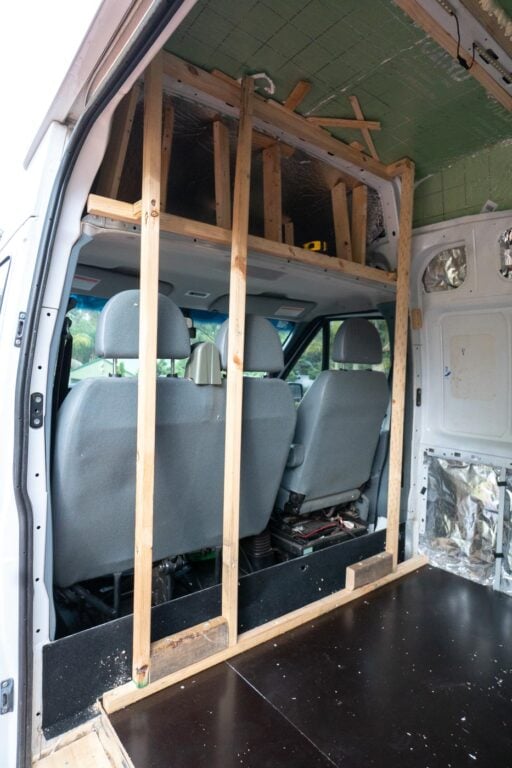

Obviously, this frame solution doesn't need to provide downward support of the roof like a house would. However, it still allowed us to form a lightweight, sturdy frame that's perfect for a bulkhead wall.
Unfortunately, on our transit, the seats are positioned so that the driver's seat can slide back into the van cargo area a little. This meant that we had to offset the wall further into the cargo area to allow room for the seats.
It took a bit of bracing off the van metal cabinet frame to achieve as you can see from the photos. It was a little annoying, but it worked out in our favour because we were able to create a unique shelf in front of the cabinet which we love.


We ended up mounting the 9MM plywood bulkhead wall on the driver's side a little later on in the build. However, the image above shows how it looks from the inside.
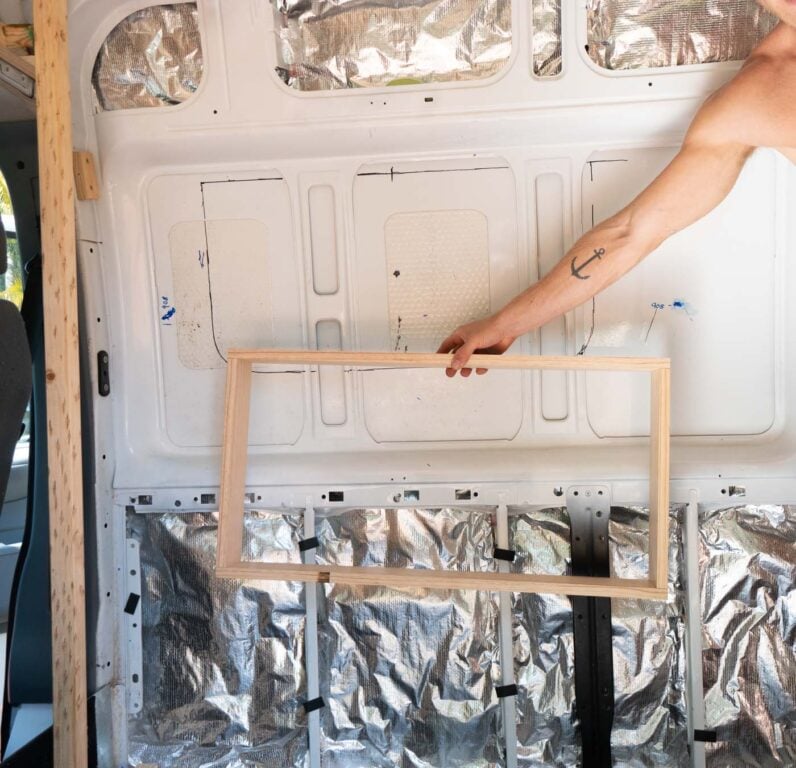
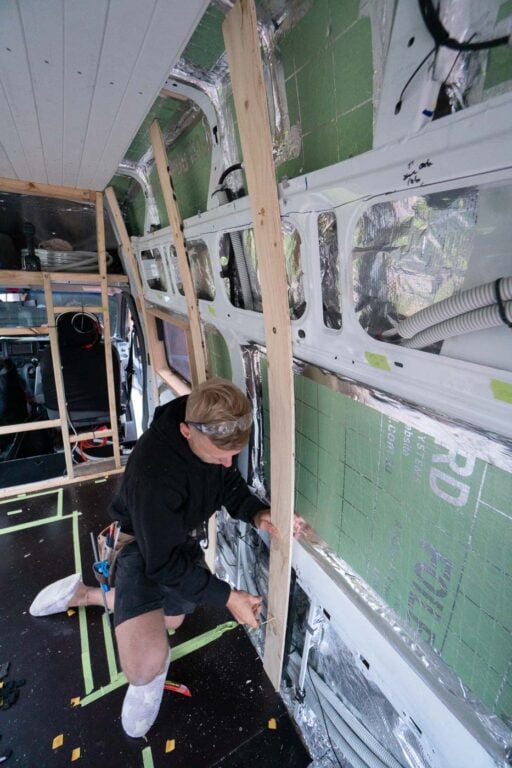
Furring Strips
To create a skeleton for the wall sheeting and cabinetry to be fixed to, we bolted furring strips on both side walls and above the sliding door.
For this, we used lightweight, 9MM plywood cut into 200MM wide strips. We ran these strips vertically from the floor to the roof and positioned them approximately 500MM apart. To fix them, we installed rivnuts into the van metal framing in order to create a very strong fixing to the van. Bolts are much stronger than screws. And, as these strips serve a structural purpose, we didn't want to sacrifice strength or durability.
BUY A RIVNUT KIT: RIVET NUT (NUT CERT) HEAVY DUTY KIT

We painted all holes before installing the rivnuts. We also used self-adhseive foam strips wherever any timber came into contact with metal to prevent any squeaking while driving.
Where the furring strips meet the roof, we bolted a custom-cut pine beam (running lengthways) to the roof ribs at the point where the wall sheets would meet the roof sheets. We had to cut one edge beam down at a 10-degree angle to make sure that we had a flush join.
Where the strips meet the floor, we simply used a bracket to secure it to the subfloor as there wasn't any steel to fix to in sections. We also joined the strips in some sections with more 9MM ply strips to create more rigidity.


Our furring strips worked perfectly as the 9MM plywood is malleable enough to bend and conform to the van's natural curves while still being incredibly strong. Also, setting the beam at the corner of the roof and the walls meant that we had a solid fixing point for the furring strips at the top.
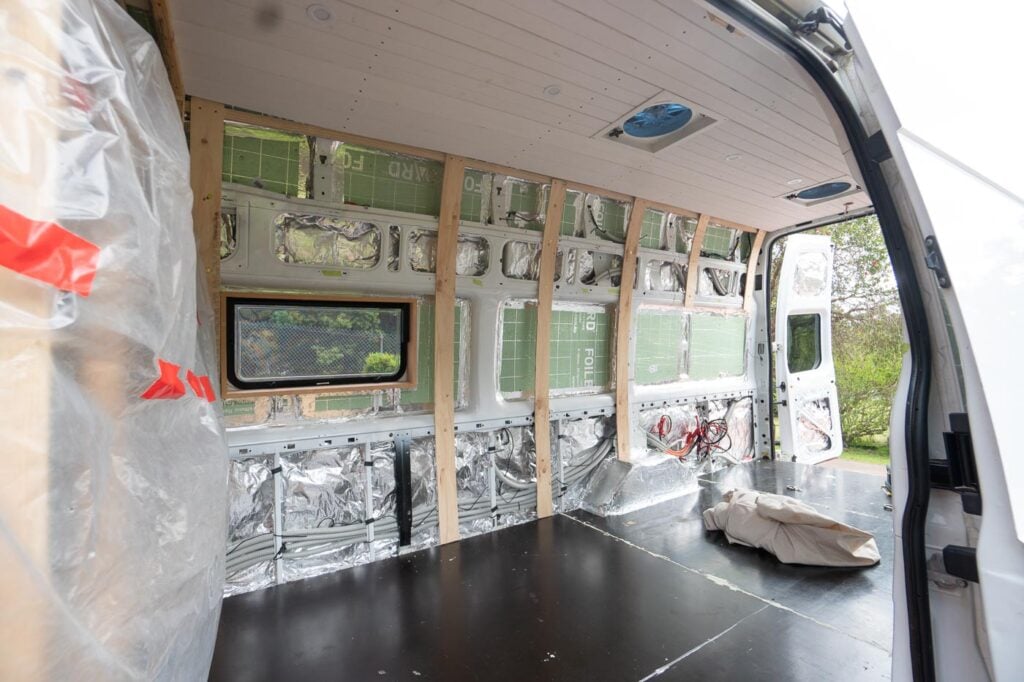

10. Vinyl Plank Flooring
The goal for the flooring was to achieve a real, "wooden" look without adding too much weight or sacrificing head height. So, after a bit of research, we decided to cover the entire subfloor with vinyl plank flooring from Bunnings. In our opinion, the planks give a much more realistic look than vinyl sheeting. Also, they're still waterproof and safe to use in wet areas.
Before installing the vinyl planks, we sanded down the subfloor and cleaned it thoroughly with isopropyl alcohol. We then began laying the planks in a brickwork pattern, starting in the middle. This Bunnings video is a great tutorial if you've never done a job like this before.
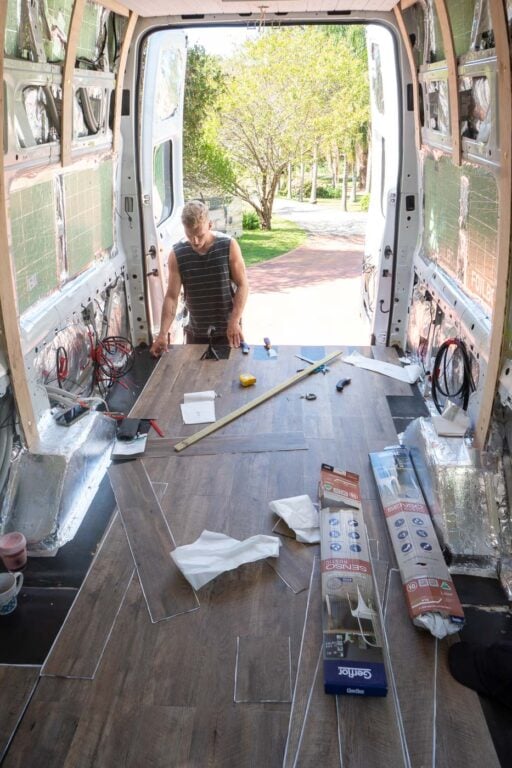

The planks were really easy to install since they have a self-adhesive backing. However, there was a bit of Stanley-blade trimming to do around the edges.
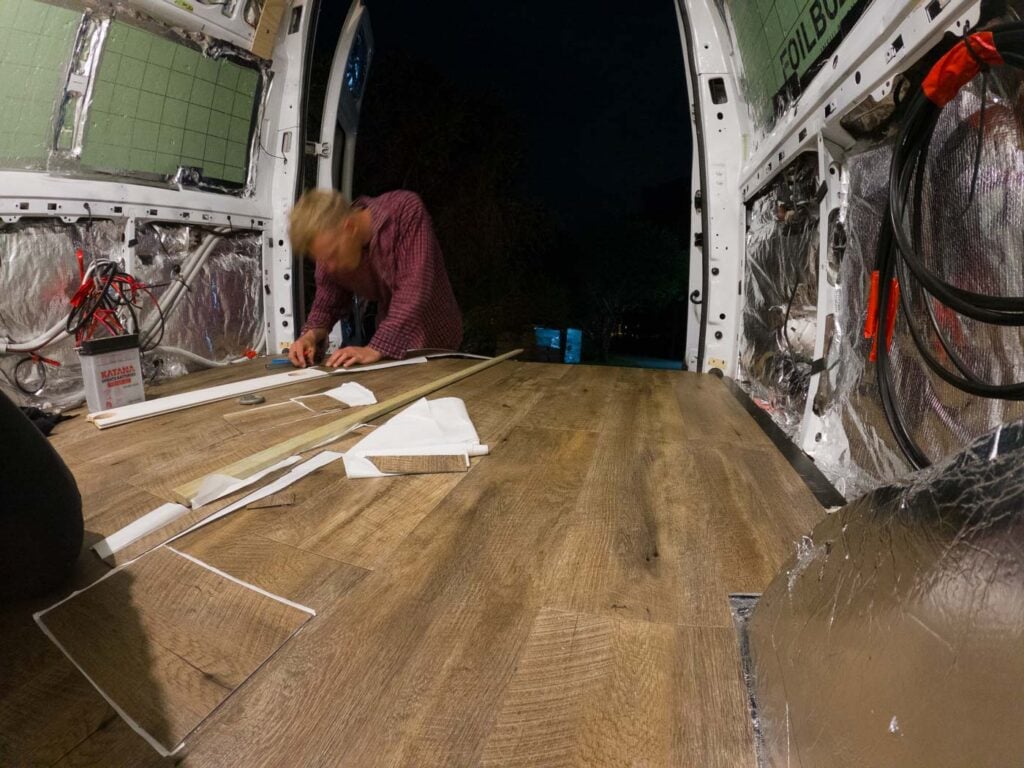

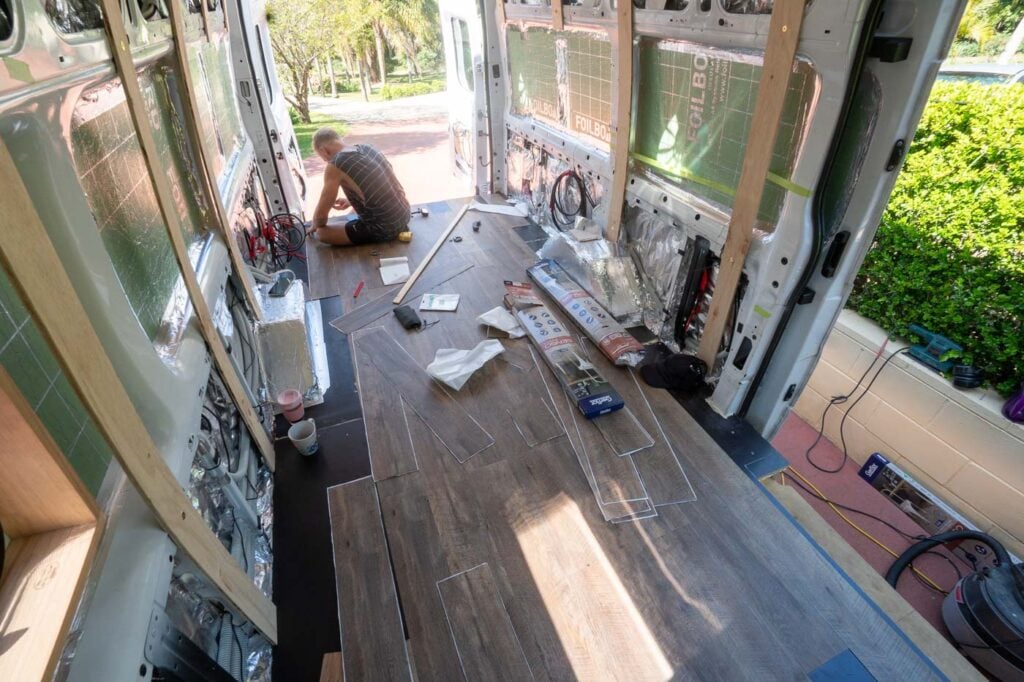

To finish and completely waterproof the flooring on our van build, we resealed the entire edge with clear silicone.
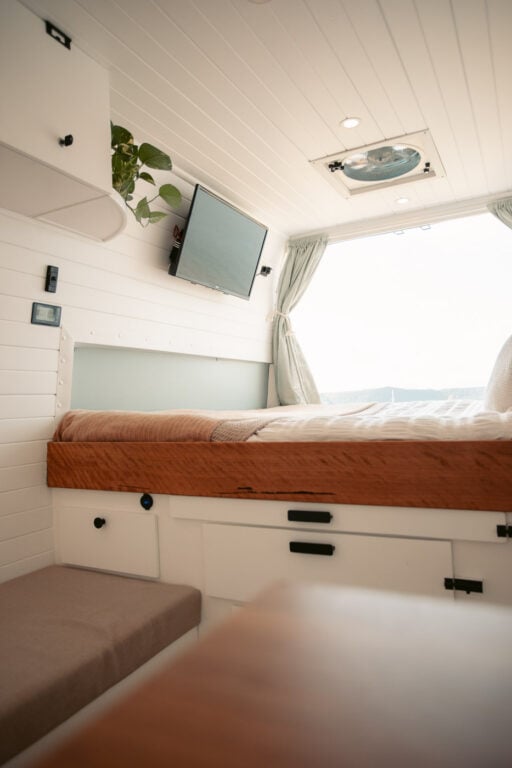
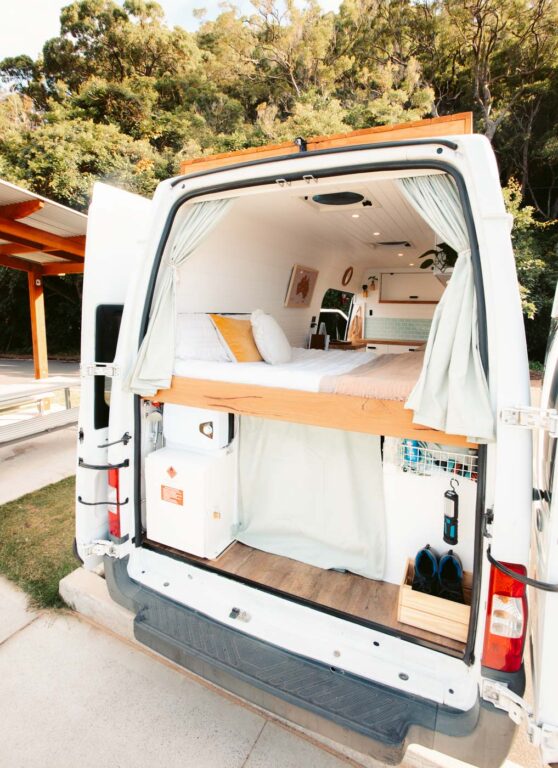
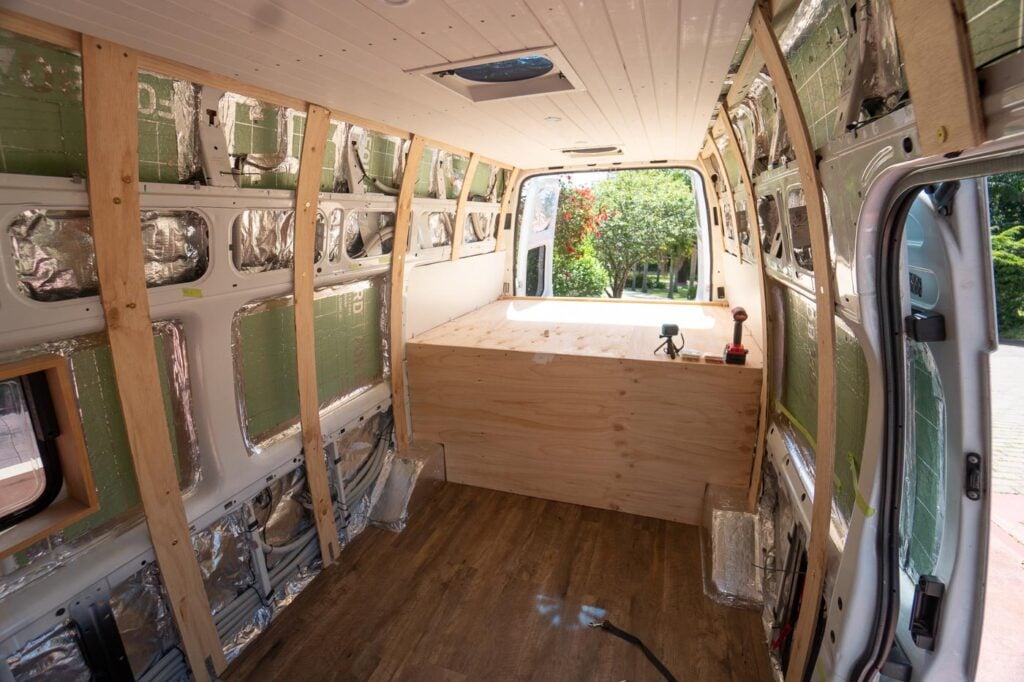
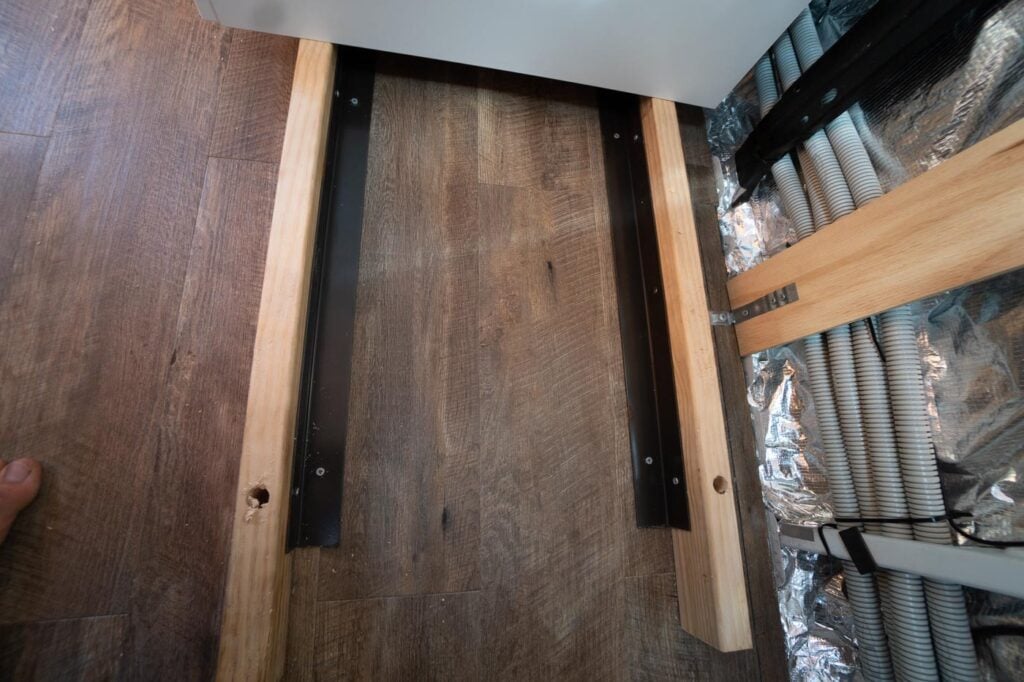
11. Fixed Platform Bed
We wanted to pursue van living to spend more time adventuring, not pulling apart beds and re-sheeting every day. So, learning from our experience living out of a van in New Zealand, we definitely knew we wanted a permanent, fixed bed.
Our fixed platform bed design serves two purposes. Firstly, of course, it's a solid platform for a bed. Secondly, it serves as the framing for our "garage" cabinets, pull-out table and toilet slider.
We spent loads of time planning this stage as we knew whatever measurements we chose would need to work with our table height and cabinets. In the end, we chose to set the bed height at 800MM to allow room for a sliding table at the standard 720MM height.
Framing Up the Platform Bed
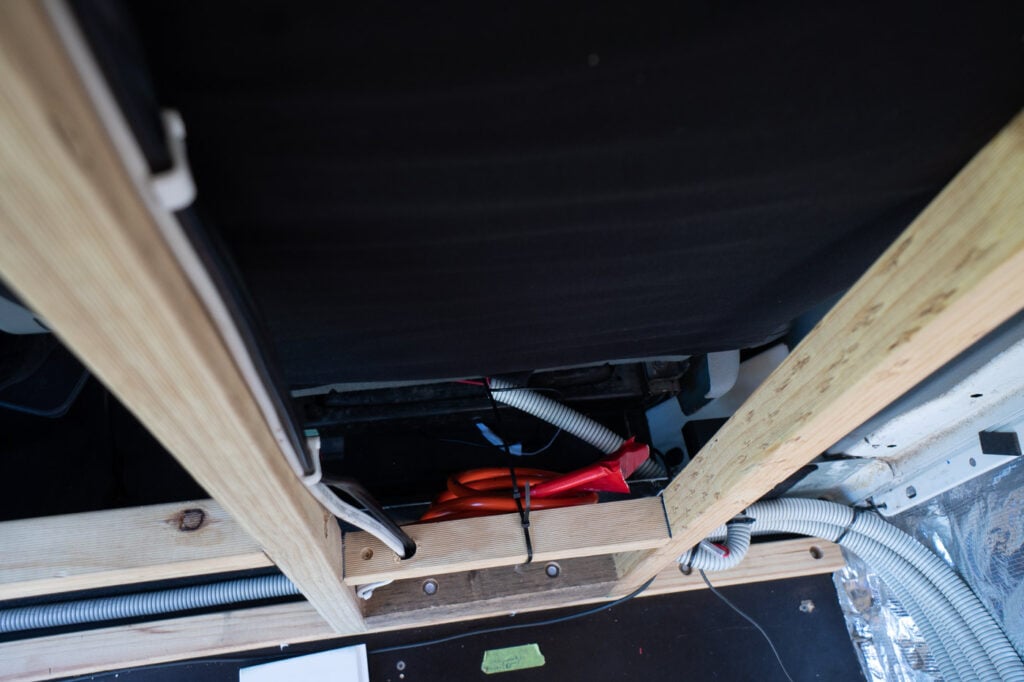
We built a sturdy frame by using 70MM x 35MM treated pine framing. Again, we attached the vertical side supports to the van metal using rivnuts. We also bolted bottom plates and supports approximately 400MM from each wall. This would serve as central supports for the bed, as well as a frame for our cabinets.

We also laid the top beams perpendicular to the van and screwed them on top of the supporting frames. Next, we cut 12MM plywood to size using a jigsaw. This was then secured straight into the perpendicular beams.
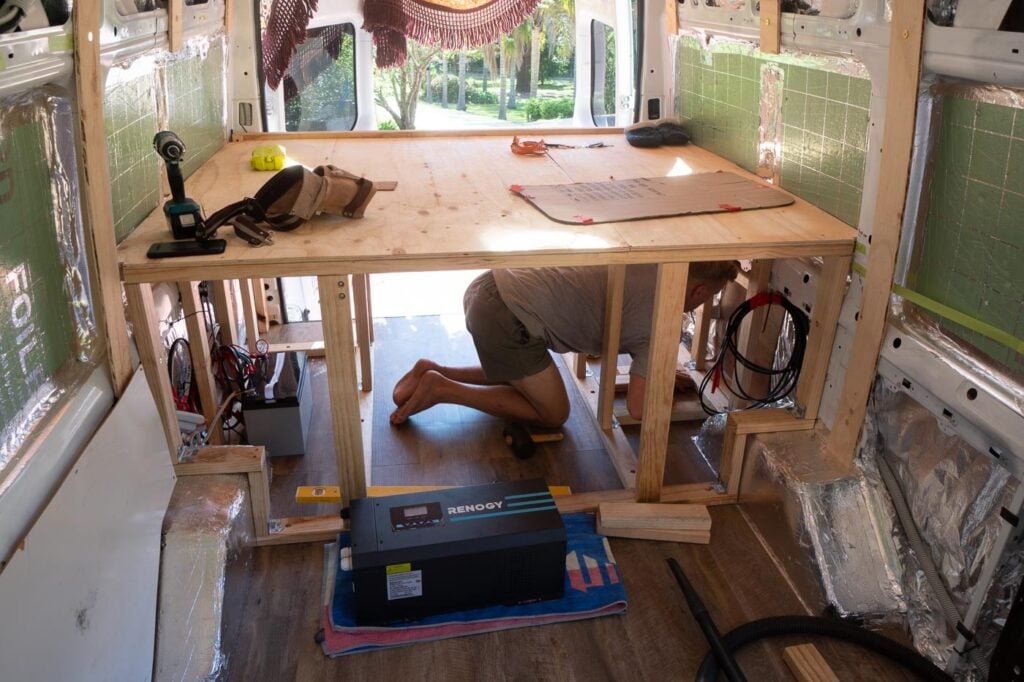


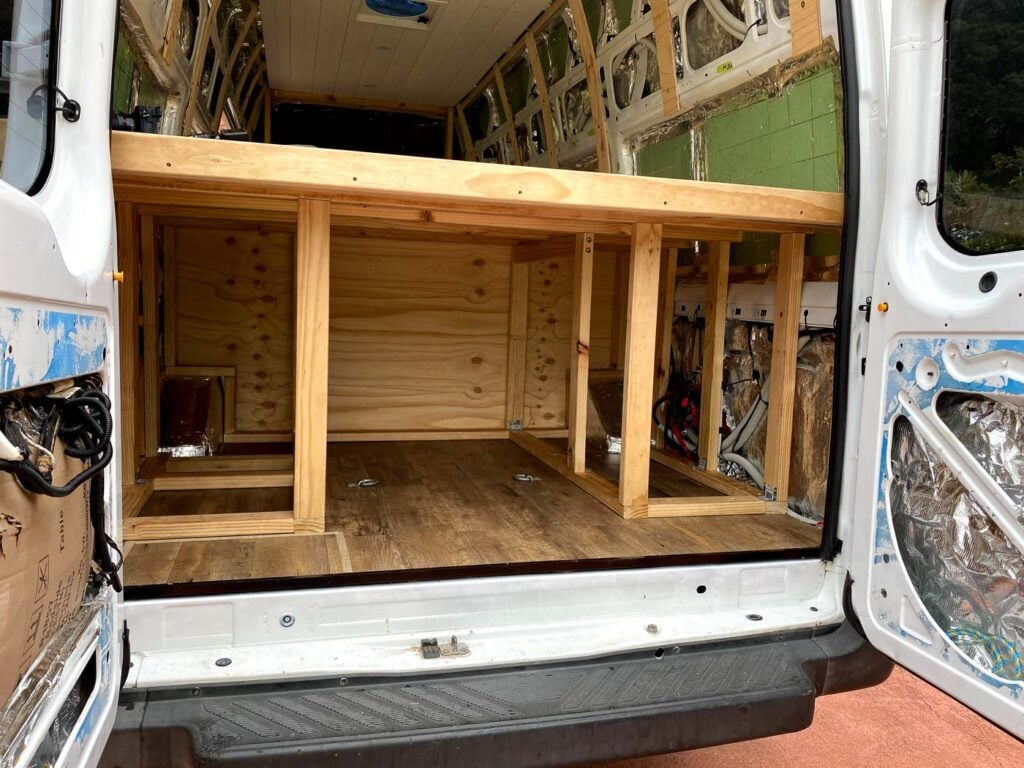

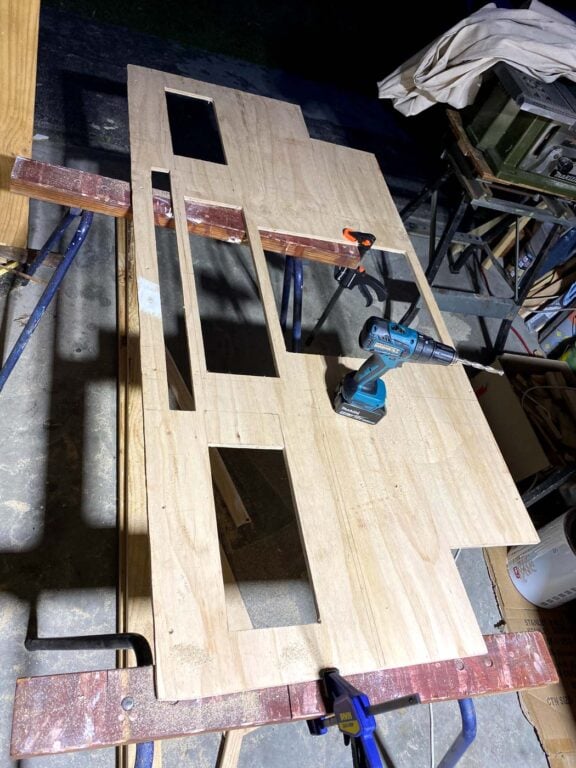
We also cut a plywood piece for the front of the bed. Honestly, this part took the longest as we later needed to plan out and cut holes for drawers, the toilet slider and the table slider.


Luckily for us, our van is quite wide at 1900MM at the widest point in the back. To maximise space, we took advantage of the van's metal frame shape to build a niche around the section of the bed.
Our platform bed is incredibly sturdy. We used liquid nails as well as screws for most of the joints which means it doesn't move or creak. As with everything in the van, all timber including the already treated pine is painted to ensure it holds up longer than the van itself.
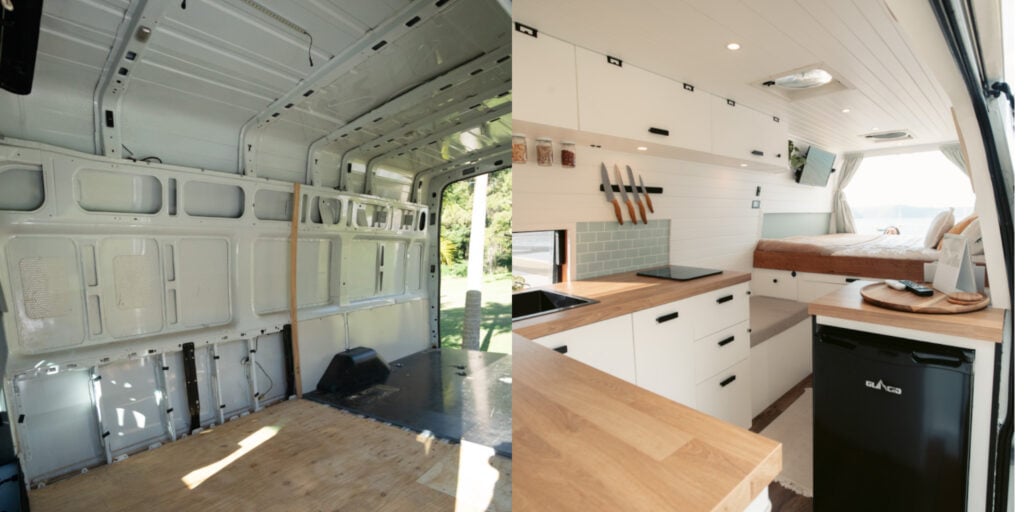
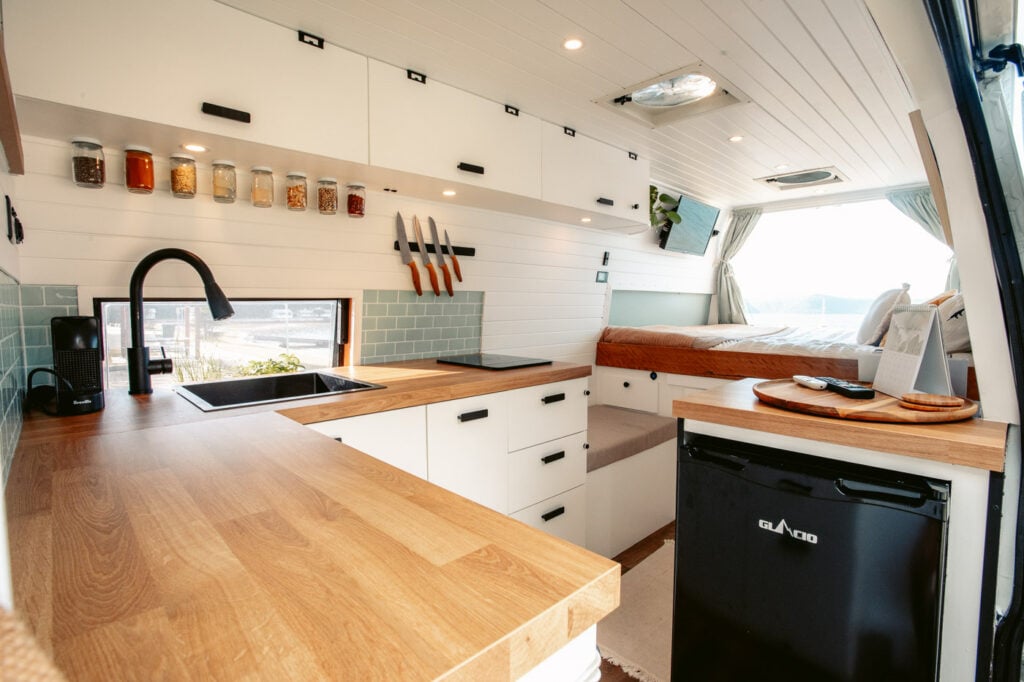
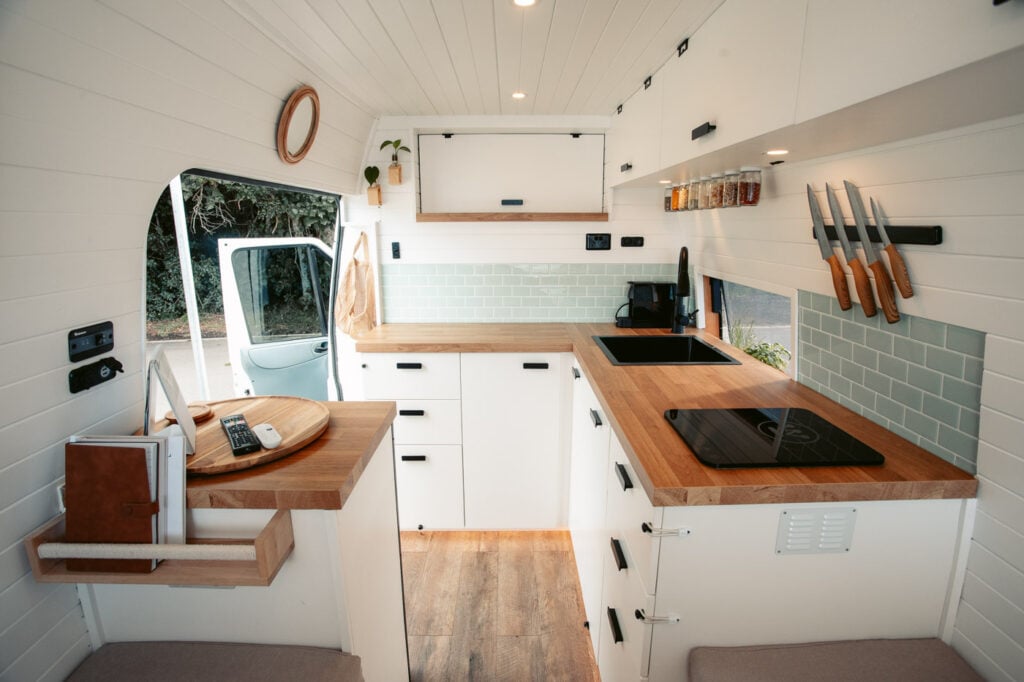
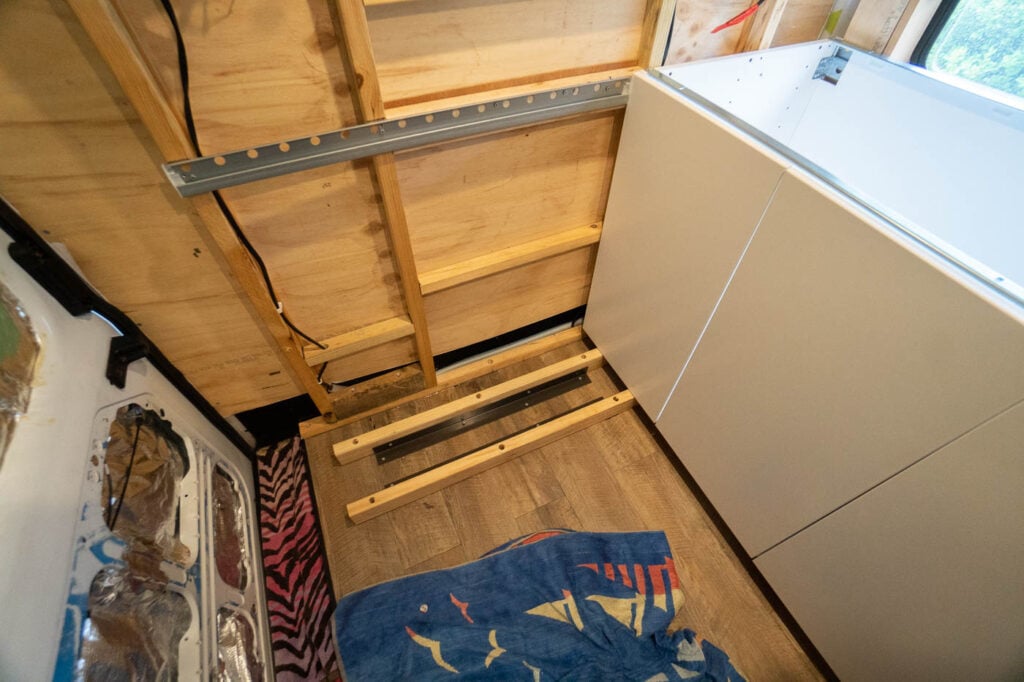
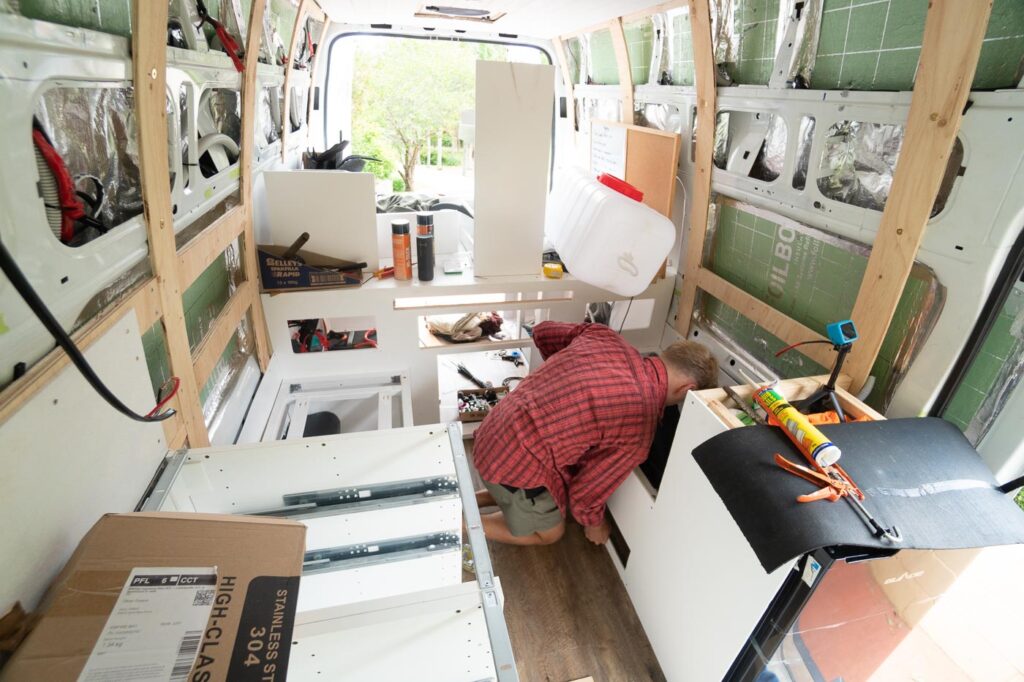
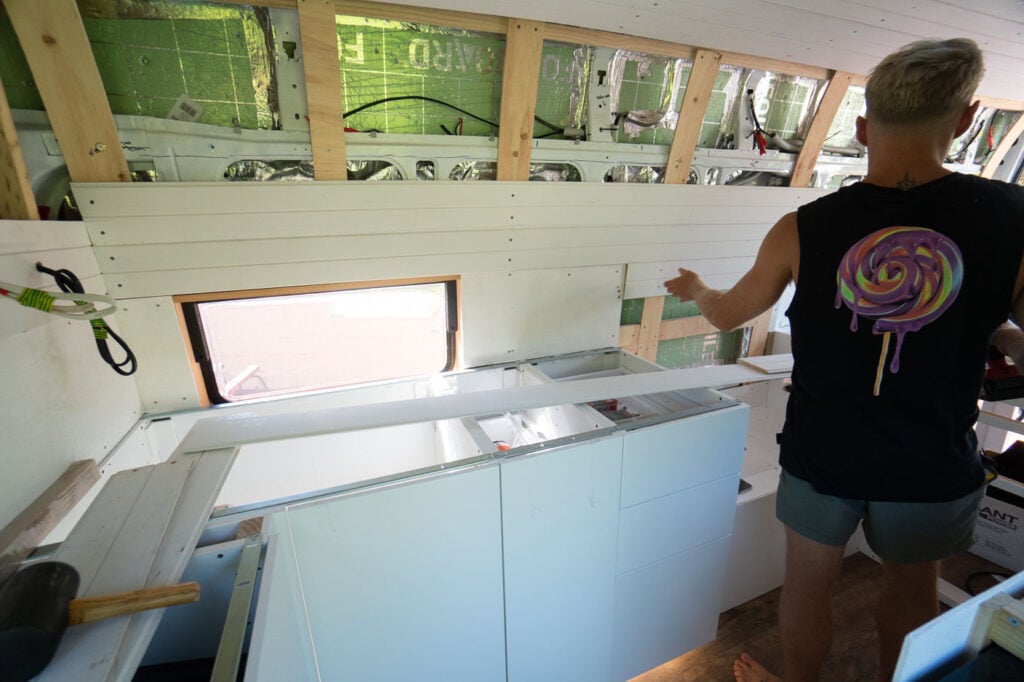
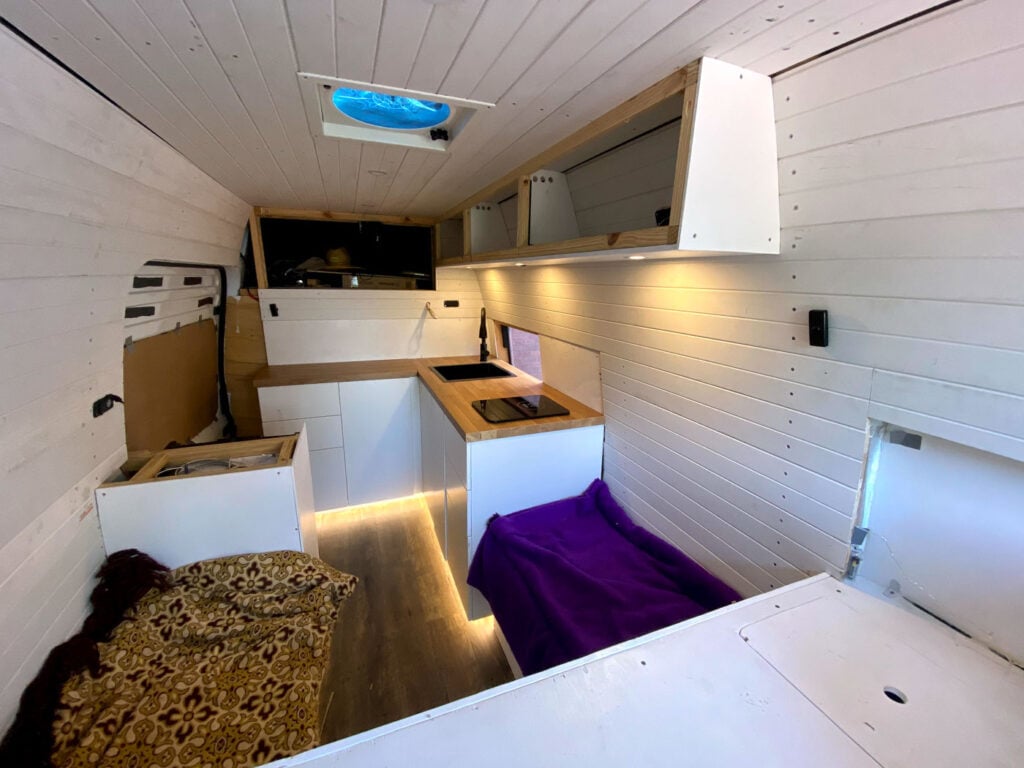
12. Galley Cabinets
This section is most likely going to be different from most other guides or articles you read about DIY van conversions in Australia. For our galley (kitchen) cabinetry, we used IKEA METOD cabinets!
Purchasing flat pack cabinets saved us months of labour. It also left us with clean, professional cabinets that would have been impossible to build from scratch at the same standard.
Some DIYers might cringe at the thought but honestly, we'd double down on our decision any day of the week. In the end, after purchasing timber, paint, screws, fixings, slides, brackets, catches, latches and all the little extras, purchasing a flat pack kitchen for our van would have probably cost roughly the same.
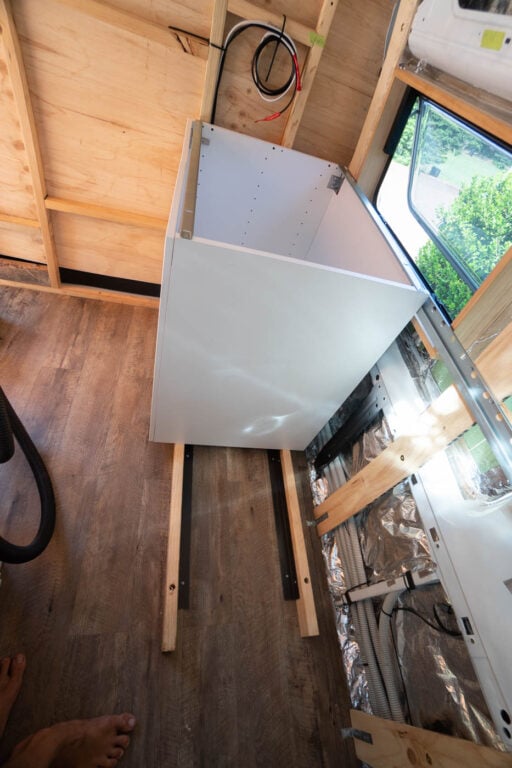

We worked with an IKEA kitchen expert to design our cabinets to fit our build perfectly. They then supplied the entire system pre-packaged with all hardware components including draw slides, faces, mounting brackets, handles and well, pretty much all we needed.
Fixing our flat-pack cabinets
Once assembled, we securely bracketed two lengths of 70MM x 35MM treated pine framing to the floor which would raise the height of the cabinets and act as our feet. This also served the dual purpose of creating a kickspace since we offsetted these feet about 90MM back from the front of the drawer face.
Next, we rested the cabinets on the feet and used the supplied wall-mounting bracket to secure the back to the furring strips. Then, to secure the cabinets to the floor, we screwed the bottom of the cabinets directly into feet.


While I can recommend IKEA cabinets for your DIY van build, there are a couple of things that are worth noting. Firstly, they can be heavier than just building plywood cabinets. However, you get the total weight of your order on the picking slip which helps to plan it into your payload weights. In the end, it didn't make that much of a difference for us as we fit comfortably within our upgraded limits.

Secondly, I would recommend painting any exposed MDF edges to protect them from long-term swelling
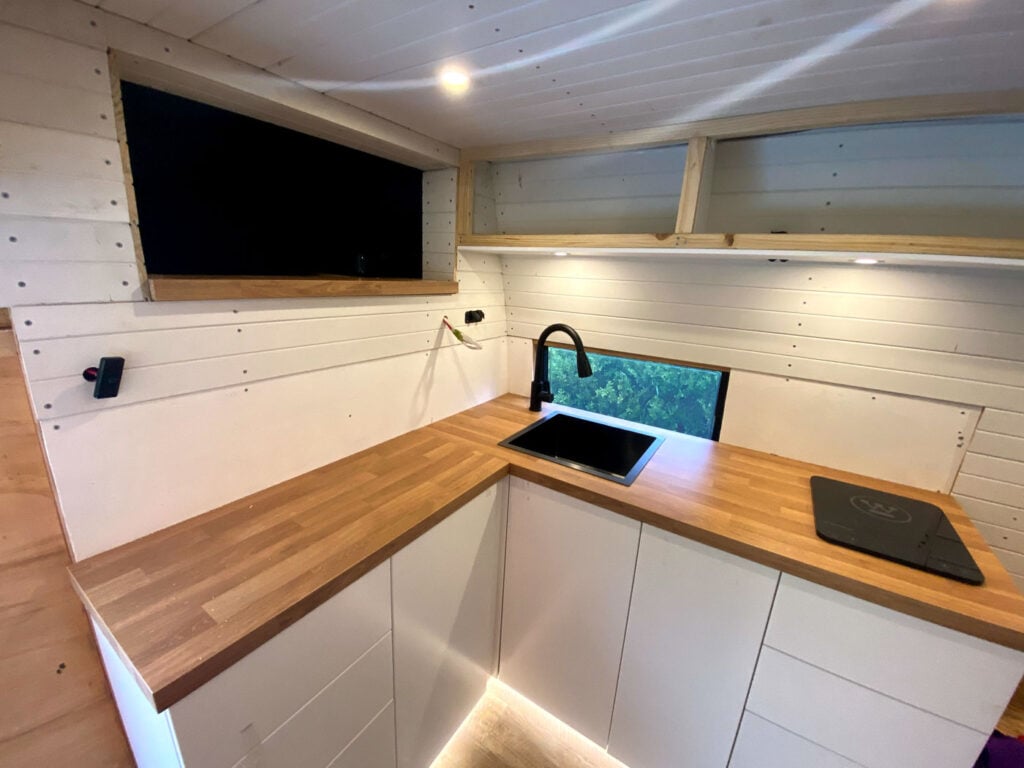
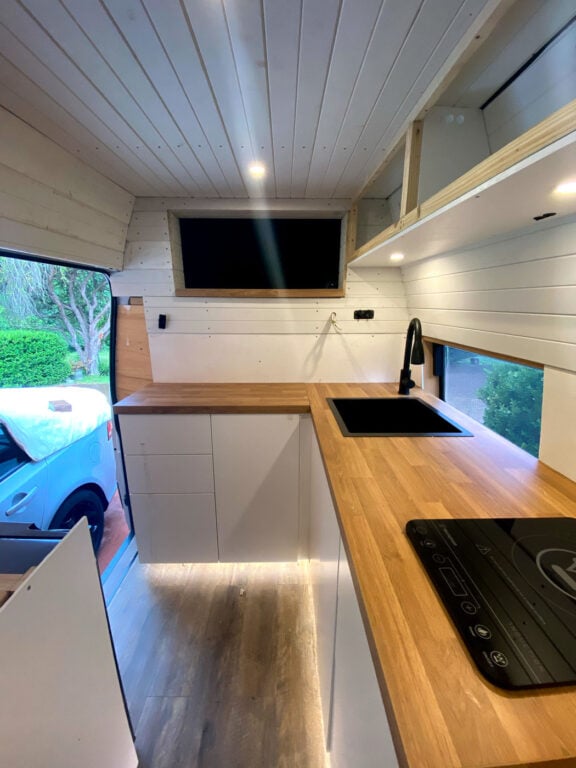
Installing IKEA laminate benchtop
In reality, we mounted the benchtops a little further down the line. This was so that we could still access the cabinets to pull our induction cooktop cable and plumbing hoses. However, I've again gone a little out of order to make this article easier to navigate.
We finished the galley cabinets off by installing the benchtop. This was as simple as cutting it to size and using the supplied brackets to fix it to the cabinets. To finish, we used wet-area silicone to seal every edge and waterproof our galley kitchen.
Prior to installation, we also installed the sink, tap and induction cooktop by cutting out carefully measured holes with a jigsaw. These were then also sealed with wet-area clear silicone.
The induction cooktop was a little tricky since it wasn't designed to be mounted on a benchtop. However, we managed to do this cleanly but adding a supporting bracket underneath since the lip was a little skinny.
OUR COOKTOP: Westinghouse Induction Cooktop
OUR SINK & TAP: Cefito Stainless Sink | Cefito Black Tap

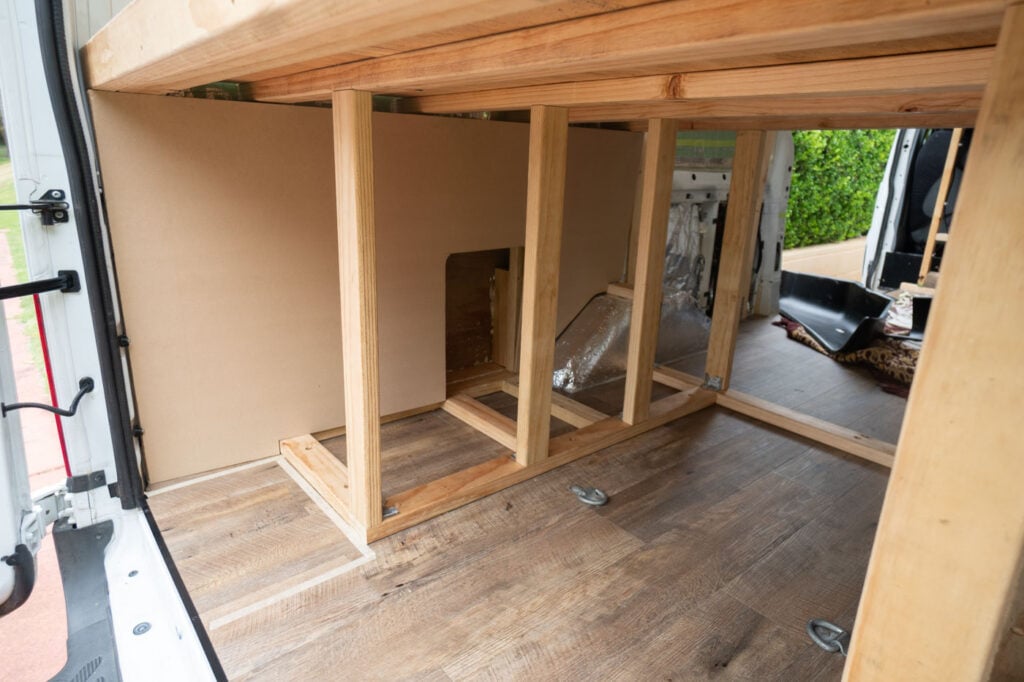
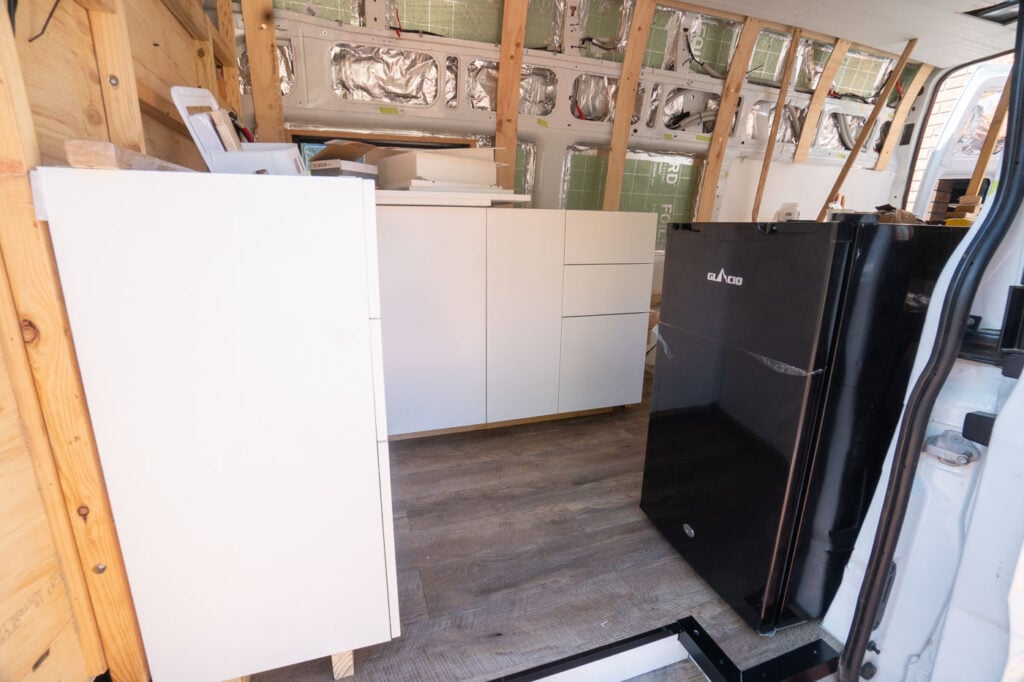
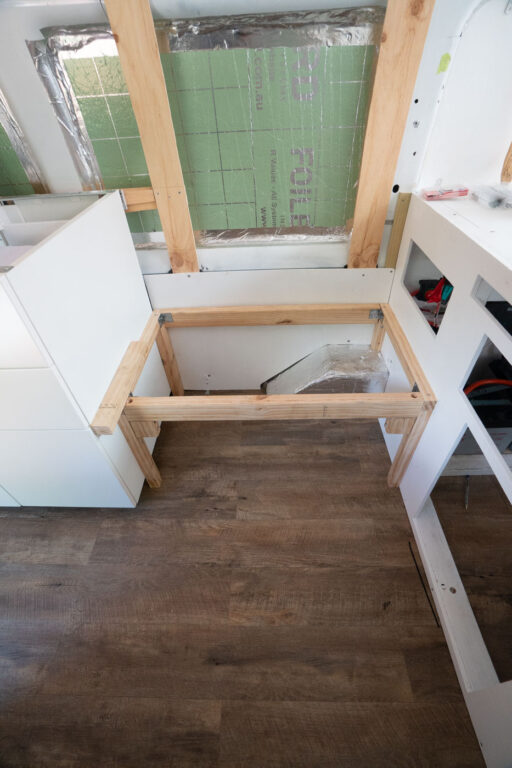
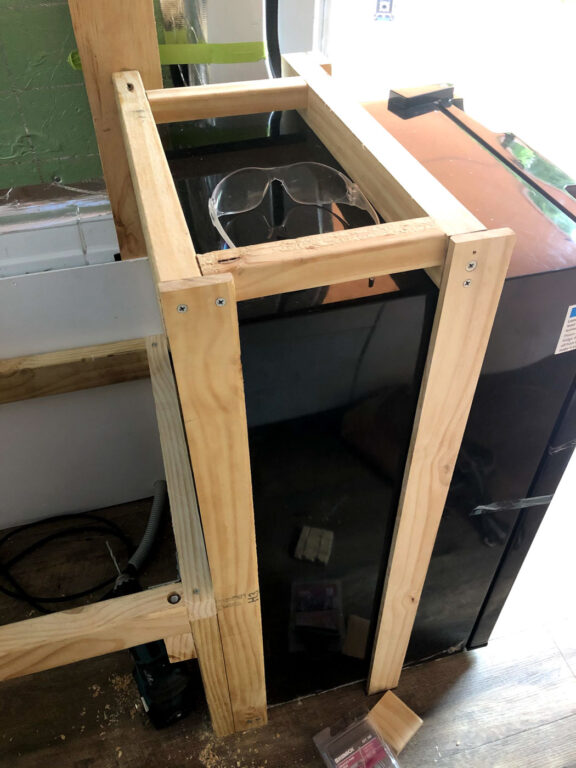
13. Bench Seats, Built in Upright Fridge
After installing our beautiful new kitchen, it was time to build the bench seats adjacent to the bed, using a similar framing system to the bed. However, we cut the pine down to 35MM x 35MM to save space. This frame was fixed to the floor, furring strips, IKEA cabinets and bed frame. Finally, it was sheeted with 9MM plywood on the face and 12MM plywood on the top.

Inspired by my boat-building experience, each large part of our entire internal build is securely fixed to another. This means that all components act as a support for something else, creating s a unified, rigid design that easily withstands movement.
Mounting our freshwater tank
To offset the weight of the batteries and cabinets on the driver's side of the van, we mounted our 70L internal freshwater tank underneath the passenger side bench.
We were lucky enough to find a tank that fitted our space perfectly! To secure it, we built a lightweight but very strong pine frame around it and wrapped it with rubber matting to protect it.
We also installed an electric tank gauge at this stage and ran the cable to the electrical cabinet in the garage.


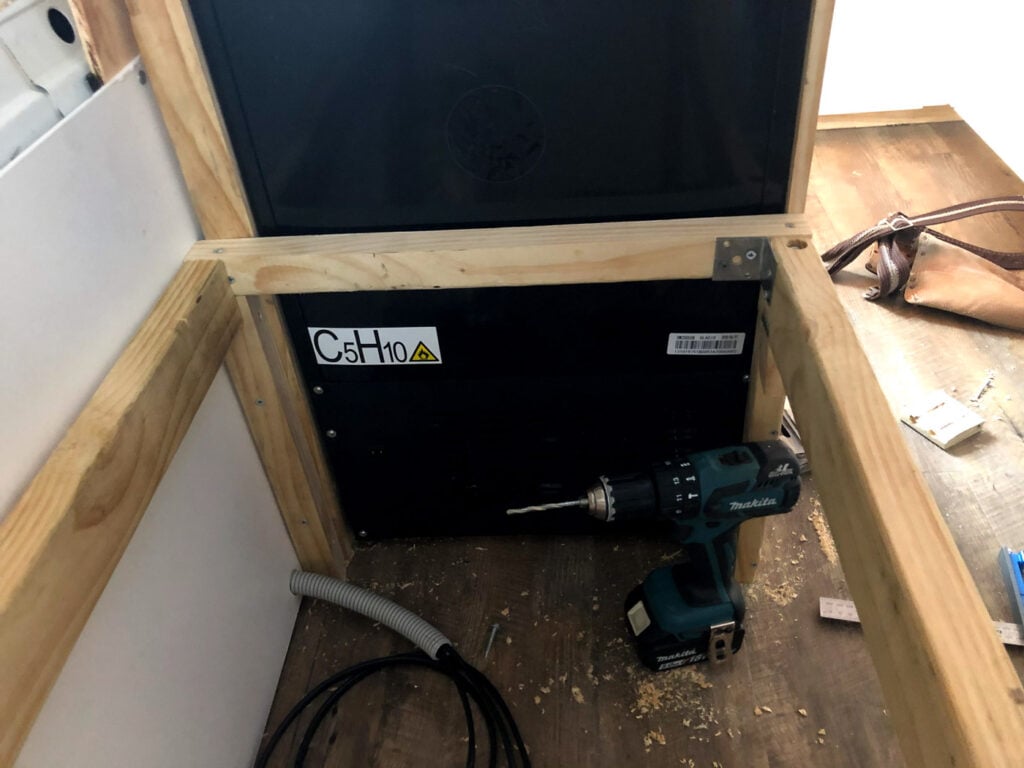
Installing a 12V standing fridge in Our Van
Also, beside the bench seat on the passenger side, we put our 95L Glacio upright fridge/freezer. This was a little tricky to secure but we ended up using brackets to secure it to the floor and built a very tight frame around it.
This frame was also secured to the furring strips and bench seat frames to create a rigid unistructure. We made sure to leave enough room for the compressor to vent into the beach seat cupboard. We also later installed a grille vent on the outside of the bench seat to improve the fridge ventilation even more.
OUR 12V FRIDGE: Glacio 95L Fridge Freezer


We finished off this frame by sheeting with thin, 7MM ply to save space in the corridor. Also, since we built the frame height to the same height as the kitchen cabinets, we topped it off with an offcut piece from our benchtop to create even more countertop space.
While unconventional, we decided to face the front of the fridge the way you see it in the picture because this way, it's much easier to open and doesn't cramp up the space. Furthermore, it means we can access the fridge from the outside of the van when cooking outside.

14. Connecting The Electrical System Components
Ahh, the long-awaited moment where we could finally see our system come to light. Since we'd already ran all of the wiring and the electrical cabinet in the garage was already built, it was time to hook everything together.
All of our components were to be mounted vertically on the cabinet wall for easy access. So, the first step was drawing up a plan for where the components would be mounted. Once we had our template, we screwed the components to the plywood board and positioned it in the cabinet.

We then ran all of the wires behind the plywood wall and drilled entry holes where each wire would be lugged onto each component. Then, we fixed all of the cables behind the wall while still leaving a little bit of slack in case we needed to pull it out later on.
OUR ELECTRICAL SYSTEM COMPONENTS
CHARGE SYSTEM COMPONENTS
- Solar panels: 2x Renogy 160W Panels connected in parallel with MC4 Y-connectors | protected by 40A ANL fuse
- Charge Controller: Renogy 50A DC-DC & MPPT | charge output & run from engine battery protected by 70A circuit breakers
- Inverter/Charger: Renogy 2000W Inverter Charger | protected by 250A terminal fuse & 16A RCD protection on the AC side
- Mains connection: 15A inlet
BATTERY & MONITORING
- Batteries: 3X Giant 140AH AGM (in parallel)
- Battery Isolation Switches: 275A Heavy-Duty Isolation Switch
- Distribution Blocks: 12V Distribution Blocks
- Battery Monitor: Renogy 500A Battery Monitor & Shunt
- Charge Bluetooth module: Renogy BT-2
LOAD SYSTEM COMPONENTS
DC:
- 12V Fuse panel: Blue Sea 12V Fuse Panel
- Vent fans: 2X LivPow Roof Vent
- Fridge: Glacio 95L Standing Fridge/Freezer
- Lights: 8X Acegoo (warm) downlights & 1X warm cabinet kickboard LED strip
- Water pump: SeaFlow 12V Water Pump
- Smart TV: Devanti 24" 12V Smart TV
- 12V Outlets: 4X Narva cig-socket + USB oulets & 3X 48W USB C PD outlets
AC:
- Outlets: 3X 10A Clipsal Double Pole GPOs & 1X 10A External GPO
- Appliances:
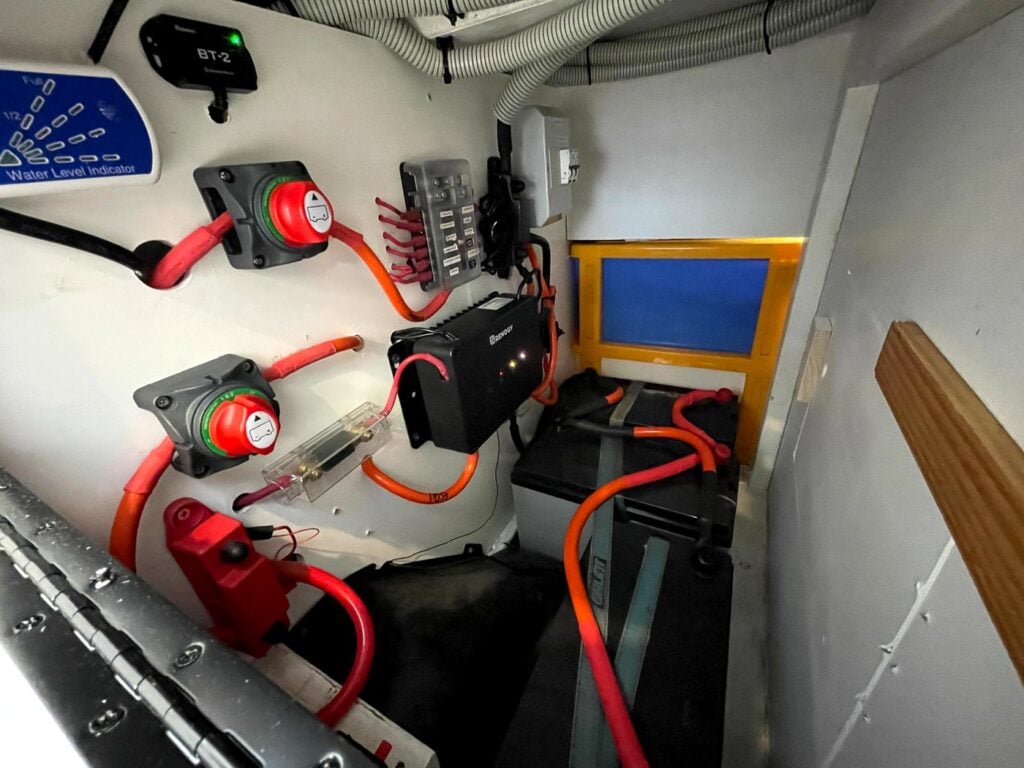

Van Build 12V Electrical System
We wired all of the charging components together as illustrated in the schematic, with the appropriate fuses shown in the form of manual reset circuit breakers. The solar panel output is the only exception to this, where we chose to use a 40A ANL in-line fuse.
Essential tool for this step: Crimping Tool Kit

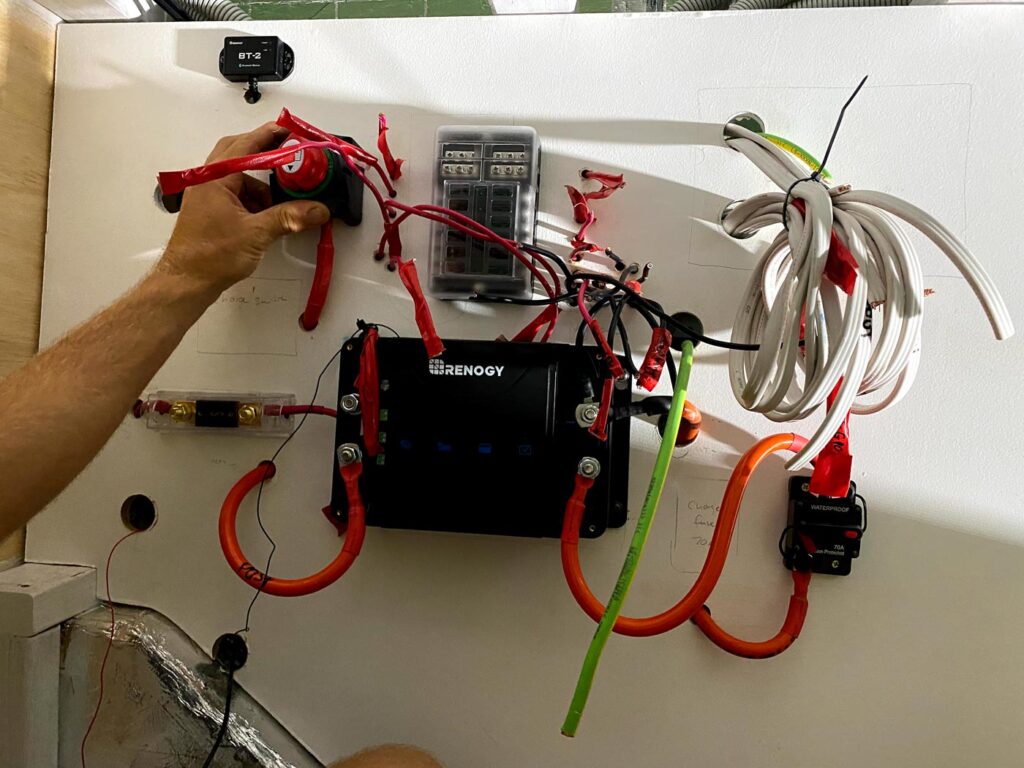


When we connected the batteries, we used 90MM² welding cable, wired in parallel. We also didn’t just have everything hanging off the terminals and instead used a positive and neutral block to connect all of the components.

To summarise, solar output and alternator outputs are wired into the DC-DC/MPPT Charger, which is then connected to the positive and neutral blocks. All 12V load positive wires are wired into a 12V fuse block, which is also connected to the positive block.
We also installed a battery monitor in our system so that we could keep a track of our current draw and charge and to see how much battery power we have remaining at all times. The Renogy monitor includes a 500A shunt, which is easy to wire up on the neutral side of the battery running to the neutral block.
On the neutral side, the entire block is earthed to the chassis and all 12V neutral cables are attached to this. We made sure to choose a solid metal point near the wheel well and sanded off the paint with a wire brush drill attachment tool to get a solid earth.
At this earth point on the chassis, we bolted a thick M10 stainless bolt and lugged a 16MM² earth cable to it. We repeated this process for a separate earth on the 240V side.
We also installed a relatively inexpensive Bluetooth module that Renogy makes. This allows us to monitor the status of our charging on our phone, which has been super handy.

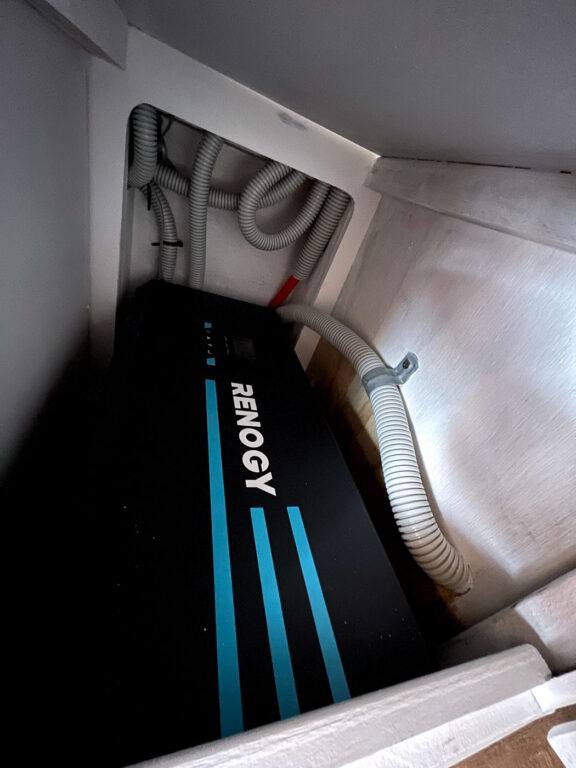
240V Installation in a Van Build
During this phase, we also had the help of a licensed electrician to install our 2000W Renogy inverter charger. This is protected by RCDs for both the input and output of the 240 voltage. All earths in this system are also bolted cleanly to the van’s chassis, separately from the 12V system.

OUR INVERTER/CHARGER: 2000W Renogy Inverter Charger
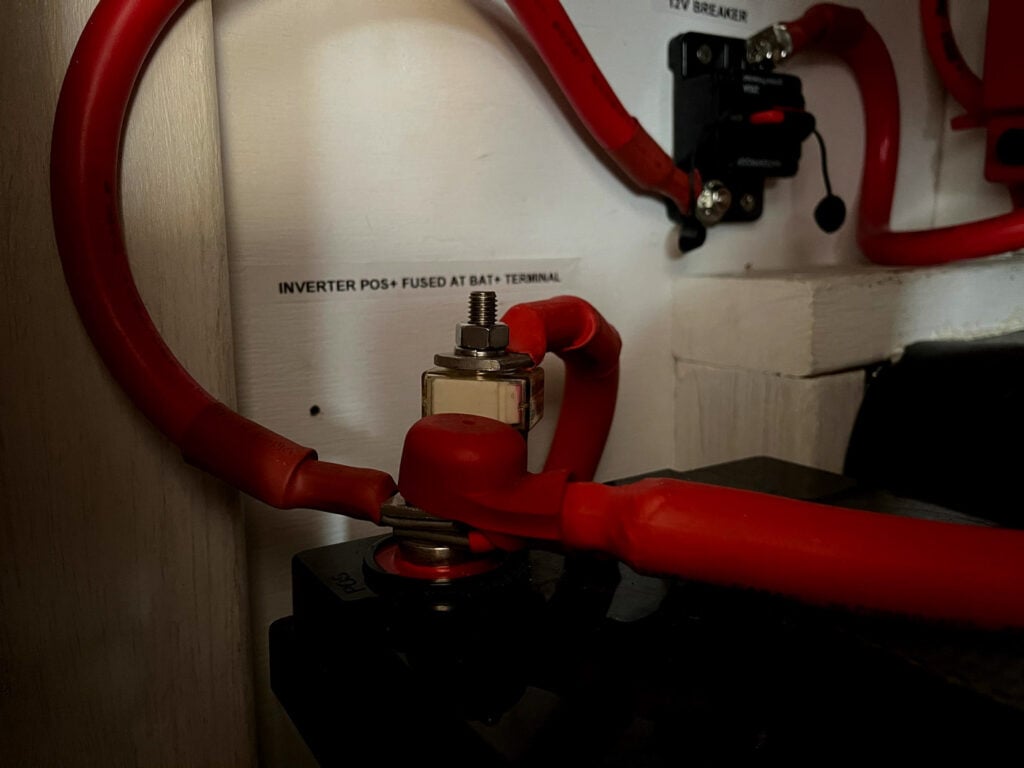
When wiring the inverter to the battery, we needed to use heavy-duty, 90MM² welding cable due to the distance across the bed. We also placed a 250A terminal fuse directly onto the positive terminal of the battery. While our inverter already has an internal circuit breaker, we wanted to be safe since we'd be running high current through the cables daily.


We ran our four GPOs on the same circuit and ensured that they were double pole switched to comply with Australian campervan regulations. However, since the sheeting had not yet been done, the electrician waited to hook up the load side of the inverter so there wouldn't be a chance of having live wires in the walls.
15. Sheeting the Walls & Installing Splash-back Tic Tac Tiling
With all systems nearly at a go, there was still some cosmetic work to be done on our Australian DIY van conversion. Luckily for us, sheeting the walls was quite easy since we had already prepared solid furring strips to attach to. We loved the look of the white tongue-and-groove lining boards so we decided to use this for the walls too.

Surprisingly, this part only took us a few hours but it made a huge difference to how “completed” the van felt.
Above the benchtop in the galley, we installed 9MM plywood so that we’d have a flat and even surface. This was because we wanted to use vinyl “sticker” tiles here to create a realistic tile splashback effect.
Again, this process was super easy and with some careful measuring and proper material preparation, looked great when finished. However, we did take care to follow the instructions by sanding down the ply and painting it with multiple coats of primer/sealer.
OUR VINYL TILES: Tic Tac Tiles
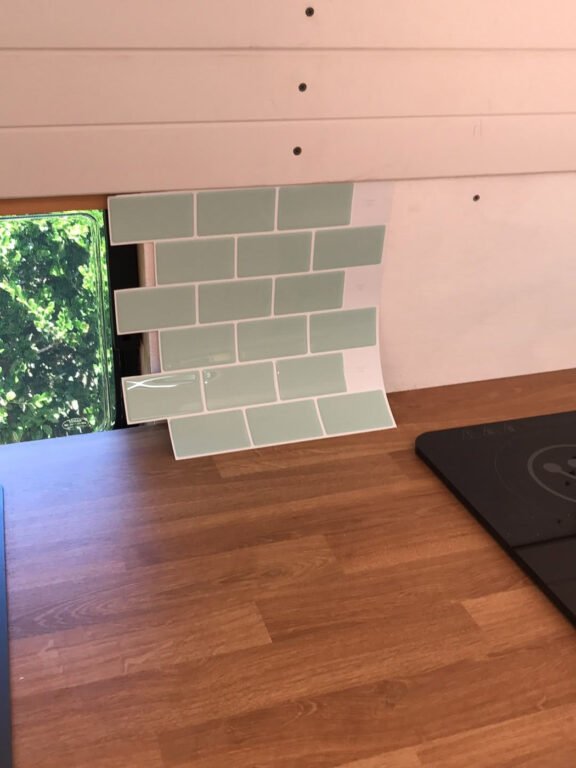

So far, the Tic Tac tiles have held up great!
Looking back, we waited to install the Tic Tac tiles until after the overhead cabinets. However, I've included the process in this stage because in hindsight, it would have made more sense.
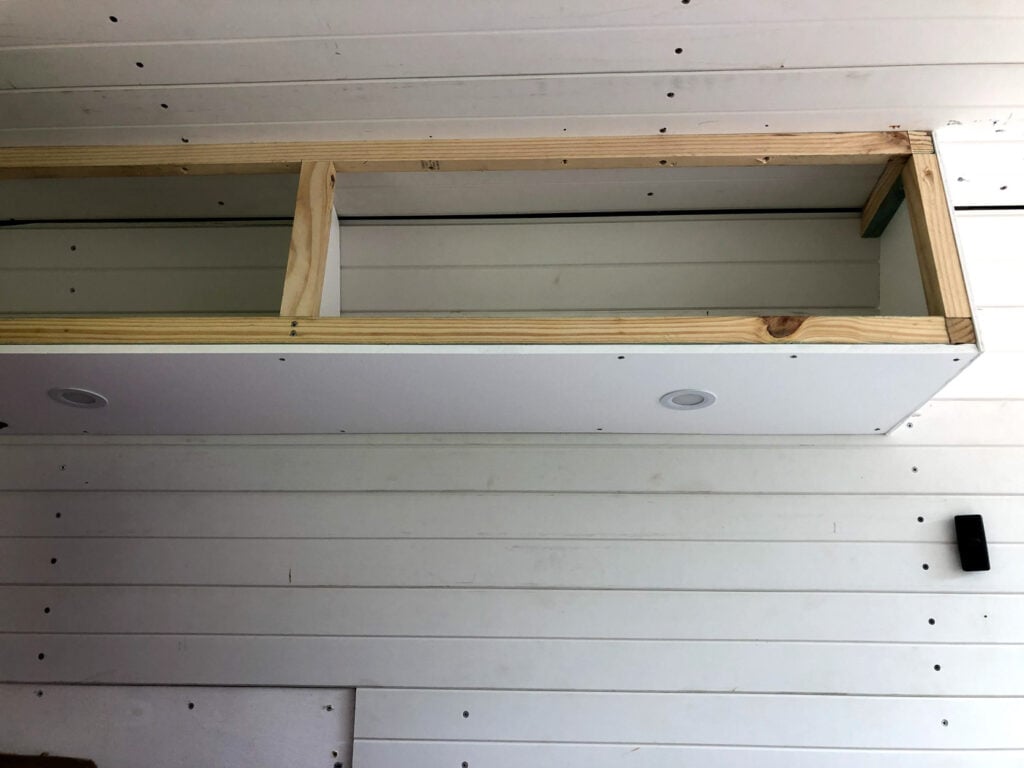
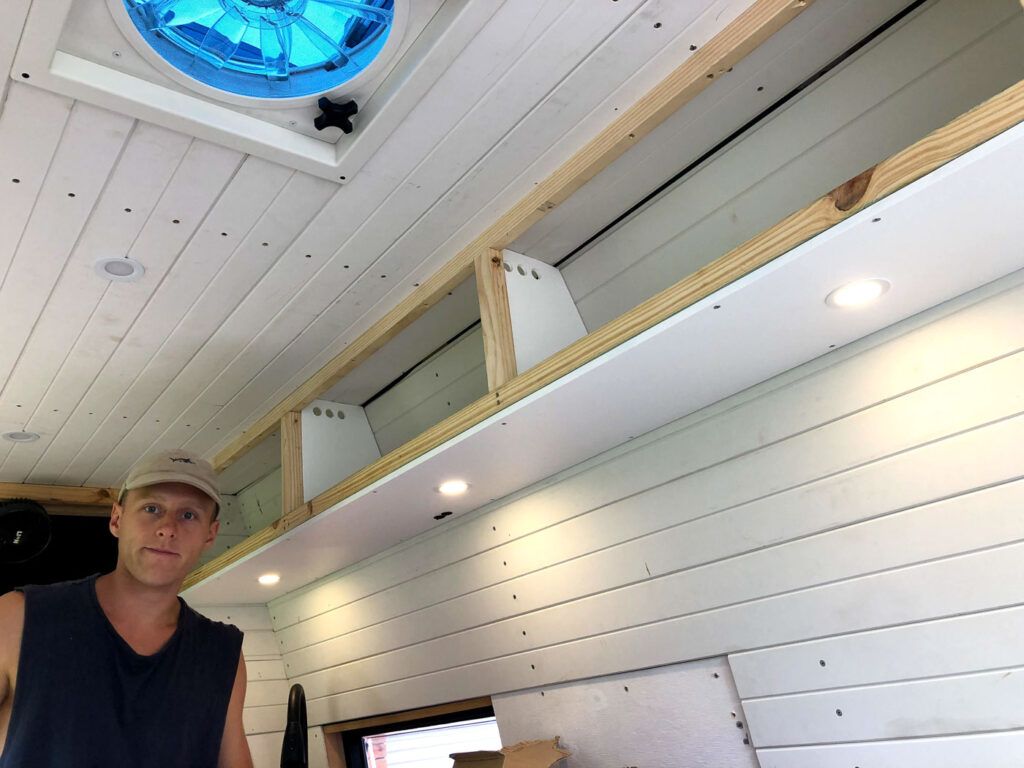
16. Overhead Cabinets & Bulkhead Cabinet
Anybody attempting a DIY van conversion knows just how annoying those angles and curves are for mounting overhead cabinets. While there are loads of guides and videos out there recommending great ways to scribe and build solid cabinets on the ground before mounting, we decided to just build the frames and cabinetry as we went.

This worked better for us and allowed us to get a really strong, clean and straight cabinet even with a really curved back wall. We sheeted the bottom with 12MM plywood to add additional strength and waited until later to finish the faces.
However, we did take this time to run the last wires to our LED downlights that would be mounted underneath the cabinets. We were very impressed with how it all turned out and we were stoked that one of the most daunting parts of the build was behind us!


Since we’d already taken the necessary steps to frame the cabinet above the bulkhead when we built the frame, this next part of the job was quite easy. We worked off the measurements of the galley overhead cabinets and sheeted around to make a large access hatch.
Furthermore, we used an off-cut from the benchtop to mount on the shelf we had made.

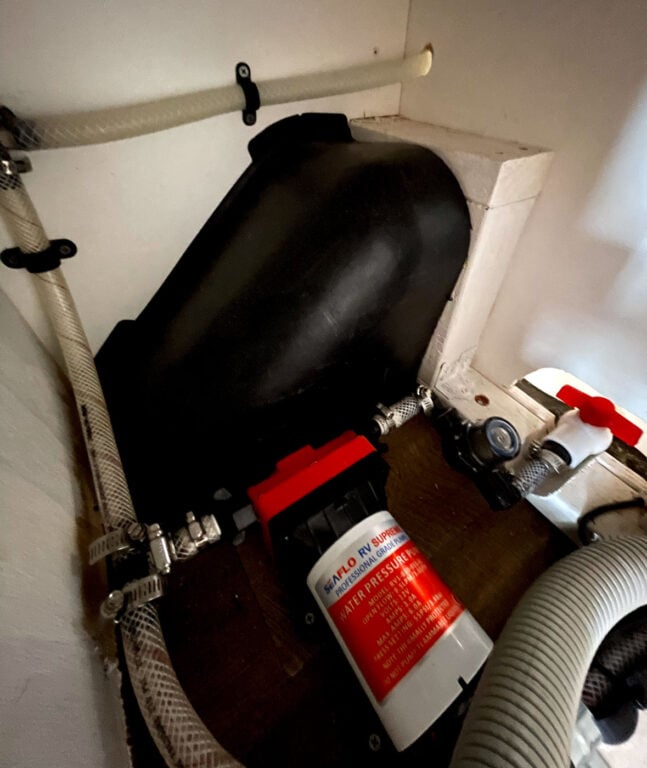
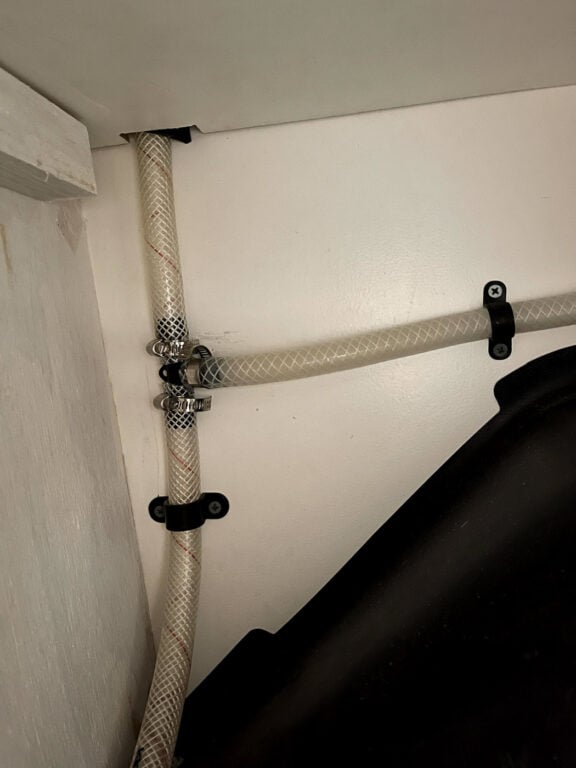
17. Plumbing and Water
Next up was one of my favourite parts of our DIY van build, Our plumbing system is simple yet fulfills our needs of having fresh running water in the sink and at our outdoor hot water shower.
We used pressure-resistant 13MM water-grade hose for all of our plumbing since it’s easy to work with and durable.

Running Water in a Van Conversion
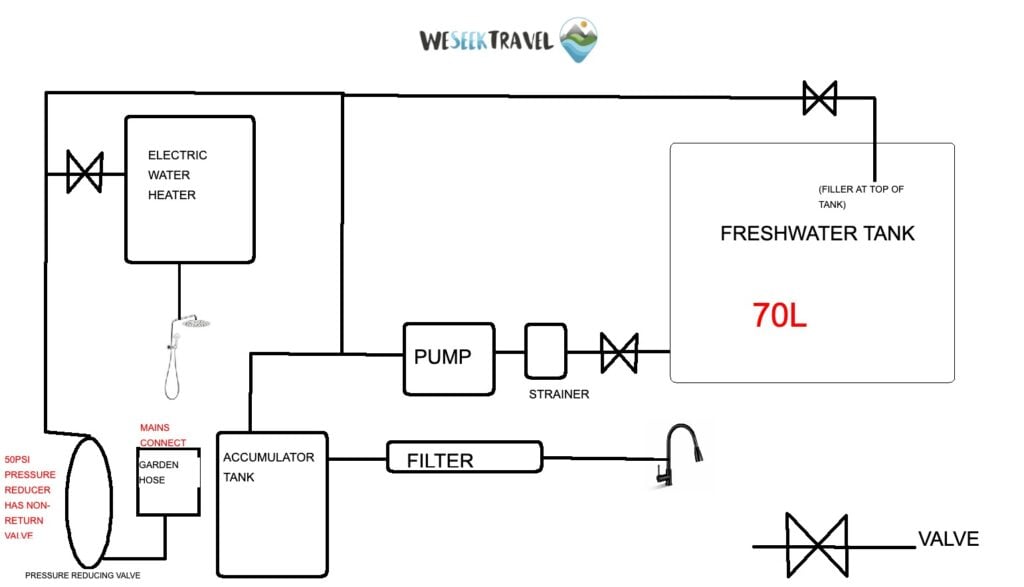

The first step was to install our 12V pump. This was positioned right next to the tank with a strainer in between. This was the suction side of the pump completed.
Our pump: SeaFlow 12V Water Pump
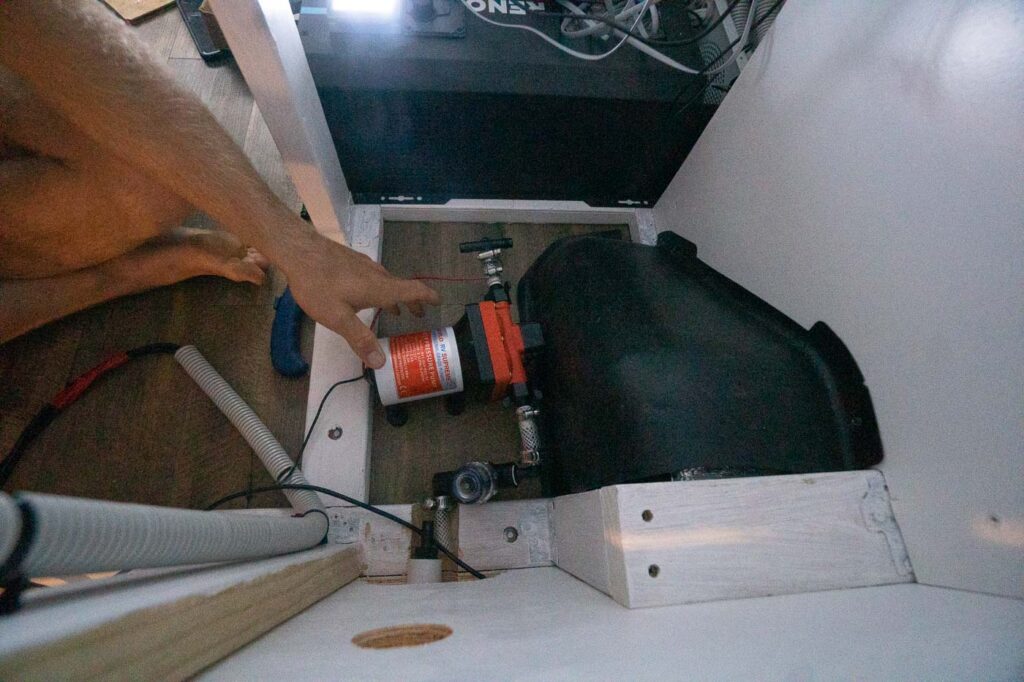

WATER RUN TO THE TAP
Next was the discharge side, which involved a little more thinking. Coming off the pump discharge is a T join with one length of hose running to our tap in the kitchen with an accumulator pump in between. We also included an in-line filter before the tap so that our water would always be filtered twice (first time when filling with another in-line filter).
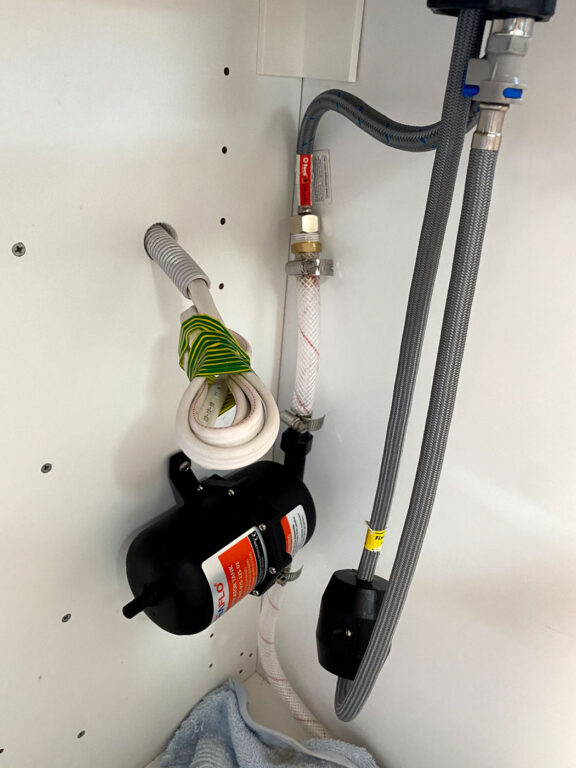

WATER RUN TO THE EXTERNAL HOT WATER SHOWER
The other side of the discharge "T" near the pump runs to our electric hot water shower which is mounted at the back of the garage. Now, off this shower discharge run is another "T" which goes directly back into the top of the water tank with a ball valve in between.
This might be confusing at first but it will hopefully make sense shortly.

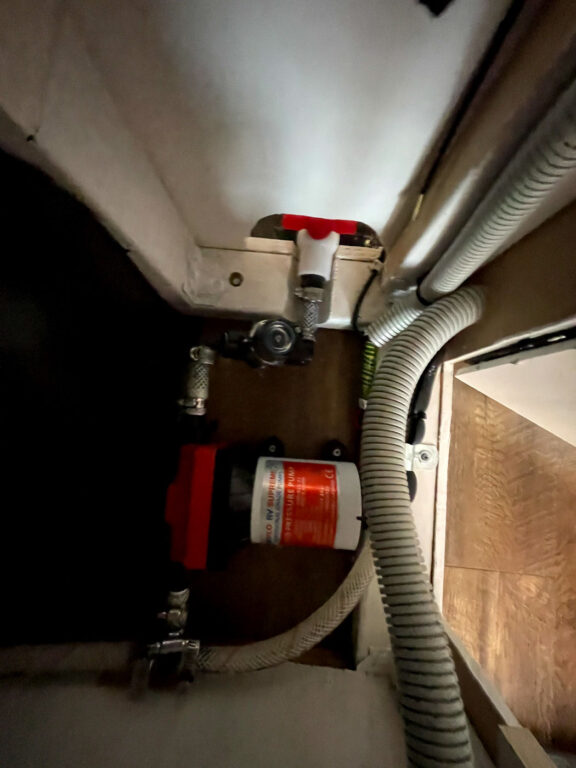

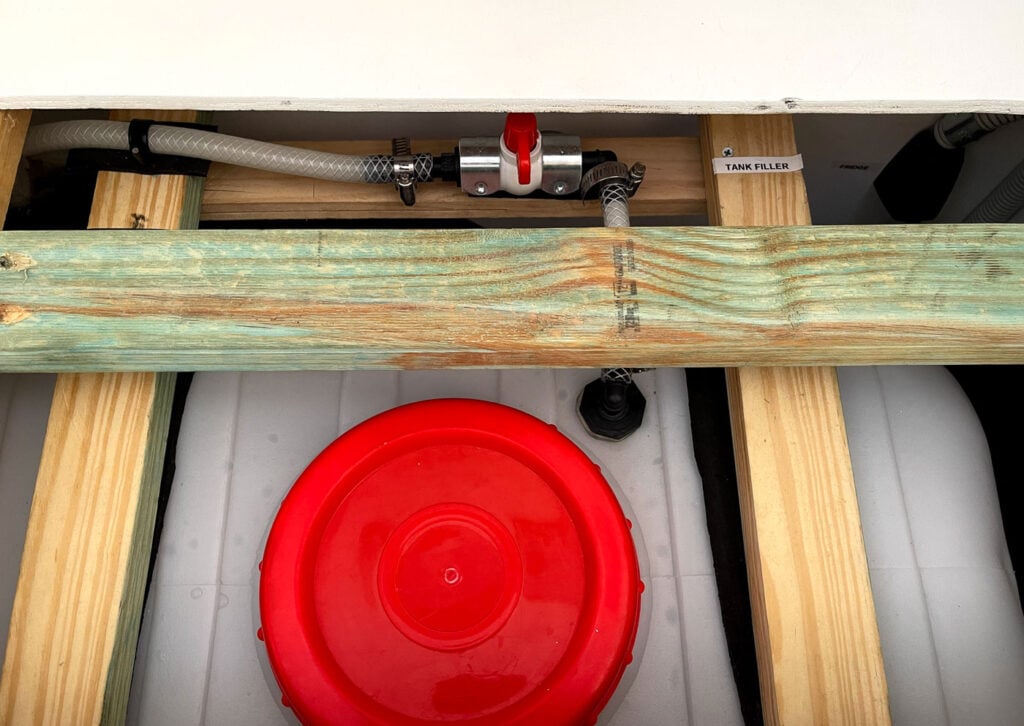
INSTALLING MAINS WATER CONNECTION VALVE AND TANK FILLER
At the back of the van, on the discharge side just before the shower is another "T" that runs to a pressure-reducing mains connection valve which is mounted underneath the van. This means, when I hook into mains pressure from any garden hose or fill up point, the discharge side of the pump is pressurised with mains water to 50PSI (same as 12V pump pressure) without having to use the pump or tank water.
As a result, when hooked up to any water source, we can simply rely on it for infinite water without using power or water.
The pressure reducing valve has a built-in non-return or "check" valve. As a result, water will not run through the valve when the pump is pressurising the system.


Back to the T on the discharge side leading back into the tank. As mentioned, this has a ball valve between it and the tank. When this valve is opened, the discharge side of the pump runs directly into the tank. This means that when we plug into mains water at any tap, pressurising our system with town water, we turn this valve to open and it begins to fill the tank too.
While it might seem complicated, I promise, it's really quite simple. Hopefully the schematic drawing makes it easier to understand for plumbing rookies like myself.
If you're attempting a DIY plumbing job in your camper conversion, I'd highly recommend installing an accumulator pump The Seaflow ones are really good and only cost about $40. It works by pressurising your system so the pump doesn't have to work so hard. In turn, this saves battery power, protects your pump from "hammer" and smoothens the water flow.
Want to hire a van instead? Read my guide to the best road trip vans and camper van rental options.
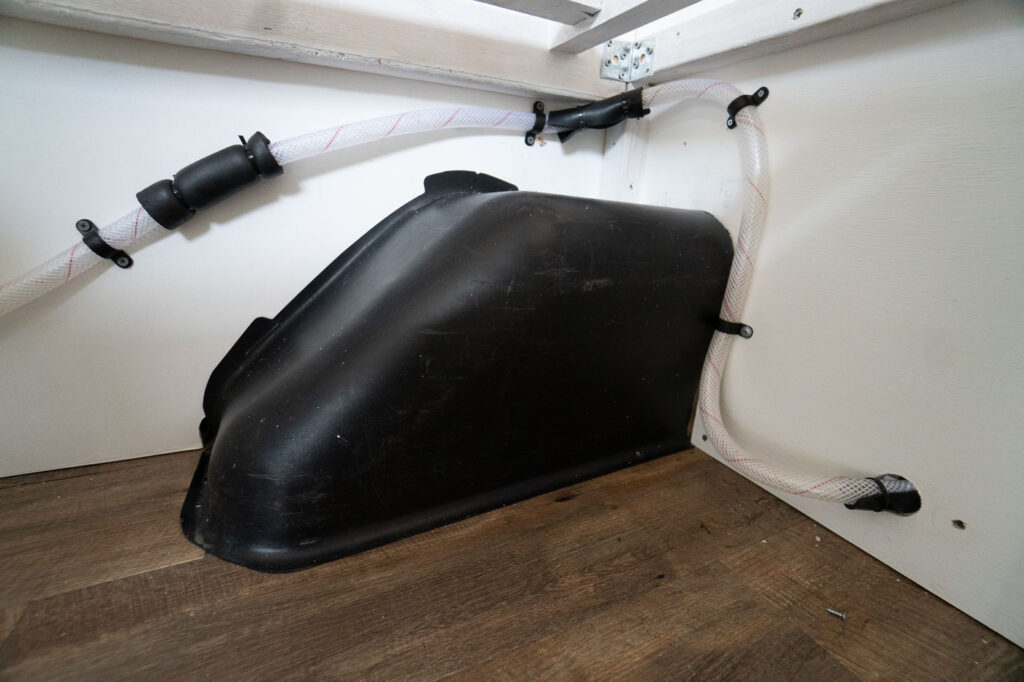
Mounting a Grey Water Tank Under The Van
Now that we had flowing water inside the van, we needed a way to dispose of it. It’s good practice and required in some National Parks to have a grey water tank installed in your van. This is basically a storage tank for all of your wastewater.
We found a perfect grey water tank that already had the wide, 50MM BSP fittings included at Campsmart. However, we had to make up our own heavy-duty mount to have it underslung the van.
BUILDING A MOUNT FOR THE GREY WATER TANK
The system we employed was quite simple yet very strong. We began by cutting a piece of form ply to serve as the base for the tank and to protect it from rocks as we drive. We then cut two lengths of 42MM x 21MM unistrut that was just a little longer than the width of the tank.
Next, we mounted some heavy-duty brackets straight into the chassis of the van with stainless steel bolts. Again, we were careful to paint any exposed steel edges. We also drilled 13MM holes in the bottom of the bracket to fit out 12MM threaded rod through.

Then, we bolted the threaded rod using nuts on both sides of the brackets so that we had four hanging rods the width of the tank, securely bolted to the chassis. Next, we inserted the unistrut through the threaded rod and hung it by fastening lock-nuts on the bottom.
After this, we slid the tank and plywood base over the unistrut and wrapped the tank with rubber to protect it wherever it touched the van.
The last step was simply to tighten the nuts on the threaded rod to wind the tank up and hug it tight to the underneath of the van, against the thick rubber. We also fixed some extra bolts through the unistrut into the plywood base to extra measure and painted everything, including the plywood, with metal paint.

Unfortunately, I don't have any photos of the mounting process because my SD card got corrupted before I could dump it. Instead, the photos you see are the finished product but it should still be possible to work out the process from it.
Plumbing in the Grey Water Tank
The last step on our DIY plumbing venture was to connect the sink basin into the grey water tank. We were able to find some fittings and a pre-made trap from bunnings that worked perfectly to attach to 32MM hose, which we plumbed directly into the grey water tank.

On the base of the grey water tank, we fitted a 25MM ball valve so that we could open and close waste release as we pleased (see image of greywater tank above).
FINISHING OFF THE HOT WATER SHOWER SYSTEM
Now that we had our electric hot water system plumbed up and mounted at the rear of the van, we were ready to finish our shower system.
Products used:
- 8L Electric water heater (1500W) - new one available now
- Water-saving shower head combo
- Extra-long shower curtain
- Suction cup hooks
- Screw valve
First, we purchased a water-saving shower head since we wanted to maintain shower pressure without wasting too much water. This is important since we would be showering off our main water tank supply most of the time.
The shower head we purchased fit straight onto the hot water output of the water heater. We didn’t want to mix with cold water as we knew that this would waste water and electricity. There is a temperature control directly on the water heater so this really wasn’t necessary.
Next, we plumbed in a 2-way screw valve on the end of the shower hose so that we could control water flow at the shower head.
The next step was to create our outdoor van shower curtain for privacy. We purchased an extra-long curtain and looped it through an old heavy-duty extendable tent pole. This tent pole is easy to put up and take down, and slots directly into the door locking mechanism.
We also sewed strips of fabric onto the shower curtain and tied them onto suction cup hooks. This allows us to secure the curtain to the side of the van doors so that it doesn’t flap in the wind.
All in all, this system is incredibly effective, cheap and uses very little power and water. Usually, we just run the hot water system to heat up the internal bladder (8L) and then shower straight off that. This means that we’re not excessively running the 1500W heater and we also don’t waste much water.


18. Drawers, Garage, Slide Out Table
All systems go! At this stage of our van build we were really feeling like things were coming together and there were only a few things left on the list to finish before hitting the road.
However, before we could, we had to fit our slide-out table. We used a laminated table top which we picked up at IKEA. Fortunately, this fit our build really nicely since we had planned to have a 750MM wide table. Although, we did have to cut it down to length to fit the space at about 1 metre.
This stage really showed how important the garage planning stage was. To fit the table sliders (heavy duty, 200KG fridge sliders), we needed the space between the garage cabinets to be just wider than the table. Fortunately for us, our planning paid off.
The sliders fitted in the space perfectly and after a few screws and a bit of glue for good measure, we had a full-sized slide out dining table in our DIY campervan.

The toilet slider was also quite simple. Again, we used heavy fridge sliders. To begin, we mounted them onto 35MM treated pine to get the added height then fixed the sliding components on a piece of 17MM form ply.
This would be the base of our toilet. We then built blocks around the chemical toilet onto the form ply so that it wouldn’t move when we drove.

Next, we pushed the sliders together and just like that, we had a slide out toilet that could be pulled out easily but only visible when needed.
19. Final Electrical Work & Installing 240V Outlets
Since the wall sheeting was now finished, we could connect our 240V GPOs and screw them into the walls. Again, this is illegal to do yourself in Australia so make sure you get an electician to do this.
We also connected our 12V components that already had wires spooled in position and were already hooked up to the fuse block.
Admittedly, we’d already gotten a bit ahead of ourselves and connected a few of the lights and switches out of excitement prior to this. However, at the end of this stage of the build, all electrics had been wired up and were in full working order.
20. Sanding, Painting and Trims
Our Australian DIY van build was now finished! However, we still had a few cosmetic jobs to complete before we set off. This involved cutting plywood drawer faces, installing drawer handles, cabinet hinges and gas struts.
It also meant a lot of sanding, puttying, priming and top-coating. We sealed all wet-areas using silicone, gap filled here and there and used trims to clean up any visible joins.
During this final stage, we also sheeted the back and side doors with pine tongue-and-groove boards which we stained.
They say that it’s the small details that count. We certainly think it made a difference in our van build. What do you think?
After the Van Build: Read About Our Adventures on the Road
So, that wraps up this comprehensive van build article of our Ford Transit campervan conversion! It's been a long one.
If you're interested in reading about our travels in it, head over to our Van Journal for weekly updates from the road in Tasmania.
I hope my "DIY Van Conversion" article has been useful for you. Whether our build and process have given you some tips, or whether it's helped inspire you to pursue your own van life conversion altogether, let me know in the comments below!

Thursday 8th of December 2022
Thank you for revealing. Reading your article about converting your van into an off grid van life home was enjoyable. I'm going to bookmarked this article.
Boban
Monday 31st of October 2022
Hi Olly, I’ve got a couple questions for you about your build that I couldn’t find. What sort of ladder do you have to get on the deck? Did you have any sort of latches on the kitchen draws to stop them opening? What was the reasoning in avoiding gas for the build? Cheers Bobby
Olly Gaspar
Wednesday 9th of November 2022
Hi Bobby,
I used a lightweight collapsable ladder stored in the back instead of fixing a ladder on the outside. This was to save cost and also to discourage people getting on top of my van.
I used elastic strap latches from Bunnings. It's a simple "bungy" loop onto a button and is fixed on the outside of the cabinet.
Gas in Motorhomes in Australia is heavily regulated. You'll have to pay extra when you sell the van, there are extra inspection processes when you register in some states. The installation is also tricky. You need to cut a huge hole in the side of the van in order to be compliant in most states. I'm also a big fan of DIY and didn't want to fork out a lot more for the gas plumbing installation (Need to be a licensed gas plumber to do this). When I weighed up the costs, it was more economical to put the money into a bigger electrical system and just go all-electric.
Hope that answers your questions. Good luck with the build!
Jo Morgan
Thursday 16th of June 2022
WOW this is the best conversion information and instructions I've ever read. Thank you for sharing all this information with all the details included. I am planning on converting a Ford Transit as well but it will be the medium length one as it will not be my full time home and I'll be travelling as a solo with my hyperactive whippet. May I copy your information so that I can take it to some tradesmen to get quotes for my van please? (I'm a female older person and will not be able to do all this work myself.) Thank you once again, Jo & Bryn the whippet
Olly Gaspar
Friday 17th of June 2022
Hi Jo and Bryn, glad you enjoyed it.
Of course you can!
Good luck with the conversion
Lisa
Tuesday 29th of March 2022
Hi Olly,
I can only second all the compliments, your design is fantastic, and pretty much exactly what I’m planning to do too. A few questions, could you check the shower head link please and also, your bed is set up across instead of lengthwise, right? What dimensions is the mattress and what kind did you choose to use? Thanks heaps and have the best time in the Americas!
Lisa
Olly Gaspar
Tuesday 29th of March 2022
Hi Lisa,
Thanks! Hope you find the guide useful for your build. I'll check the links today to make sure all the products are still available.
Yes, the bed was built across the van, I got extra space by building in the niches on the side, which go all the way to the van steel, bar a thin layer of insulation (with 25mm air cap). I believe the mattress length was around 188 cm or so at the longest, and maybe 182cm at the shortest (since there is a slight taper at the rear of the van).
I purchased a foam mattress from Clark rubber and just cut it to size myself with a sharp knife (very easy to do). I went for the thinner mattress but the premium quality and it was super comfortable. I also added an "eggshell" topper to it.
Hope that answers all your questions! Let me know if you have any questions for your build, happy to answer questions.
Rebecca
Thursday 30th of December 2021
Wow you are one very talented and motivated person, really enjoyed seeing this van conversion unfold at every step although a lot of the electrical and other parts were way over my head, I’m impressed at your skill and ingenuity. Hope you have found a better free-er life somewhere. It’s getting pretty stink down here in NZ too. Any place you would recommend to travel to that hasn’t sold their population out to covid/restrictions and profits?
Olly Gaspar
Thursday 30th of December 2021
Thanks for all the kind words! Yeah I hear things are pretty bad in NZ right now. Really feel for you guys! I'm sure things will start opening up like the rest of the world soon enough.
I'm currently in Texas so it doesn't really get freer than that haha. Planning to spend some more time in Central America over the nexts few months.
I just came back from Mexico which had no restrictions and life was pretty normal.